Introduction
Welcome to this comprehensive guide on Backend Engineering Fundamentals. This article consolidates all the learning materials from Hussein Nasser’s “Fundamentals of Backend Engineering” course into a single, cohesive reference document.
Over the course of this journey, I’ve taken detailed notes on 40+ lectures covering everything from low-level networking protocols to high-level system design patterns. Rather than having these insights scattered across dozens of individual posts, I wanted to create a unified resource that presents the material in a logical learning progression.
What You’ll Find Here:
This guide covers the complete spectrum of backend engineering, organized into eight major parts:
- Foundation - Communication patterns and core protocols
- Application Layer Protocols - The evolution of HTTP and modern web protocols
- Real-Time Communication - WebSockets, gRPC, WebRTC, and Server-Sent Events
- Backend Execution & Concurrency - Processes, threads, and execution patterns
- Connection Management - Socket programming and TCP connection handling
- Load Balancing & Proxying - Distributing traffic and managing connections
- Performance & Optimization - Techniques for building fast, efficient systems
- Backend Patterns & Best Practices - Authentication, idempotency, and design principles
How to Use This Guide:
This article is designed to be both a learning resource and a reference guide. If you’re new to backend engineering, I recommend reading it sequentially, as later sections build on concepts introduced earlier. If you’re looking for specific information, use the table of contents below to jump directly to the topic you need.
Throughout the article, you’ll find cross-references linking related concepts. These connections are important—backend engineering is deeply interconnected, and understanding how different pieces fit together is crucial for building robust systems.
Prerequisites:
This guide assumes basic programming knowledge and familiarity with web concepts. You don’t need to be an expert, but understanding what a client-server architecture is and having written some code will help you get the most out of this material.
Let’s dive in.
Table of Contents
Part I: Foundation - Communication Patterns & Protocols
Part II: Application Layer Protocols
Part III: Real-Time Communication
Part IV: Backend Execution & Concurrency
Part V: Connection Management & Socket Programming
Part VI: Load Balancing & Proxying
Part VII: Performance & Optimization
Part VIII: Backend Patterns & Best Practices
- Request Journey and System Design
- Authentication and Authorization
- Idempotency and Reliability
- Software Design Principles
- Server-Sent Events and Streaming Architectures
Conclusion
Final Thoughts and Key Takeaways
Part I: Foundation - Communication Patterns & Protocols
1. Backend Communication Fundamentals
Before diving into specific protocols and technologies, let’s establish the foundational patterns that govern how backend systems communicate. At its core, backend communication is about moving data between systems reliably and efficiently.
The Four Core Communication Patterns:
Every backend system uses one or more of these fundamental patterns:
-
Request-Response: The client sends a request, the server processes it, and returns a response. This is the most common pattern, used in HTTP, DNS, SSH, and database protocols.
-
Push-Pull: The server pushes updates to clients, or clients pull data as needed. This pattern is common in message queues and data synchronization systems.
-
Long Polling: The client repeatedly requests updates at intervals, keeping a connection open until new data is available.
-
Publish-Subscribe: Clients subscribe to topics and receive notifications when new data is published. This pattern decouples producers from consumers.
Understanding these patterns is crucial because they influence everything from API design to system architecture. Most modern systems combine multiple patterns—for example, a web application might use request-response for page loads, publish-subscribe for notifications, and long polling for real-time updates.
2. Protocol Properties and the OSI Model
Every communication protocol is designed to solve specific problems, and understanding their properties helps us choose the right tool for the job. A protocol is simply a set of rules that allows two parties to communicate effectively.
Why Protocols Matter:
Protocols aren’t arbitrary—they’re carefully designed with specific trade-offs. TCP, for instance, was created in the 1960s for low-bandwidth networks. Today’s data centers push TCP to its limits, leading to newer protocols like Homa (2022) that optimize for modern hardware. The key insight is that every protocol makes deliberate choices about reliability, performance, and complexity.
Key Protocol Properties:
When evaluating any protocol, consider these characteristics:
-
Data Format: Text-based (JSON, XML, HTTP) vs. binary (Protocol Buffers, gRPC, HTTP/2). Text is human-readable but less efficient; binary is optimized for machines.
-
Transfer Mode: Message-based (HTTP, UDP) with clear boundaries vs. stream-based (TCP) with continuous byte flows. Message-based protocols package data into discrete units, while streams require applications to parse boundaries.
-
Addressing: How the protocol identifies source and destination—DNS for domain names, IP for network routing, MAC addresses for local networks, and ports for application multiplexing.
-
Directionality: Unidirectional (one-way), bidirectional (two-way), full-duplex (simultaneous two-way), or half-duplex (taking turns).
-
State Management: Stateful protocols (TCP, gRPC) maintain session information, while stateless protocols (UDP, HTTP) treat each message independently.
-
Reliability: Protocols like TCP guarantee delivery with retransmissions and flow control, while UDP provides best-effort delivery with no guarantees.
The OSI Model:
The Open Systems Interconnection (OSI) model divides networking into seven layers, providing a framework for understanding how data moves through a network. While the strict boundaries can blur in practice, the model remains invaluable for troubleshooting and system design.
The seven layers are:
- Physical Layer: Transmission media (electrical signals, light, radio waves)
- Data Link Layer: Frames with MAC addresses; switches operate here
- Network Layer: IP packets and routing; routers work at this layer
- Transport Layer: TCP and UDP; provides end-to-end communication
- Session Layer: Connection establishment and state management
- Presentation Layer: Data serialization and encoding
- Application Layer: End-user protocols (HTTP, FTP, gRPC)

Copyrights © FS
The beauty of this layered approach is abstraction—applications don’t need separate versions for WiFi, Ethernet, or LTE because lower layers handle the conversion. Each layer can be updated independently, making networks more maintainable and extensible.
2.1. Network Layer: IP, TCP, and UDP
At the heart of internet communication are three fundamental protocols: IP (Internet Protocol), TCP (Transmission Control Protocol), and UDP (User Datagram Protocol). Understanding these protocols is essential for any backend engineer.
TCP: The Reliable Workhorse
TCP is the backbone of reliable networking. When I first learned about TCP, I was amazed at how it ensures data arrives perfectly every time—no lost packets, no jumbled order. It’s like the internet’s most reliable delivery service.
TCP is a layer 4 protocol that sits on top of IP. While IP handles routing packets between devices, TCP ensures reliable, ordered delivery. It’s connection-oriented, meaning it establishes a dedicated connection before transmitting data.
Key TCP Characteristics:
-
Reliability: TCP guarantees delivery through acknowledgments and retransmissions. If a segment is lost or corrupted, TCP automatically resends it.
-
Order Guarantee: Packets can take different routes and arrive out of order. TCP uses sequence numbers to reassemble them correctly.
-
Flow Control: TCP prevents overwhelming the receiver using a sliding window mechanism, limiting how much data can be sent before receiving acknowledgments.
-
Congestion Control: TCP adjusts its sending rate based on network conditions, using techniques like Explicit Congestion Notification (ECN) to avoid network congestion.
-
Statefulness: TCP maintains connection state, storing sequence numbers and window sizes in a session identified by a four-tuple (source IP, source port, destination IP, destination port).
-
Connection Management: TCP uses a three-way handshake (SYN, SYN-ACK, ACK) to establish connections and a four-way handshake (FIN, ACK, FIN, ACK) to close them gracefully.
How TCP Connections Work:
The three-way handshake is fundamental to TCP. When a client wants to connect:
- Client sends SYN (synchronize) to the server
- Server responds with SYN-ACK (synchronize-acknowledge)
- Client sends ACK (acknowledge)

This handshake ensures both sides agree on initial sequence numbers and are ready to communicate. Behind the scenes, the OS kernel manages two queues:
- SYN queue: Holds connections that have sent SYN but haven’t completed the handshake
- Accept queue: Holds fully-established connections waiting for the application to accept them
When your application calls listen() on a socket, the kernel handles the entire handshake process. Your code only calls accept() to retrieve a fully-established connection from the accept queue. This separation between kernel space (where TCP lives) and user space (where your application runs) is crucial for performance.
TCP Trade-offs:
While TCP is powerful, it has costs:
-
Latency: The three-way handshake and acknowledgment process introduce delays, problematic for time-sensitive applications like gaming or video streaming.
-
Overhead: TCP headers (20-60 bytes) and control mechanisms add extra data to each packet, inefficient for small transfers.
-
Resource Intensive: Maintaining connection state requires memory and CPU. Even advanced systems like WhatsApp are limited to about 3 million connections per server.
-
Complexity: Features like flow and congestion control make TCP more complex to implement and troubleshoot than simpler protocols.
UDP: Simple and Fast
UDP (User Datagram Protocol) takes the opposite approach from TCP. It’s a simple, message-oriented protocol that prioritizes speed over reliability. UDP is connectionless—no handshake, no state, no guarantees.
Key UDP Characteristics:
-
Message-Based: Each UDP datagram is independent with fixed boundaries. Unlike TCP’s byte stream, UDP preserves message boundaries.
-
Stateless: No connection establishment or state tracking. Each message is fire-and-forget.
-
Minimal Header: Only 8 bytes compared to TCP’s 20-60 bytes, reducing overhead.
-
Multiplexing: Like TCP, UDP uses ports to distinguish between applications on the same host.
-
No Reliability: UDP doesn’t guarantee delivery, order, or error-free transmission. Lost packets stay lost.
-
No Flow or Congestion Control: The sender doesn’t adjust rates based on network conditions—applications must handle this if needed.
When to Use UDP:
UDP shines in scenarios where speed matters more than perfect delivery:
- Video Streaming & Gaming: Occasional packet loss is acceptable; speed is critical
- DNS Queries: Small, fast lookups where retrying is cheaper than TCP overhead
- VPNs: Many VPN implementations use UDP to avoid connection-oriented overhead
- WebRTC: Browser-based peer-to-peer communication uses UDP with application-layer reliability
UDP Trade-offs:
UDP’s simplicity is both its strength and weakness:
- Pros: Low latency, minimal overhead, scales well (no state to maintain), simple to implement
- Cons: No reliability guarantees, vulnerable to packet loss, no congestion control (can flood networks), susceptible to spoofing attacks
Practical Example: TCP vs UDP Servers
Here’s how different these protocols look in practice. A simple TCP server in Node.js:
const net = require("net");

const server = net.createServer((socket) => {
  console.log(`TCP connection from ${socket.remoteAddress}:${socket.remotePort}`);
  socket.write("Hello from TCP server");

  socket.on("data", (data) => {
    console.log("Received:", data.toString());
  });
});

server.listen(8800, "127.0.0.1");
And a UDP server:
const dgram = require("dgram");

const server = dgram.createSocket("udp4");

server.on("message", (msg, rinfo) => {
  console.log(`UDP message from ${rinfo.address}:${rinfo.port}`);
  console.log("Message:", msg.toString());
});

server.bind(8801, "127.0.0.1");
The TCP version establishes a connection and maintains state, while the UDP version simply receives messages without any connection concept. Node.js’s event-driven model handles multiple connections automatically, but the underlying protocol differences remain.
The choice depends on your requirements:
- Use TCP when: You need guaranteed delivery, ordered data, or can’t tolerate loss (web browsing, file transfers, databases, email)
- Use UDP when: Speed is critical, occasional loss is acceptable, or you’re implementing custom reliability (streaming, gaming, DNS, VoIP)
Many modern protocols like QUIC (used in HTTP/3) actually build reliability on top of UDP, getting the best of both worlds—UDP’s speed with application-layer reliability mechanisms. We’ll explore this more when we discuss HTTP/3 and QUIC.
Understanding TCP and UDP is fundamental because almost every network application uses one or the other. They represent different philosophies: TCP’s “make sure everything arrives perfectly” versus UDP’s “send it fast and move on.” Both have their place in the backend engineer’s toolkit.
Part II: Application Layer Protocols
3. HTTP Evolution: From 1.1 to 3.0
Now that we understand the transport layer with TCP and UDP, let’s move up the stack to the application layer, where HTTP lives. HTTP (Hypertext Transfer Protocol) is the foundation of the web, and its evolution tells a fascinating story about how we’ve optimized web performance over the past three decades.
The journey from HTTP/1.1 to HTTP/3 represents a continuous effort to make the web faster, more efficient, and more reliable. Each version addresses specific limitations of its predecessor while introducing new capabilities. Understanding this evolution is crucial for backend engineers because the protocol you choose can dramatically impact your application’s performance.
3.1. HTTP/1.1: The Foundation
HTTP/1.1 has been the workhorse of the web since 1997. Despite being over 25 years old, it’s still widely used today, powering countless websites and APIs. Its longevity speaks to both its simplicity and effectiveness.
What Makes HTTP/1.1 Tick:
HTTP/1.1 is a text-based, client-server protocol built on top of TCP. The client (usually a browser) sends a request, and the server responds with the requested resource. It’s stateless—each request is independent, with no memory of previous interactions.
The basic structure is straightforward. A request includes:
- Method: GET, POST, PUT, DELETE, HEAD, etc.
- Path: The resource location (e.g.,
/about) - Headers: Metadata as key-value pairs
- Body: Optional data (empty for GET, populated for POST)
A response includes:
- Status Code: 200 OK, 404 Not Found, 500 Internal Server Error, etc.
- Headers: Response metadata
- Body: The actual content (HTML, JSON, images, etc.)
Here’s what a simple HTTP/1.1 request looks like:
GET /about HTTP/1.1
Host: example.com
User-Agent: curl
Accept: */*
And the response:
HTTP/1.1 200 OK
Content-Type: text/html
Content-Length: 1234

<html>...</html>
And the visualization:

Copyrights © oreilly
Key Features:
-
Persistent Connections: Unlike HTTP/1.0, which closed connections after each request, HTTP/1.1 introduced the “Keep-Alive” header to reuse TCP connections for multiple requests. This was a huge improvement—establishing TCP connections is expensive (three-way handshake, slow start), so reusing them reduces latency significantly.
-
Mandatory Host Header: This simple addition enabled multi-homed hosting, where multiple domains can share a single IP address. The server uses the Host header to determine which site to serve. This was revolutionary for hosting providers and remains essential today.
-
Pipelining: HTTP/1.1 allows sending multiple requests without waiting for responses. However, this feature is disabled by default in most browsers due to head-of-line blocking—if one response is slow, all subsequent responses are delayed. Only Opera fully supported it, and even then, issues with proxies and servers made it unreliable.
The Limitations:
While HTTP/1.1 served the web well, it has significant drawbacks:
-
No Multiplexing: Each request ties up a connection until the response arrives. Browsers work around this by opening multiple connections (typically 6 per domain), but this is inefficient and resource-intensive.
-
No Compression: Headers are sent as plain text with every request, creating overhead, especially for requests with many headers or cookies.
-
No Streaming: HTTP/1.1 requires the entire response to be ready before sending, with
Content-Lengthspecifying the size upfront. This prevents true streaming or server-sent events. -
Security Vulnerabilities: HTTP smuggling attacks exploit inconsistencies in how servers handle
Content-LengthandTransfer-Encodingheaders. An attacker can craft requests that are interpreted differently by front-end and back-end servers, potentially bypassing security controls.
When to Use HTTP/1.1:
Despite its age, HTTP/1.1 remains relevant for:
- Simple applications with few concurrent requests
- Legacy systems that don’t support newer protocols
- Debugging and development (its text-based format is human-readable)
- APIs where simplicity matters more than performance
3.2. HTTP/2: Multiplexing and Performance
HTTP/2, standardized in 2015, was designed to address HTTP/1.1’s performance bottlenecks while maintaining backward compatibility. The key insight was that the web had changed—modern websites load dozens or hundreds of resources (images, scripts, stylesheets), and HTTP/1.1’s one-request-per-connection model couldn’t keep up.
The Game-Changer: Multiplexing
HTTP/2’s headline feature is multiplexing—the ability to send multiple requests and responses simultaneously over a single TCP connection. Instead of opening 6 connections and queuing requests, HTTP/2 uses one connection with multiple independent streams.
Each stream has a unique ID (odd numbers for client requests, even for server responses), allowing the server to process requests concurrently and send responses as they’re ready, regardless of order. This eliminates the connection limit bottleneck and dramatically improves performance for resource-heavy pages.
Key Features:
-
Binary Protocol: Unlike HTTP/1.1’s text format, HTTP/2 uses binary framing. This is more efficient for machines to parse but less human-readable. Each frame includes metadata like stream ID, frame type, and flags.
-
Header Compression: HTTP/2 uses HPACK compression to reduce header overhead. Since many headers repeat across requests (like cookies and user agents), compression can save significant bandwidth.
-
Stream Prioritization: Clients can assign priorities to streams, helping servers decide which resources to send first. For example, CSS might be prioritized over images to render the page faster.
-
Server Push (Deprecated): HTTP/2 initially allowed servers to proactively push resources to clients. However, this was abandoned because servers often pushed resources the client already had cached, wasting bandwidth. It’s been replaced by “early hints” (HTTP 103 status code) that suggest resources without sending them.
Performance Comparison:
The lecture included a practical test loading 100 images on a webpage, comparing HTTP/1.1 and HTTP/2 on a simulated 3G connection:
- HTTP/1.1: Limited to 6 concurrent connections, images loaded in batches with noticeable delays between batches.
- HTTP/2: All images loaded concurrently over a single connection, completing “way faster” with no artificial connection limits.

Copyrights © wallarm
This test highlights HTTP/2’s strength for modern web applications with many resources.
The Trade-offs:
HTTP/2 isn’t perfect:
-
TCP Head-of-Line Blocking: While HTTP/2 eliminates application-level head-of-line blocking, it still suffers from TCP’s version. If a single packet is lost, TCP’s in-order delivery requirement stalls all streams until the packet is retransmitted. This is especially problematic on lossy networks like mobile connections.
-
Increased Server Complexity: Managing multiple streams, flow control, and prioritization requires more CPU and memory than HTTP/1.1’s simpler model.
-
Not Always Necessary: For applications with few requests or fast responses, HTTP/1.1’s simplicity may be sufficient. HTTP/2’s benefits shine with high request volumes.
When to Use HTTP/2:
HTTP/2 is ideal for:
- Modern web applications with many resources
- High-traffic websites where performance matters
- APIs with frequent, concurrent requests
- Any scenario where reducing latency is critical
Most major websites and CDNs now support HTTP/2, and it’s often enabled by default in modern web servers.
3.3. HTTPS and TLS: Securing the Web
Before diving into HTTP/3, we need to understand HTTPS and TLS (Transport Layer Security), which secure HTTP traffic. While not a version of HTTP per se, HTTPS is fundamental to modern web communication—so much so that browsers now warn users about non-HTTPS sites.
What is HTTPS?
HTTPS is simply HTTP running over TLS. TLS provides three critical security features:
- Encryption: Scrambles data so only the intended recipient can read it
- Authentication: Verifies the server’s identity to prevent impersonation
- Integrity: Ensures data hasn’t been tampered with during transmission
How TLS Works:
TLS uses a clever combination of symmetric and asymmetric encryption:
-
Asymmetric Encryption: Uses a public key (anyone can encrypt) and a private key (only the owner can decrypt). This is used during the TLS handshake to securely exchange keys and authenticate the server. Algorithms like RSA and Elliptic Curve Cryptography (ECC) are common, but they’re computationally expensive.
-
Symmetric Encryption: Uses the same key for encryption and decryption. It’s much faster than asymmetric encryption, making it ideal for encrypting large amounts of data. Algorithms like AES and ChaCha20 are widely used.
The TLS handshake combines both: asymmetric encryption securely establishes a shared symmetric key, which is then used for the actual data transfer. This gives you the security of asymmetric encryption with the performance of symmetric encryption.
The TLS Handshake:
When you connect to an HTTPS website, here’s what happens:
- Client Hello: Your browser proposes encryption algorithms and sends a random number
- Server Hello: The server responds with its certificate (containing its public key), chooses encryption algorithms, and sends its own random number
- Key Exchange: Using algorithms like Diffie-Hellman or RSA, both parties derive a shared symmetric key without ever sending it across the network
- Finished: Both sides verify the handshake succeeded and begin encrypted communication

Copyrights © oracle docs
In TLS 1.2, this takes two round trips. TLS 1.3 optimizes it to one round trip, and for repeat connections, 0-RTT (zero round-trip time) allows sending encrypted data immediately using a pre-shared key.
Certificates and Trust:
Certificates are digital passports for websites. They contain:
- The server’s public key
- Identity information (domain name, organization)
- A digital signature from a Certificate Authority (CA)
Your browser trusts certificates signed by CAs in its certificate store (like Let’s Encrypt, DigiCert, or Cloudflare). This creates a chain of trust: you trust the CA, the CA vouches for the website, so you trust the website.
Key Exchange Algorithms:
-
RSA: The client encrypts the symmetric key with the server’s public key. Simple but lacks forward secrecy—if the private key is compromised later, past sessions can be decrypted.
-
Diffie-Hellman (DH): Both parties generate private numbers and use modular arithmetic to derive the same symmetric key without ever sending it. This provides forward secrecy because each session uses a unique key. Even if the server’s private key is compromised, past sessions remain secure.
TLS 1.3 mandates Diffie-Hellman, eliminating RSA’s forward secrecy problem.
Real-World Security:
The Heartbleed bug (2014) was a devastating vulnerability in OpenSSL that allowed attackers to read server memory, potentially exposing private keys. This highlighted the importance of forward secrecy—with RSA, attackers could decrypt all past recorded sessions. With Diffie-Hellman, past sessions remained secure.
Modern best practices include:
- Using TLS 1.3 (or at minimum TLS 1.2)
- Preferring Diffie-Hellman for forward secrecy
- Using short-lived certificates (weeks to months, not years)
- Enabling HTTP Strict Transport Security (HSTS) to force HTTPS
Performance Considerations:
TLS adds overhead:
- The handshake introduces latency (though TLS 1.3’s 1-RTT and 0-RTT help)
- Encryption/decryption requires CPU (though modern hardware has dedicated instructions)
- Certificates can be large, requiring multiple TCP segments
However, the security benefits far outweigh these costs, and optimizations like session resumption and 0-RTT minimize the impact.
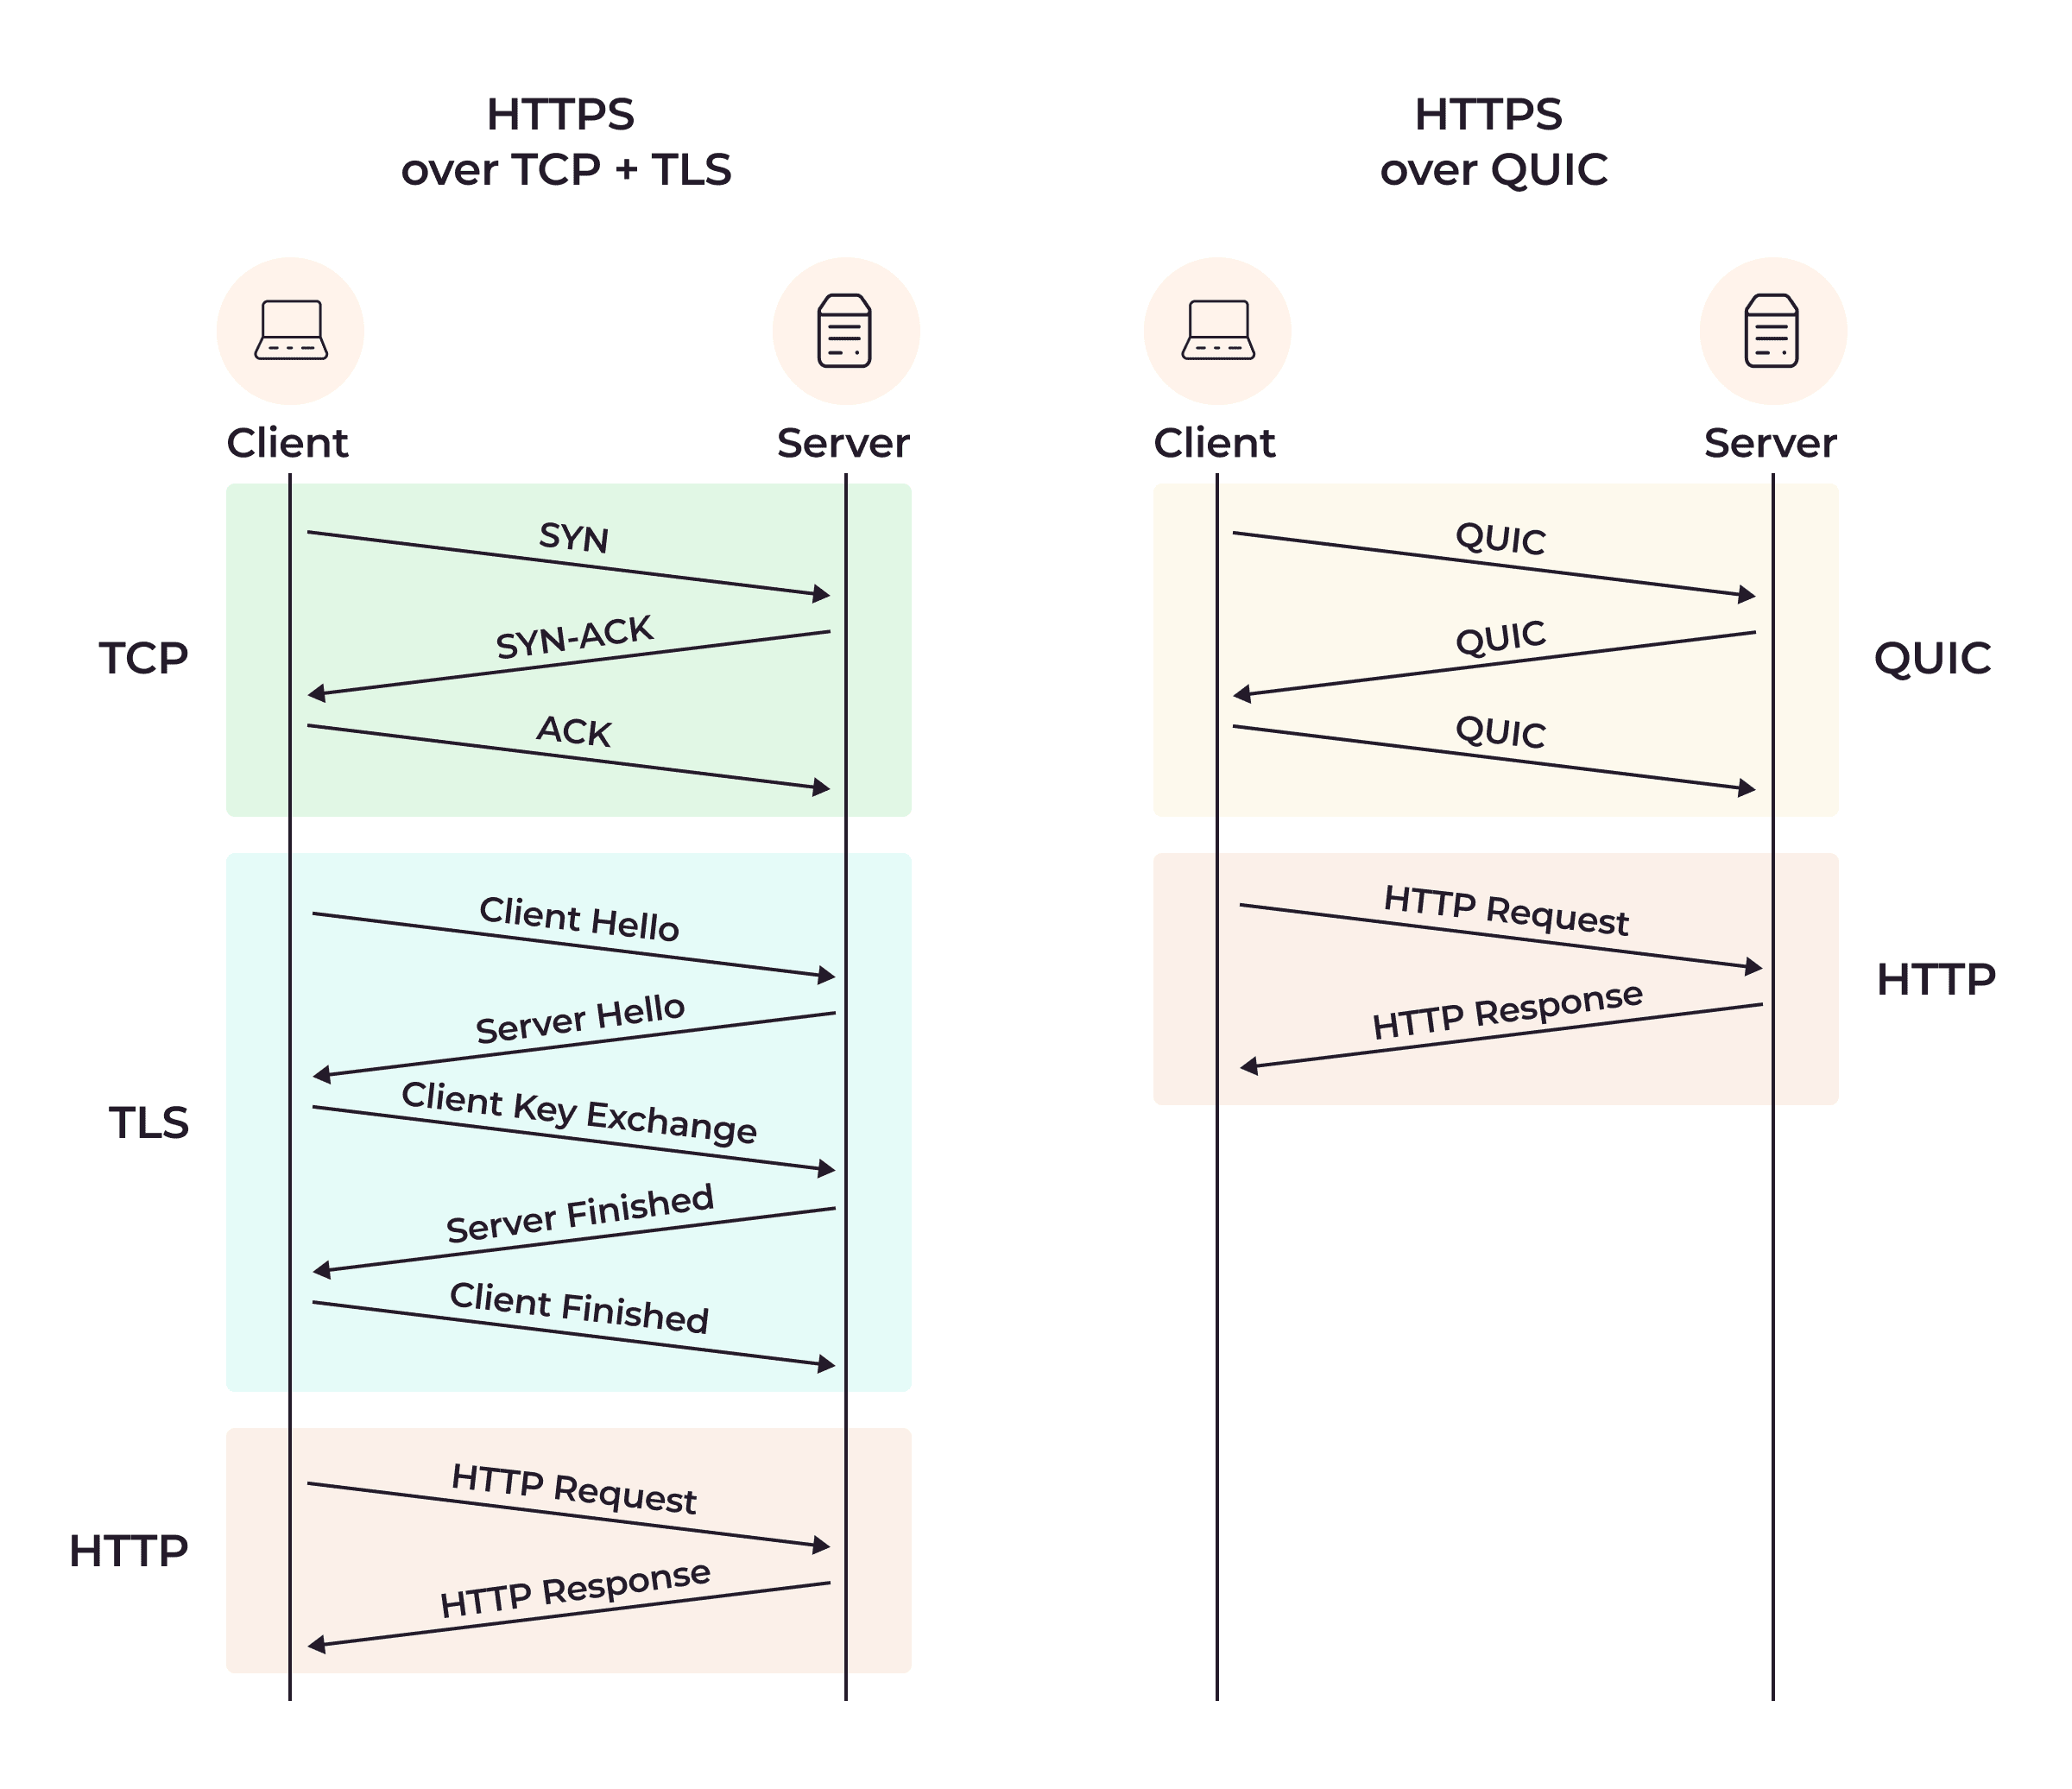
3.4. HTTP/3 and QUIC (/kwɪk/): The UDP Revolution
HTTP/3 represents a radical departure from its predecessors: it abandons TCP entirely in favor of QUIC (Quick UDP Internet Connections), a new protocol built on UDP. This might seem counterintuitive—didn’t we just learn that TCP is reliable and UDP is unreliable? The key insight is that QUIC implements reliability at the application layer, giving it flexibility TCP lacks.
The Problem HTTP/3 Solves:
HTTP/2’s Achilles’ heel is TCP head-of-line blocking. Even though HTTP/2 multiplexes streams at the application layer, TCP’s requirement for in-order delivery means a single lost packet stalls all streams. On lossy networks (like mobile connections), this can negate HTTP/2’s performance gains.
HTTP/3 solves this by using QUIC, which manages streams independently. A lost packet only affects its own stream, not others. This is a game-changer for performance on unreliable networks.
What is QUIC?
QUIC is a transport protocol that combines features of TCP, TLS, and HTTP/2 into a single layer. It runs over UDP but implements its own reliability, congestion control, and encryption. Think of it as “TCP done right for the modern internet.”

Copyrights © gcore
Key Features of HTTP/3:
-
Independent Stream Management: Each QUIC stream is independent. Lost packets only delay their own stream, eliminating head-of-line blocking entirely.
-
Faster Connection Setup: QUIC combines the transport handshake and TLS handshake into one step, reducing latency. For repeat connections, 0-RTT allows sending data immediately.
-
Connection Migration: QUIC uses connection IDs instead of the traditional four-tuple (source IP, source port, destination IP, destination port). This means connections survive network changes—like switching from Wi-Fi to cellular—without interruption. This is huge for mobile users.
-
Built-in Encryption: QUIC mandates TLS 1.3, making encryption a core feature rather than an add-on. This improves security and simplifies implementation.
-
Improved Congestion Control: QUIC’s congestion control is more sophisticated than TCP’s, adapting better to modern networks.
Copyrights © gcore
The Trade-offs:
HTTP/3 isn’t without challenges:
-
UDP Blocking: Some networks and firewalls block UDP traffic, preventing HTTP/3 from working. Implementations typically fall back to HTTP/2 or HTTP/1.1 in these cases.
-
Higher CPU Usage: QUIC handles tasks like stream management and encryption in user space rather than kernel space, requiring more CPU than TCP.
-
Complex Header Compression: HTTP/3 uses QPACK instead of HPACK, which is more complex to handle out-of-order delivery.
-
Security Concerns: Connection IDs are sent in plaintext, potentially allowing connection hijacking attacks. This is an active area of research.
-
Maturity: HTTP/3 is newer and less battle-tested than HTTP/2. Not all servers, clients, and intermediaries support it yet.
Performance in Practice:
HTTP/3 shines on lossy networks. On a perfect network with no packet loss, HTTP/2 and HTTP/3 perform similarly. But on mobile networks or congested connections where packet loss is common, HTTP/3’s independent stream management provides significant improvements.
Adoption:
Major players like Google, Facebook, and Cloudflare have adopted HTTP/3. Modern browsers (Chrome, Firefox, Edge, Safari) support it, and web servers like Nginx and Apache are adding support. The protocol is still evolving, but it’s clear that HTTP/3 represents the future of web communication.
When to Use HTTP/3:
HTTP/3 is ideal for:
- Mobile applications where network conditions vary
- Real-time applications sensitive to latency
- Global applications serving users on diverse networks
- Any scenario where connection migration is valuable
The Evolution Continues:
The progression from HTTP/1.1 to HTTP/3 shows how protocols evolve to meet changing needs:
- HTTP/1.1: Simple, reliable, but limited by one-request-per-connection
- HTTP/2: Multiplexing over TCP, but TCP head-of-line blocking remains
- HTTP/3: Multiplexing over QUIC/UDP, eliminating head-of-line blocking entirely
Each version builds on lessons learned from its predecessor. HTTP/1.1’s simplicity made it ubiquitous. HTTP/2’s multiplexing addressed the connection bottleneck. HTTP/3’s move to QUIC solves the last major performance issue.
As backend engineers, understanding these trade-offs helps us choose the right protocol for our applications. For simple APIs, HTTP/1.1 might suffice. For high-traffic websites, HTTP/2 is a solid choice. For mobile-first applications or real-time systems, HTTP/3’s benefits may be worth the added complexity.
The web continues to evolve, and HTTP/3 won’t be the final chapter. But for now, it represents the cutting edge of web protocol design, balancing performance, security, and reliability in ways previous versions couldn’t.
3.5. TLS/SSL: The Foundation of Secure Communication
While we’ve discussed HTTPS and TLS in the context of HTTP/3, it’s worth diving deeper into how TLS actually works under the hood. TLS (Transport Layer Security) is the backbone of internet security, and understanding its mechanics is crucial for any backend engineer building secure systems.
What is TLS?
TLS is a cryptographic protocol that provides three essential security features:
- Encryption: Scrambles data so only the intended recipient can read it
- Authentication: Verifies the server’s identity to prevent impersonation
- Integrity: Ensures data hasn’t been tampered with during transmission
Think of TLS as a digital lock that protects your data as it travels across the internet. When you see https:// in a URL, that’s HTTP running over TLS, ensuring your online banking, shopping, and private communications stay secure.
The Encryption Dance: Symmetric vs Asymmetric
TLS cleverly combines two types of encryption, each with different strengths:
Symmetric Encryption uses the same key for both encryption and decryption. It’s like a locked box where the same key locks and unlocks it. Algorithms like AES (Advanced Encryption Standard) and ChaCha20 are incredibly fast, making them perfect for encrypting large amounts of data like web pages or file transfers.
The challenge? Both parties need the same key, but how do you share it securely without someone intercepting it?
Asymmetric Encryption solves this problem using a public-private key pair. Think of it like a mailbox: anyone can drop a letter in (encrypt with the public key), but only the owner with the private key can open it and read the message. Algorithms like RSA and Elliptic Curve Cryptography (ECC) enable secure key exchange without ever sending the private key across the network.
The trade-off? Asymmetric encryption is computationally expensive—all that exponential math takes time and CPU cycles, making it too slow for encrypting large amounts of data.
TLS’s Brilliant Solution:
TLS uses asymmetric encryption during the handshake to securely establish a shared symmetric key, then switches to symmetric encryption for the actual data transfer. You get the security of asymmetric encryption with the performance of symmetric encryption. It’s the best of both worlds.
The TLS Handshake: Establishing Trust
The TLS handshake is where the magic happens. It’s the process where client and server establish a secure connection before any sensitive data is exchanged. Let’s walk through it:
TLS 1.2 Handshake (Two Round Trips):
- Client Hello: Your browser sends a message proposing encryption algorithms (cipher suites) and a random number
- Server Hello: The server responds with its certificate (containing its public key), chooses encryption algorithms, and sends its own random number
- Key Exchange: Using algorithms like RSA or Diffie-Hellman, both parties derive a shared symmetric key
- Finished: Both sides verify the handshake succeeded and begin encrypted communication
This process takes two round trips—two complete back-and-forth exchanges between client and server. On high-latency connections, this delay is noticeable.
TLS 1.3 Handshake (One Round Trip):
TLS 1.3 streamlines this process dramatically:
- Client Hello: The client sends cipher suite proposals AND key exchange parameters in the first message
- Server Hello: The server responds with its certificate and key exchange parameters in one message
- Both parties immediately derive the symmetric key and start encrypted communication
By including key exchange parameters upfront, TLS 1.3 cuts the handshake to one round trip, significantly reducing latency. For repeat connections, TLS 1.3 even supports 0-RTT (Zero Round-Trip Time), where the client can send encrypted data immediately using a pre-shared key from a previous session.
Key Exchange Algorithms: RSA vs Diffie-Hellman
The choice of key exchange algorithm has significant security implications:
RSA Key Exchange:
In RSA, the client generates a random pre-master secret, encrypts it with the server’s public key, and sends it. The server decrypts it with its private key, and both derive the same symmetric key.
The problem? If the server’s private key is ever compromised—say, through a vulnerability like Heartbleed—an attacker who recorded past encrypted sessions can decrypt them all. RSA lacks forward secrecy.
Diffie-Hellman Key Exchange:
Diffie-Hellman takes a different approach. Both parties generate private numbers (let’s call them X and Y) and a shared public number (G). Using modular arithmetic, they compute:
- Client calculates: G^X mod N and sends it
- Server calculates: G^Y mod N and sends it
- Both can derive the same symmetric key: (G^X)^Y mod N = (G^Y)^X mod N
The beautiful part? The symmetric key is never transmitted across the network. Even if someone intercepts all the messages, they can’t derive the key without knowing X or Y.
More importantly, Diffie-Hellman provides forward secrecy. Each session uses unique, ephemeral keys that are discarded after use. Even if the server’s private key is compromised later, past sessions remain secure because the session keys no longer exist.
Elliptic Curve Diffie-Hellman (ECDH) is a more efficient variant using elliptic curve mathematics, providing the same security with smaller keys and less computation.
Certificates and the Chain of Trust
Certificates are digital passports for websites. They contain:
- The server’s public key
- Identity information (domain name, organization)
- A digital signature from a Certificate Authority (CA)
When you connect to a website, your browser verifies the certificate by checking:
- Is it signed by a trusted CA? (Your browser has a list of trusted root CAs)
- Is it valid? (Not expired, not revoked)
- Does the domain match? (The certificate’s common name matches the URL)
This creates a chain of trust: you trust the CA, the CA vouches for the website, so you trust the website. Root CAs like Let’s Encrypt, DigiCert, and Cloudflare are pre-installed in your browser or operating system’s certificate store.
The Heartbleed Lesson
The Heartbleed bug (2014) was a devastating vulnerability in OpenSSL that allowed attackers to read server memory, potentially exposing private keys, session keys, and user data. It highlighted two critical lessons:
-
Forward secrecy matters: With RSA, compromised private keys meant all past recorded sessions could be decrypted. With Diffie-Hellman, past sessions remained secure.
-
Certificate lifetime matters: Modern best practices use short-lived certificates (weeks to months, not years). Cloudflare, for example, uses certificates that expire in 2 weeks to 3 months. If a key is compromised, the window of vulnerability is limited.
TLS Versions: Evolution of Security
| Version | Status | Key Features | Security Notes |
|---|---|---|---|
| TLS 1.0, 1.1 | Deprecated | Early standards | Vulnerable, not recommended |
| TLS 1.2 | Widely used | Two-roundtrip handshake, supports RSA | Lacks forward secrecy with RSA |
| TLS 1.3 | Modern standard | One-roundtrip handshake, mandates Diffie-Hellman | Enhanced security, forward secrecy, 0-RTT support |
TLS 1.3 represents a significant leap forward. It removes insecure cipher suites, mandates forward secrecy, and improves performance. As of 2024, over 95% of major browsers support TLS 1.3, and adoption is growing rapidly.
Performance Considerations
TLS adds overhead, but modern optimizations minimize the impact:
- Handshake Latency: TLS 1.3’s one-round-trip handshake reduces connection time by 50% compared to TLS 1.2
- 0-RTT: For repeat connections, 0-RTT eliminates handshake delays entirely, though it requires careful implementation to prevent replay attacks
- Session Resumption: Clients can reuse session parameters from previous connections, avoiding full handshakes
- Hardware Acceleration: Modern CPUs have dedicated instructions (AES-NI) for encryption, making symmetric encryption nearly free
- Certificate Compression: Reduces certificate size to minimize the number of TCP segments needed
The trade-off between security and performance has largely been solved. With TLS 1.3 and modern hardware, the overhead is minimal—typically adding only 10-20ms to connection establishment.
Practical Implementation
Implementing TLS in your applications involves several steps:
-
Obtain a Certificate: Use services like Let’s Encrypt for free, automated certificates, or purchase from commercial CAs for extended validation
-
Configure Your Server: Modern web servers like Nginx and Apache make TLS configuration straightforward:
server {
    listen 443 ssl http2;
    server_name example.com;

    ssl_certificate /path/to/cert.pem;
    ssl_certificate_key /path/to/private.key;

    # Modern TLS configuration
    ssl_protocols TLSv1.2 TLSv1.3;
    ssl_prefer_server_ciphers on;
    ssl_ciphers 'ECDHE-ECDSA-AES256-GCM-SHA384:ECDHE-RSA-AES256-GCM-SHA384';
}
- Enable HSTS: HTTP Strict Transport Security forces browsers to always use HTTPS:
add_header Strict-Transport-Security "max-age=31536000; includeSubDomains" always;
- Monitor and Renew: Automate certificate renewal (Let’s Encrypt certificates expire every 90 days) and monitor for security advisories
In Node.js, setting up an HTTPS server is straightforward:
const https = require('https');
const fs = require('fs');

const options = {
  key: fs.readFileSync('private.key'),
  cert: fs.readFileSync('cert.pem')
};

https.createServer(options, (req, res) => {
  res.writeHead(200);
  res.end('Secure connection established!');
}).listen(443);
Security Best Practices
Modern TLS deployment should follow these guidelines:
- Use TLS 1.3 (or at minimum TLS 1.2) and disable older versions
- Prefer Diffie-Hellman key exchange for forward secrecy
- Use short-lived certificates (90 days or less) to limit exposure
- Enable HSTS to prevent downgrade attacks
- Implement certificate pinning for high-security applications
- Monitor for vulnerabilities and apply patches promptly
- Use strong cipher suites and disable weak algorithms
The Future of TLS
TLS continues to evolve. Research focuses on:
- Post-quantum cryptography: Preparing for quantum computers that could break current encryption
- Encrypted Client Hello (ECH): Hiding the destination domain from network observers
- Improved 0-RTT security: Making zero-round-trip connections safer
- Certificate transparency: Public logs of all issued certificates to detect misissued certificates
Why This Matters
Understanding TLS isn’t just academic—it’s essential for building secure systems. Every time you:
- Design an API that handles sensitive data
- Configure a web server
- Debug connection issues
- Evaluate security requirements
- Choose between protocols
…you’re making decisions that depend on understanding how TLS works. The difference between RSA and Diffie-Hellman isn’t just theoretical—it determines whether your users’ past communications remain secure if your server is compromised.
TLS is the foundation of internet security. It protects everything from your online banking to your private messages. As backend engineers, we’re responsible for implementing it correctly, and that starts with understanding how it works under the hood.
Part III: Real-Time Communication
4. Real-Time Communication Technologies
Now that we’ve covered HTTP and its evolution, let’s explore technologies specifically designed for real-time communication. While HTTP works well for traditional request-response interactions, modern applications often need instant, bidirectional communication—think chat applications, live feeds, collaborative editing, or multiplayer games.
Real-time communication is about minimizing latency and enabling immediate data exchange. The technologies we’ll explore—WebSockets, Server-Sent Events, and polling—each take different approaches to this problem, with distinct trade-offs in complexity, performance, and use cases.
4.1. WebSockets: Full-Duplex Communication
WebSockets represent a fundamental shift from HTTP’s request-response model. They provide true bidirectional, full-duplex communication over a single TCP connection, allowing both client and server to send data at any time without waiting for the other party.
What Makes WebSockets Special:
Unlike HTTP, where the client always initiates requests and the server responds, WebSockets establish a persistent connection where either party can send messages independently. This is perfect for applications requiring instant updates in both directions—chat applications, live gaming, collaborative tools, and real-time dashboards.
The beauty of WebSockets is that they start as HTTP and then upgrade to a more efficient protocol. This clever design ensures compatibility with existing web infrastructure while providing the performance benefits of a persistent connection.
The WebSocket Handshake:
WebSockets begin with an HTTP connection that upgrades to a WebSocket connection through a handshake process. Here’s how it works:
- Client Request: The client sends an HTTP GET request with special headers indicating it wants to upgrade to WebSocket:
GET /chat HTTP/1.1
Host: servername
Upgrade: websocket
Connection: Upgrade
Sec-WebSocket-Key: dGhlIHNhbXBsZSBub25jZQ==
Sec-WebSocket-Protocol: chat
- Server Response: If the server supports WebSockets, it responds with HTTP 101 (Switching Protocols):
HTTP/1.1 101 Switching Protocols
Upgrade: websocket
Connection: Upgrade
Sec-WebSocket-Accept: s3pPLMBiTxaQ9kYGzzhZRbK+xOo=
Sec-WebSocket-Protocol: chat
- Bidirectional Communication: After the handshake, the connection becomes a WebSocket connection. Both parties can now send messages in real-time without further HTTP overhead.
This handshake process is elegant—it uses HTTP to establish a secure connection before switching to a more efficient protocol. The Sec-WebSocket-Key and Sec-WebSocket-Accept headers provide security by preventing cross-protocol attacks.
Key Characteristics:
-
Bidirectional Communication: Both client and server can initiate data transfer at any time, enabling true push notifications from the server.
-
Built on HTTP: Uses HTTP for the initial handshake, ensuring security and compatibility with existing infrastructure.
-
Real-time Data Transfer: Supports instantaneous data exchange with minimal overhead once the connection is established.
-
Standard Ports: Uses ports 80 (ws://) and 443 (wss://), making it firewall-friendly and compatible with existing network infrastructure.
-
Stateful Connection: Unlike HTTP’s stateless nature, WebSockets maintain a persistent connection with session state.
-
Low Overhead: After the initial handshake, WebSocket frames have minimal overhead compared to HTTP headers, making them efficient for frequent small messages.
Practical Example: Building a Chat Application
Let’s look at a real implementation of a WebSocket-based chat application. This example demonstrates the push notification model, where the server instantly pushes messages to all connected clients without them needing to request updates.
Server-side implementation using Node.js and the ws library:
const WebSocket = require('ws');
const http = require('http');
const server = http.createServer();
const wss = new WebSocket.Server({ server });
let connections = [];

wss.on('connection', (ws) => {
    connections.push(ws);
    const remotePort = ws._socket.remotePort;
    const joinMessage = `User ${remotePort} just connected`;

    // Notify all clients about the new connection
    connections.forEach((client) => {
        if (client.readyState === WebSocket.OPEN) {
            client.send(joinMessage);
        }
    });

    // Handle incoming messages
    ws.on('message', (message) => {
        console.log(`User ${remotePort} says: ${message}`);
        // Broadcast to all other clients
        connections.forEach((client) => {
            if (client.readyState === WebSocket.OPEN && client !== ws) {
                client.send(`User ${remotePort} says: ${message}`);
            }
        });
    });

    // Handle disconnections
    ws.on('close', () => {
        connections = connections.filter((client) => client !== ws);
        const leaveMessage = `User ${remotePort} disconnected`;
        connections.forEach((client) => {
            if (client.readyState === WebSocket.OPEN) {
                client.send(leaveMessage);
            }
        });
    });
});

server.listen(8080, () => {
    console.log('WebSocket server running on port 8080');
});
Client-side implementation using the browser’s WebSocket API:
const ws = new WebSocket('ws://localhost:8080');

ws.onmessage = (event) => {
    console.log('Received message:', event.data);
    displayMessage(event.data);
};

function sendMessage(message) {
    ws.send(message);
}

document.getElementById('sendButton').addEventListener('click', () => {
    const message = document.getElementById('messageInput').value;
    sendMessage(message);
});
This example shows how a few lines of code can create a functional real-time chat application. The server maintains an array of all connected clients, broadcasting messages to everyone except the sender. Messages appear instantly in all connected browsers, showcasing WebSockets’ speed.
The Trade-offs:
While WebSockets are powerful, they come with challenges:
-
Complexity in Management: Handling long-lived connections, especially with proxies and load balancers, can be tricky. Many proxies weren’t designed for persistent connections and may close idle WebSocket connections.
-
Stateful Nature: Makes scaling across multiple servers more difficult compared to stateless HTTP. You need strategies like sticky sessions or a shared message broker to ensure messages reach the right clients.
-
Connection Drops: Intermediaries like routers may close idle connections, requiring “ping-pong” messages (heartbeats) to keep them alive. This adds complexity to both client and server implementations.
-
Resource Intensive: Maintaining many open connections consumes significant server resources. Even advanced systems are limited to a few million connections per server.
-
Proxying Challenges: WebSocket proxying at Layer 7 is complex because proxies need to understand the WebSocket protocol. We’ll explore this more in the WebSocket Proxying section.
When to Use WebSockets:
WebSockets are ideal for:
- Chat applications and instant messaging
- Multiplayer games requiring low latency
- Collaborative editing tools (like Google Docs)
- Live dashboards and monitoring systems
- Any application requiring true bidirectional, real-time communication
However, WebSockets aren’t always the best choice. For simpler real-time needs where only the server pushes updates, alternatives like Server-Sent Events might be easier to implement.
4.2. Server-Sent Events: Unidirectional Streaming
Server-Sent Events (SSE) provide a simpler alternative to WebSockets when you only need unidirectional communication from server to client. SSE is perfect for scenarios like live feeds, notifications, or streaming responses—exactly what ChatGPT uses to stream its responses token by token.
What is SSE?
SSE is a one-way streaming protocol over HTTP where the server sends updates and the client receives them. Unlike WebSockets, which require a protocol upgrade and bidirectional communication, SSE uses standard HTTP with a special content type: text/event-stream.
The key insight is that SSE is simpler than WebSockets because it’s built directly on HTTP. There’s no protocol upgrade, no special handshake—just a regular HTTP request that the server keeps open to stream data.
How SSE Works:
The client makes a standard HTTP request, but instead of receiving a complete response and closing the connection, the server keeps the connection open and sends data as events:
// Client-side using EventSource API
const eventSource = new EventSource('/api/stream');

eventSource.onmessage = (event) => {
    console.log('Received:', event.data);
};

eventSource.onerror = (error) => {
    console.error('SSE error:', error);
};
The server responds with Content-Type: text/event-stream and sends data in a specific format:
data: First message

data: Second message

data: {"type": "update", "value": 42}
Each message is prefixed with data: and separated by blank lines. The browser’s EventSource API automatically handles parsing and reconnection if the connection drops.
ChatGPT’s SSE Implementation:
ChatGPT provides a fascinating real-world example of SSE in action. When you ask ChatGPT a question, the answer streams back token by token over an SSE connection. However, ChatGPT doesn’t use the standard EventSource API—instead, it uses a custom implementation with fetch() and stream readers for more control.
Here’s how ChatGPT’s streaming works:
async function streamChatResponse(message, conversationId, parentMessageId) {
    const headers = {
        'Content-Type': 'application/json',
        'Authorization': `Bearer ${accessToken}`
    };

    const body = JSON.stringify({
        message,
        conversationId,
        parentMessageId
    });

    const response = await fetch('/backend-api/conversation', {
        method: 'POST',
        headers,
        body
    });

    const reader = response.body.getReader();
    const decoder = new TextDecoder('utf-8');
    let fullText = '';

    while (true) {
        const { done, value } = await reader.read();
        if (done) break;

        const chunk = decoder.decode(value);
        fullText += chunk;
        updateUI(chunk); // Update the chat window with new tokens
    }
}
This approach gives ChatGPT fine-grained control over the stream, allowing it to handle errors, parse custom formats, and manage the UI updates precisely. The trade-off is that browser DevTools don’t show these as “EventStream” connections since they’re not using the standard API.
Key Characteristics:
-
HTTP-Based: Uses standard HTTP with
Content-Type: text/event-stream, making it simpler than WebSockets. -
Unidirectional: Only the server can send data; the client receives. For client-to-server communication, you still need regular HTTP requests.
-
Automatic Reconnection: The browser’s
EventSourceAPI automatically reconnects if the connection drops, with configurable retry intervals. -
HTTP/2 Multiplexing: Works beautifully with HTTP/2, allowing multiple SSE streams over a single TCP connection.
-
Text-Based: Events are text-based, making them human-readable and easy to debug.
SSE vs WebSockets:
When should you choose SSE over WebSockets?
-
Use SSE when: You only need server-to-client communication, want simpler implementation, or are already using HTTP/2 for multiplexing.
-
Use WebSockets when: You need bidirectional communication, want lower latency, or need to send binary data efficiently.
SSE’s simplicity is its strength. For many use cases—live feeds, notifications, streaming AI responses—SSE provides everything you need without WebSocket’s complexity.
4.3. Polling: The Traditional Approach
Before WebSockets and SSE, polling was the primary way to achieve “real-time” updates. While it’s less efficient than modern alternatives, polling is still relevant for legacy systems and situations where persistent connections aren’t feasible.
Short Polling:
Short polling is the simplest approach: the client repeatedly requests updates at regular intervals.
// Check for updates every 5 seconds
setInterval(async () => {
    const response = await fetch('/api/updates');
    const data = await response.json();
    if (data.hasUpdates) {
        updateUI(data);
    }
}, 5000);
This is like constantly refreshing your email—wasteful and inefficient. Most requests return “no updates,” wasting bandwidth and server resources. The latency is also poor; updates can be delayed by up to the polling interval.
Long Polling:
Long polling is smarter. Instead of immediately responding with “no updates,” the server holds the request open until new data is available or a timeout occurs:
async function longPoll() {
    try {
        const response = await fetch('/api/updates?timeout=30');
        const data = await response.json();

        if (data.hasUpdates) {
            updateUI(data);
        }

        // Immediately start the next long poll
        longPoll();
    } catch (error) {
        // Wait a bit before retrying on error
        setTimeout(longPoll, 5000);
    }
}

longPoll();
The server holds the connection open until it has news, then responds and the client immediately makes another request. This reduces unnecessary requests and improves latency compared to short polling.
The Trade-offs:
Polling has significant drawbacks:
-
Inefficient: Short polling wastes bandwidth with constant requests. Long polling is better but still less efficient than persistent connections.
-
Latency: Short polling has inherent latency equal to the polling interval. Long polling is better but still involves request overhead.
-
Server Load: Each poll is a new HTTP request with full headers, creating overhead. With thousands of clients, this adds up quickly.
-
Scalability: Polling doesn’t scale well compared to WebSockets or SSE, especially for high-frequency updates.
When to Use Polling:
Despite its limitations, polling still has valid use cases:
- Legacy Systems: When you can’t modify the server to support WebSockets or SSE
- Firewall Restrictions: Some networks block WebSocket connections but allow HTTP
- Simple Requirements: For infrequent updates where efficiency isn’t critical
- Compatibility: When you need to support very old browsers
Comparison: Choosing the Right Approach
Here’s a practical comparison to help you choose:
| Method | Best For | Latency | Complexity | Scalability |
|---|---|---|---|---|
| WebSockets | Chat, gaming, bidirectional | Lowest | High | Good* |
| SSE | Notifications, feeds, streaming | Low | Medium | Excellent |
| Long Polling | Legacy compatibility | Medium | Low | Poor |
| Short Polling | Simple, infrequent updates | High | Lowest | Poor |
*WebSocket scalability requires careful architecture (sticky sessions, message brokers)
Real-World Considerations:
In practice, many applications use a combination of these technologies:
- WebSocket for the main real-time features (chat, live updates)
- SSE for server-initiated notifications and streaming responses
- Long polling as a fallback when WebSockets aren’t available
- Regular HTTP for traditional request-response interactions
The key is understanding your requirements. Do you need bidirectional communication? How many concurrent connections? What’s your latency tolerance? These questions guide your choice.
Modern frameworks often abstract these details, automatically choosing the best transport based on browser capabilities and network conditions. Socket.IO, for example, tries WebSockets first, then falls back to polling if needed.
The Evolution of Real-Time:
The progression from polling to WebSockets mirrors the evolution we saw with HTTP:
- Short Polling: Simple but inefficient, like HTTP/1.1’s one-request-per-connection
- Long Polling: Smarter but still wasteful, like HTTP/1.1 with Keep-Alive
- SSE: Efficient for unidirectional streaming, like HTTP/2’s server push
- WebSockets: True bidirectional real-time, optimized for modern needs
Each approach has its place. WebSockets and SSE represent the current state of the art, but polling remains relevant for specific scenarios. Understanding all these options makes you a better backend engineer, able to choose the right tool for each situation.
4.4. gRPC: Modern RPC Framework
While WebSockets and SSE excel at real-time browser communication, gRPC (Google Remote Procedure Call) takes a different approach, optimized for server-to-server communication in distributed systems. If you’re building microservices or need efficient communication between backend services, gRPC is a game-changer.
What is gRPC?
gRPC is a high-performance, open-source framework developed by Google that makes calling functions on remote servers feel like calling local functions. Instead of manually crafting HTTP requests and parsing responses, you define your service interface in a .proto file, and gRPC generates all the client and server code for you.
The brilliance of gRPC is that it combines the best of modern protocols: it runs on HTTP/2 for performance and uses Protocol Buffers for compact, efficient data serialization. This makes it significantly faster than traditional REST APIs using JSON over HTTP/1.1.
The Problem gRPC Solves:
Managing multiple client libraries for different communication protocols can feel like juggling too many balls at once. Each protocol—whether SOAP, REST, or GraphQL—comes with its own set of libraries that need constant updates and patches. In large enterprise systems where reliability is critical, this complexity becomes a real headache.
gRPC provides a unified solution: one framework, one client library, multiple programming languages. You define your service once, and gRPC generates idiomatic code for JavaScript, Python, Java, Go, C++, and many other languages. This dramatically simplifies maintenance and ensures consistency across your entire system.
Protocol Buffers: The Secret Sauce
Protocol Buffers (protobuf) are like a super-efficient version of JSON or XML. They let you define the structure of your data in a .proto file, which is then compiled into code for your chosen language. This ensures that data is small, fast to send, and easy to work with across different systems.
Here’s a simple example defining a to-do service:
syntax = "proto3";
package toDo;

message ToDoItem {
  int32 id = 1;
  string text = 2;
}

message NoParam {}

service ToDo {
  rpc createToDo (ToDoItem) returns (ToDoItem);
  rpc readToDos (NoParam) returns (ToDoItems);
}

message ToDoItems {
  repeated ToDoItem items = 1;
}
This .proto file defines a ToDo service with two methods: createToDo to add a new to-do item and readToDos to retrieve all items. The repeated keyword indicates an array of items. Once you compile this, gRPC generates all the boilerplate code for both client and server.
Key Characteristics:
-
HTTP/2 Based: Leverages HTTP/2’s](#http-2) advanced features like multiplexing (handling multiple requests simultaneously), header compression, and streaming. This means you can send multiple gRPC calls over a single TCP connection without blocking.
-
Binary Protocol: Uses Protocol Buffers’ compact binary format instead of text-based JSON. This makes messages smaller and faster to parse, though less human-readable.
-
Strongly Typed: The schema is defined upfront, providing compile-time type checking and preventing many runtime errors. This is a double-edged sword—it adds safety but reduces flexibility.
-
Language Agnostic: Supports many programming languages, making it easy to connect services written in different languages. Your Python service can seamlessly call your Go service.
-
Single Client Library: Provides one library managed by Google and the community, reducing the need to juggle multiple libraries and ensuring consistent behavior across languages.
Communication Patterns:
gRPC supports four communication patterns, making it incredibly versatile:
-
Request-Response (Unary): The classic pattern—client sends a request, server sends back a response. This is like a traditional REST API call but faster.
-
Server Streaming: The client sends one request, and the server responds with a stream of messages. Perfect for scenarios like downloading a large file in chunks or subscribing to real-time updates.
-
Client Streaming: The client sends a stream of messages, and the server responds with a single message. Great for uploads or aggregating data from the client.
-
Bidirectional Streaming: Both client and server send streams simultaneously. This is similar to WebSockets but optimized for server-to-server communication. Ideal for real-time applications like chat or live monitoring.
This flexibility is one of gRPC’s biggest strengths. You can use simple request-response for most operations, then switch to streaming for specific use cases without changing your infrastructure.
Practical Example: Building a To-Do Service
Let’s see gRPC in action with a Node.js implementation. After defining the .proto file above, here’s the server implementation:
const grpc = require('grpc');
const protoLoader = require('@grpc/proto-loader');

const packageDefinition = protoLoader.loadSync('todo.proto', {});
const grpcObject = grpc.loadPackageDefinition(packageDefinition);
const toDoPackage = grpcObject.toDo;

const server = new grpc.Server();
let todos = [];

server.addService(toDoPackage.ToDo.service, {
  createToDo: (call, callback) => {
    const newTodo = { id: todos.length + 1, text: call.request.text };
    todos.push(newTodo);
    callback(null, newTodo);
  },
  readToDos: (call, callback) => {
    callback(null, { items: todos });
  }
});

server.bind('0.0.0.0:40000', grpc.ServerCredentials.createInsecure());
server.start();
console.log('gRPC server running on port 40000');
The server stores to-do items in an array and handles requests to create and read to-dos. Notice how clean this is—no manual HTTP parsing, no JSON serialization. gRPC handles all of that.
The client is equally straightforward:
const client = new toDoPackage.ToDo('localhost:40000', grpc.credentials.createInsecure());

client.createToDo({ id: -1, text: 'Do laundry' }, (error, response) => {
  if (!error) console.log('Created ToDo:', JSON.stringify(response));
});

client.readToDos({}, (error, response) => {
  if (!error) console.log('ToDos:', JSON.stringify(response.items));
});
This client creates a to-do item and retrieves the list of all to-dos. The API feels like calling local functions, even though it’s making network requests under the hood.
Streaming in Action:
To demonstrate gRPC’s streaming capabilities, we can modify readToDos to stream each to-do item individually:
Server-side:
readToDosStream: (call) => {
  todos.forEach(todo => call.write(todo));
  call.end();
}
Client-side:
const call = client.readToDosStream({});
call.on('data', (item) => console.log('Received item:', JSON.stringify(item)));
call.on('end', () => console.log('Server done'));
This demonstrates how gRPC can stream data, which is useful for applications needing real-time updates or large data transfers. The streaming API is event-driven, similar to Node.js streams, making it familiar to JavaScript developers.
gRPC vs REST: When to Use Each
The comparison between gRPC and REST is one of the most common questions in backend engineering. Here’s how they stack up:
gRPC Advantages:
-
Performance: Binary Protocol Buffers are more compact than JSON, and HTTP/2 multiplexing reduces latency. In benchmarks, gRPC is often 5-10x faster than REST for equivalent operations.
-
Streaming: Native support for bidirectional streaming, which is cumbersome to implement with REST.
-
Type Safety: Strongly typed schemas catch errors at compile time, reducing runtime bugs.
-
Code Generation: Automatic client and server code generation saves development time and ensures consistency.
-
Cancelable Requests: You can cancel in-flight requests, which is tricky with traditional HTTP.
REST Advantages:
-
Simplicity: REST is simpler to understand and debug. You can test REST APIs with curl or a browser; gRPC requires specialized tools.
-
Browser Support: REST works natively in browsers; gRPC requires a proxy (gRPC-Web) to work in browsers, adding complexity.
-
Flexibility: REST with JSON is schema-less, allowing rapid iteration without recompiling. gRPC requires updating the
.protofile and regenerating code. -
Ecosystem: REST has a mature ecosystem with extensive tooling, documentation, and developer familiarity.
-
Human-Readable: JSON is easy to read and debug; Protocol Buffers are binary and require tools to inspect.
When to Use gRPC:
- Microservices: When you have many services communicating frequently, gRPC’s performance and type safety shine.
- Real-Time Systems: Streaming support makes gRPC ideal for real-time data pipelines or monitoring systems.
- Polyglot Environments: When services are written in different languages, gRPC’s cross-language support is invaluable.
- Performance-Critical Applications: When every millisecond counts, gRPC’s efficiency makes a difference.
When to Use REST:
- Public APIs: REST is more accessible to external developers and works in browsers without additional setup.
- Simple CRUD Operations: For straightforward create-read-update-delete operations, REST’s simplicity is often sufficient.
- Rapid Prototyping: When you need to iterate quickly without worrying about schemas.
- Legacy Integration: When integrating with systems that only support HTTP/1.1 or JSON.
The Trade-offs:
gRPC isn’t perfect for every situation. Here are the challenges you’ll face:
-
Schema Dependency: You must define a schema upfront, which can slow down development compared to schema-less options like REST with JSON. Every change requires updating the
.protofile and regenerating code. -
Thick Client: The client libraries can have bugs or security issues that need monitoring. You’re dependent on Google and the community for updates.
-
Complex proxies: Setting up proxies or load balancers for gRPC can be tricky. Many traditional HTTP proxies don’t understand gRPC’s streaming semantics, requiring specialized configuration.
-
No Native Error Handling: gRPC provides status codes, but developers must build their own error-handling logic. There’s no standardized error format like REST’s HTTP status codes.
-
No Browser Support: Browsers don’t natively support gRPC, requiring workarounds like gRPC-Web proxies. This adds complexity and latency for web applications.
-
Connection Issues: Long-running connections may face timeouts, and TCP connections can drop, needing reconnection logic. This is similar to WebSocket challenges.
Real-World Example: Spotify’s Switch to gRPC
Spotify provides a fascinating case study. They initially built their own custom protocol called Hermes for internal service communication. However, they eventually switched to gRPC due to its widespread adoption and strong community support.
The lesson? Building custom protocols is expensive. Unless you have very specific requirements that existing protocols can’t meet, adopting a well-established protocol like gRPC saves time and leverages community-driven improvements. Spotify’s experience shows the value of choosing battle-tested solutions over reinventing the wheel.
gRPC in the Modern Stack:
gRPC has become a cornerstone of modern microservices architectures. Companies like Google, Netflix, Square, and Cisco use it extensively for internal service communication. It’s particularly popular in cloud-native environments where services are containerized and orchestrated with Kubernetes.
The typical pattern is to use gRPC for internal service-to-service communication (where performance and type safety matter) and REST for public-facing APIs (where simplicity and browser compatibility matter). This hybrid approach gets the best of both worlds.
Comparison with Other Protocols:
To put gRPC in context, here’s how it compares to other protocols we’ve discussed:
| Protocol | Best For | Latency | Complexity | Browser Support |
|---|---|---|---|---|
| REST | Public APIs, simple CRUD | Medium | Low | Native |
| gRPC | Microservices, streaming | Low | Medium | Requires proxy |
| WebSockets | Browser real-time | Lowest | High | Native |
| SSE | Server push to browsers | Low | Low | Native |
gRPC occupies a unique niche: it’s optimized for server-to-server communication where performance and type safety are critical. It’s not trying to replace REST for public APIs or WebSockets for browser communication—it’s solving a different problem.
Getting Started with gRPC:
If you’re interested in trying gRPC, here’s the typical workflow:
-
Define Your Service: Write a
.protofile describing your service interface and data structures. -
Generate Code: Use the Protocol Buffers compiler (
protoc) to generate client and server code for your language. -
Implement the Server: Write the business logic for your service methods.
-
Create Clients: Use the generated client code to call your service from other applications.
-
Deploy and Monitor: Deploy your gRPC services and monitor their performance and health.
The official documentation at grpc.io provides excellent tutorials and examples for getting started in various languages.
The Future of gRPC:
gRPC continues to evolve. Recent developments include:
- gRPC-Web: Improved browser support through a JavaScript library and proxy
- gRPC-Gateway: Automatic REST API generation from gRPC services
- Better Observability: Integration with tracing and monitoring tools like OpenTelemetry
- Performance Improvements: Ongoing optimizations to reduce latency and resource usage
As microservices architectures become more prevalent, gRPC’s role in backend engineering will only grow. Understanding how it works and when to use it is becoming an essential skill for backend engineers.
Why This Matters:
gRPC represents a shift in how we think about service communication. Instead of treating services as HTTP endpoints that return JSON, gRPC treats them as remote objects with methods you can call. This abstraction makes distributed systems feel more like monolithic applications, reducing the cognitive overhead of network communication.
The choice between gRPC and REST isn’t about one being better than the other—it’s about choosing the right tool for the job. For internal microservices where performance and type safety matter, gRPC is often the better choice. For public APIs where simplicity and accessibility matter, REST remains king. Understanding both makes you a more versatile backend engineer.
4.5. WebRTC: Peer-to-Peer Communication
While WebSockets, SSE, and gRPC all involve communication through servers, WebRTC (Web Real-Time Communication) takes a radically different approach: it enables browsers and mobile apps to communicate directly with each other, peer-to-peer. This is the technology powering video calls in Google Meet, voice chat in Discord, and real-time collaboration tools—all without requiring users to install additional software.
What is WebRTC?
WebRTC is a free, open-source project that provides browsers and mobile applications with real-time communication capabilities through simple APIs. The key insight is that WebRTC creates direct connections between users, cutting out the middleman. Instead of your video call going through a server (which adds latency and costs), WebRTC connects you directly to the other person’s device.
Think of it like this: traditional communication is like sending a letter through the post office, while WebRTC is like walking next door and talking to your neighbor directly. The direct path is faster and more efficient.
The Challenge: NAT and Firewalls
Here’s where things get interesting. Most of us sit behind routers at home or work, and these routers use NAT (Network Address Translation) to manage multiple devices sharing one public IP address. NAT is like a gatekeeper that translates your device’s private address (like 192.168.1.5) to a public one that the internet can see.
The problem? NAT makes it tricky for two devices to find and connect to each other directly. Your device doesn’t know its public IP address, and even if it did, the router might block incoming connections. WebRTC has to work around these obstacles to establish peer-to-peer connections.
NAT Types and Their Impact:
Not all NAT implementations are created equal. The lecture explained different NAT types:
-
Full Cone NAT: The easiest to work with. Once your device sends data out through a port, anyone can send data back to that port. This is like leaving your front door unlocked—convenient for WebRTC but less secure.
-
Restricted Cone NAT: More selective. Only devices you’ve communicated with can send data back. This is like having a guest list at your door.
-
Port Restricted Cone NAT: Even more restrictive. Not only must you have communicated with the device, but it must use the same port. This adds another layer of security but makes connections harder.
-
Symmetric NAT: The trickiest for WebRTC. Your router assigns different public ports for different destinations, making it nearly impossible for peers to predict how to reach you. This is like changing your address every time you send a letter—secure but problematic for direct connections.
STUN: Discovering Your Public Address
STUN (Session Traversal Utilities for NAT) servers help your device figure out its public IP address and port. It’s like asking a friend, “Hey, what’s my address from the outside world?”
Here’s how it works:
- Your device sends a request to a STUN server
- The STUN server sees your public IP and port (from the router’s NAT translation)
- The server replies with this information
- Your device now knows how others can reach it
STUN servers are lightweight and cheap to run because they only handle these simple queries—they don’t relay any actual data. Google provides free public STUN servers that many applications use.
TURN: When Direct Connections Fail
Sometimes, direct connections just won’t work, especially with Symmetric NAT or strict firewalls. That’s where TURN (Traversal Using Relays around NAT) servers come in. TURN servers act as middlemen, relaying data between peers when direct connections fail.
It’s like using a friend to pass messages when you can’t reach someone directly. The downside? TURN servers are expensive to run because they handle all the actual data traffic, and they add latency since data takes a longer path. This is why WebRTC tries to avoid TURN whenever possible, using it only as a last resort.
ICE: Finding the Best Path
ICE (Interactive Connectivity Establishment) is the smart system that ties everything together. ICE collects all possible ways to connect two devices—these are called ICE candidates:
- Host candidates: Your local IP address (works if both devices are on the same network)
- Server reflexive candidates: Your public IP from STUN (works for most NAT types)
- Relay candidates: A TURN server address (works when nothing else does)
ICE then tries these candidates in order of preference, aiming for the fastest connection. It’s like having multiple routes to a destination and automatically choosing the quickest one.
SDP: Describing the Connection
SDP (Session Description Protocol) is how peers describe their connection details to each other. It’s a text format that includes information like:
- What kind of media you’re sending (audio, video, or data)
- Supported codecs and formats
- ICE candidates for connection
- Encryption keys for security
The lecture emphasized that SDP is “a format, not a protocol”—it’s just a way to structure information, not a method for sending it. Think of SDP as a business card that contains all the details someone needs to connect with you.
Signaling: Exchanging Connection Details
Before two peers can connect via WebRTC, they need to exchange their SDP information and ICE candidates. This process is called signaling. Here’s the interesting part: WebRTC doesn’t specify how you should do signaling. You can use:
- WebSockets for real-time exchange
- HTTP POST requests
- A chat application
- Even manual copy-paste (as demonstrated in the lecture)
This flexibility is both a strength and a weakness. It gives developers freedom to choose the best signaling method for their application, but it also means there’s no standard way to do it.
The WebRTC Connection Flow:
Here’s how a typical WebRTC connection is established:
- Peer A creates an offer: Generates SDP describing its capabilities and ICE candidates
- Peer A signals the offer: Sends the SDP to Peer B through some signaling mechanism
- Peer B receives the offer: Sets it as the remote description
- Peer B creates an answer: Generates its own SDP in response
- Peer B signals the answer: Sends it back to Peer A
- Peer A receives the answer: Sets it as the remote description
- ICE negotiation: Both peers exchange ICE candidates and test connections
- Connection established: The best path is selected and data flows directly
This dance might seem complex, but it happens quickly—often in under a second.
Practical Example: Browser-to-Browser Chat
The lecture included a fascinating live demo where a peer-to-peer chat was created using just the browser’s DevTools. This showed how WebRTC can work without fancy frameworks or build tools.
Here’s the code for Peer A (the initiator):
// Create local peer connection
let lc = new RTCPeerConnection();

// Create data channel for communication
let dc = lc.createDataChannel("dataChannel");

// Handle incoming messages
dc.onmessage = function (e) {
  console.log("Just got a message: " + e.data);
};

// Handle data channel open event
dc.onopen = function () {
  console.log("Connection open");
};

// Handle ICE candidate events
lc.onicecandidate = function (e) {
  console.log("New ICE candidate, reprinting SDP: " +
    JSON.stringify(lc.localDescription));
};

// Create an offer (SDP)
lc.createOffer()
  .then(function (offer) {
    return lc.setLocalDescription(offer);
  })
  .then(function () {
    console.log("Offer set successfully");
    console.log("Copy this SDP (offer): " +
      JSON.stringify(lc.localDescription));
  });
And here’s Peer B (the receiver):
// Create remote peer connection
let rc = new RTCPeerConnection();

// Handle ICE candidate events
rc.onicecandidate = function(e) {
    console.log("New ICE candidate, reprinting SDP: " +
      JSON.stringify(rc.localDescription));
};

// Handle receiving a data channel from Peer A
rc.ondatachannel = function(e) {
    rc.dataChannel = e.channel;

    // Handle incoming messages
    rc.dataChannel.onmessage = function(e) {
        console.log("New message from client: " + e.data);
    };

    // Handle data channel open event
    rc.dataChannel.onopen = function() {
        console.log("Connection open");
    };
};

// Paste the SDP offer from Peer A here
const offer = /* Paste from Peer A's console */;

rc.setRemoteDescription(offer).then(function() {
    console.log("Offer set as remote description");
    return rc.createAnswer();
}).then(function(answer) {
    return rc.setLocalDescription(answer);
}).then(function() {
    console.log("Answer created");
    console.log("Copy this SDP (answer): " +
      JSON.stringify(rc.localDescription));
});
Finally, Peer A completes the connection:
// Paste the answer from Peer B
const answer = /* Paste from Peer B's console */;

lc.setRemoteDescription(answer).then(function() {
    console.log("Answer set, connection established");
});

// Send a message
dc.send("Yo Peer B, what up?");
This demo is eye-opening because it shows WebRTC working with minimal code. The manual copy-paste for signaling might seem crude, but it perfectly illustrates what’s happening under the hood. In production, you’d automate this with WebSockets or another real-time protocol.
Key Characteristics:
- Peer-to-Peer: Direct device-to-device communication minimizes latency and server costs
- UDP-Based: Uses UDP instead of TCP for lower latency, accepting occasional packet loss for speed
- Built into Browsers: Standardized API works directly in modern browsers without plugins
- NAT Traversal: Sophisticated mechanisms (STUN, TURN, ICE) handle complex network configurations
- Flexible Signaling: Developers choose how to exchange connection details
- Encrypted by Default: All WebRTC connections are encrypted using DTLS (Datagram Transport Layer Security)
The Trade-offs:
WebRTC is powerful but comes with challenges:
Advantages:
- Low Latency: Direct peer-to-peer connections provide the fastest possible communication, ideal for video calls and gaming
- Reduced Server Costs: Since data flows directly between peers, you don’t need expensive servers to relay traffic (except when TURN is required)
- Standardized: Built into browsers, so users don’t need to install anything
- Efficient: UDP-based communication is perfect for real-time media where speed matters more than perfect delivery
Disadvantages:
- Connection Complexity: Symmetric NAT and strict firewalls can block direct connections, forcing expensive TURN relay usage
- Scalability Challenges: WebRTC works best for small groups. For large groups (like 100+ participants), managing all those peer-to-peer connections becomes impractical, and a server-based architecture (like Selective Forwarding Units) is often better
- Privacy Concerns: WebRTC can reveal local IP addresses, which could be a privacy issue if not properly managed
- Signaling Complexity: Developers must implement their own signaling mechanism, adding development overhead
- TURN Costs: When direct connections fail, TURN servers can be expensive to operate at scale
Real-World Applications:
WebRTC powers many applications you use daily:
- Video Conferencing: Google Meet, Zoom (partially), Microsoft Teams
- Voice Chat: Discord uses WebRTC for voice channels, though they customize the SDP for their specific needs
- File Sharing: Peer-to-peer file transfer applications
- Gaming: Low-latency multiplayer games
- Live Streaming: Interactive streaming platforms
- Collaborative Tools: Real-time document editing and screen sharing
Discord’s use of WebRTC is particularly interesting. They customize the SDP to optimize for their voice servers, showing how flexible WebRTC can be when you understand its internals.
WebRTC vs Other Real-Time Technologies:
How does WebRTC compare to the other technologies we’ve discussed?
| Technology | Direction | Latency | Use Case | Server Required |
|---|---|---|---|---|
| WebSockets | Bidirectional | Low | Chat, updates | Yes (always) |
| SSE | Server→Client | Low | Notifications | Yes (always) |
| gRPC | Bidirectional | Low | Microservices | Yes (always) |
| WebRTC | Peer-to-Peer | Lowest | Video, voice | Only for signaling |
WebRTC’s unique advantage is that it can eliminate the server from the data path entirely. Once the connection is established, data flows directly between peers. This is why video calls feel so responsive—there’s no server in the middle adding latency.
When to Use WebRTC:
WebRTC is ideal for:
- Video and Voice Calls: Where low latency is critical and direct connections provide the best experience
- Small Group Communication: Up to about 10-20 participants, where peer-to-peer connections are manageable
- File Sharing: When you want to transfer files directly between users without uploading to a server
- Gaming: For low-latency multiplayer experiences
- Screen Sharing: Real-time screen sharing and remote desktop applications
When Not to Use WebRTC:
WebRTC might not be the best choice for:
- Large Groups: With 100+ participants, the mesh of peer-to-peer connections becomes unmanageable
- Server-Side Processing: If you need to process or record the media on the server, a server-based architecture is simpler
- Guaranteed Delivery: WebRTC uses UDP, so if you need guaranteed message delivery, WebSockets over TCP might be better
- Simple Use Cases: For basic real-time updates, SSE or WebSockets are simpler to implement
The Future of WebRTC:
WebRTC continues to evolve. Recent developments include:
- Insertable Streams: Allowing developers to process media streams with custom code
- Scalable Video Coding (SVC): Better support for adaptive video quality
- QUIC Integration: Exploring QUIC as a transport for improved performance
- Better Mobile Support: Optimizations for mobile networks and battery life
Why This Matters:
Understanding WebRTC opens up a world of possibilities for real-time applications. It’s not just about video calls—it’s about any scenario where direct, low-latency communication matters. The ability to connect users directly, bypassing servers, is powerful both for performance and cost efficiency.
The lecture’s hands-on demo was particularly valuable because it demystified WebRTC. Seeing a peer-to-peer connection established with just a few lines of code in the browser console made the technology feel accessible. You don’t need complex frameworks or build tools to experiment with WebRTC—you can start right in your browser’s DevTools.
As backend engineers, we need to understand WebRTC even if we’re not implementing the peer-to-peer connections ourselves. We’re often responsible for the signaling servers, STUN/TURN infrastructure, and the backend systems that support WebRTC applications. Knowing how WebRTC works helps us build better supporting infrastructure and make informed architectural decisions.
WebRTC represents a fundamental shift in how we think about real-time communication. Instead of always routing through servers, it empowers direct peer-to-peer connections. This isn’t just a technical detail—it’s a different philosophy of how the internet can work, one that’s more decentralized and efficient.
Part IV: Backend Execution & Concurrency
5. Backend Communication Patterns
Now that we’ve explored specific protocols and technologies, let’s step back and examine the fundamental communication patterns that underpin all backend systems. Understanding these patterns is crucial because they influence everything from API design to system architecture. Every protocol we’ve discussed—HTTP, WebSockets, gRPC—implements one or more of these core patterns.
The Four Fundamental Patterns:
At the heart of backend communication are four essential patterns that describe how systems exchange information. These aren’t just theoretical concepts—they’re practical tools that shape how we design and build distributed systems.
Request-Response: The Foundation
Request-response is the most common and straightforward communication pattern. The client sends a request, the server processes it, and returns a response. It’s simple, predictable, and forms the backbone of the web.
How It Works:
The flow is linear and easy to reason about:
- Client sends a request
- Server parses the request
- Server processes the request
- Server sends a response
- Client parses and consumes the response
This pattern is everywhere. When you load a webpage, query a database, or call a REST API, you’re using request-response. HTTP is built entirely around this pattern, as are protocols like DNS, SSH, and most database protocols.
Anatomy of a Request:
Every request-response interaction follows an agreed-upon format defined by the protocol. For HTTP, a request includes:
GET /api/users/123 HTTP/1.1
Host: example.com
Content-Type: application/json
Authorization: Bearer token123
The server responds with:
HTTP/1.1 200 OK
Content-Type: application/json
Content-Length: 156

{"id": 123, "name": "John Doe", "email": "john@example.com"}
This structure—method, path, headers, body—is consistent across millions of API calls every second. The predictability is what makes request-response so powerful.
Where It’s Used:
- Web protocols: HTTP, HTTPS, DNS
- RPC communication: gRPC, SOAP, XML-RPC
- Database protocols: SQL queries, MongoDB commands
- API architectures: REST, GraphQL
Practical Example: File Upload Strategies
Consider uploading a large image file. Request-response offers two approaches, each with trade-offs:
Single Large Request:
// Upload entire file in one request
const formData = new FormData();
formData.append('image', fileBlob);

await fetch('/api/upload', {
  method: 'POST',
  body: formData
});
This is simple and straightforward. One request, one response, done. But if the connection drops halfway through a 100MB upload, you lose everything and must start over.
Chunked Upload:
// Split file into chunks and upload separately
const chunkSize = 1024 * 1024; // 1MB chunks
for (let i = 0; i < file.size; i += chunkSize) {
  const chunk = file.slice(i, i + chunkSize);
  await fetch(`/api/upload/chunk?offset=${i}`, {
    method: 'POST',
    body: chunk
  });
}
Chunked uploads add complexity but enable pause-and-resume functionality. YouTube uses this approach—if your upload fails, you can resume from where you left off rather than starting over. The trade-off is managing multiple requests and tracking upload state.
Understanding TCP Segmentation:
When you use tools like curl to make requests, you might notice responses arrive in chunks. This isn’t the server deliberately chunking data—it’s TCP segmentation at work.
TCP has a Maximum Segment Size (MSS), typically around 1460 bytes. After accounting for TCP headers, you get roughly 1388 bytes of actual data per segment. The operating system’s TCP stack negotiates this during the connection handshake and automatically splits large responses into segments.
This is why when you download a large file, it doesn’t arrive all at once—TCP breaks it into manageable pieces for transmission. Understanding this helps debug network issues and optimize performance.
Limitations of Request-Response:
While request-response is powerful, it has clear limitations:
- Not efficient for real-time applications: Chat apps and live notifications need instant updates, not polling
- Long-running requests: If processing takes minutes, keeping the connection open is wasteful
- Client disconnections: If the client disconnects mid-request, the server might continue processing unnecessarily
- Server-initiated updates: The server can’t push updates to clients; clients must poll for changes
These limitations led to the development of other patterns like push-pull and publish-subscribe.
Push-Pull: Flexible Data Flow
The push-pull pattern offers more flexibility than request-response by allowing either party to initiate data transfer. The server can push updates to clients, or clients can pull data as needed. This pattern is common in message queues and data synchronization systems.
Push Model:
In the push model, the server proactively sends data to clients without waiting for requests. This is perfect for scenarios where the server knows when new data is available and wants to notify clients immediately.
Server-Sent Events (SSE) is a classic example of the push model. The server maintains an open connection and pushes updates as they occur:
// Server pushes updates to client
const eventSource = new EventSource('/api/updates');
eventSource.onmessage = (event) => {
  console.log('Server pushed:', event.data);
  updateUI(event.data);
};
The client doesn’t need to repeatedly ask “do you have updates?” The server pushes them when they’re ready. This is more efficient than polling and provides lower latency.
Pull Model:
In the pull model, clients request data when they need it. This is essentially request-response, but the emphasis is on the client controlling when data is retrieved.
Traditional REST APIs use the pull model:
// Client pulls data when needed
async function refreshData() {
  const response = await fetch('/api/data');
  const data = await response.json();
  updateUI(data);
}

// Pull data every 30 seconds
setInterval(refreshData, 30000);
The client decides when to fetch data, giving it control over timing and resource usage.
Hybrid Approaches:
Many systems combine push and pull. For example, a mobile app might:
- Use push notifications to alert users of new messages (push)
- Fetch the actual message content when the user opens the app (pull)
This hybrid approach balances efficiency (push for notifications) with control (pull for detailed data).
Where It’s Used:
- Message queues: RabbitMQ, Kafka (consumers pull messages)
- Data synchronization: Dropbox, Google Drive (push changes, pull on demand)
- Mobile notifications: APNs, FCM (push alerts, pull content)
- RSS feeds: Clients pull updates periodically
Trade-offs:
The push model is efficient but requires maintaining open connections, which can be resource-intensive. The pull model is simpler but can waste bandwidth with unnecessary requests. Choosing between them depends on your specific requirements for latency, resource usage, and control.
Long Polling: Bridging the Gap
Long polling is a clever technique that bridges request-response and real-time communication. Instead of the server immediately responding with “no updates,” it holds the request open until new data is available or a timeout occurs.
How It Works:
Traditional short polling is wasteful:
// Short polling - inefficient
setInterval(async () => {
  const response = await fetch('/api/updates');
  const data = await response.json();
  if (data.hasUpdates) {
    updateUI(data);
  }
}, 5000); // Check every 5 seconds
Most requests return “no updates,” wasting bandwidth and server resources. The latency is also poor—updates can be delayed by up to the polling interval.
Long polling is smarter:
// Long polling - more efficient
async function longPoll() {
  try {
    const response = await fetch('/api/updates?timeout=30');
    const data = await response.json();

    if (data.hasUpdates) {
      updateUI(data);
    }

    // Immediately start the next long poll
    longPoll();
  } catch (error) {
    // Wait before retrying on error
    setTimeout(longPoll, 5000);
  }
}

longPoll();
The server holds the connection open until it has news (or hits the timeout), then responds. The client immediately makes another request, creating a continuous loop. This reduces unnecessary requests and improves latency compared to short polling.
The Server Side:
On the server, long polling requires holding requests in memory until data is available:
// Simplified long polling server
const waitingClients = [];

app.get('/api/updates', (req, res) => {
  // Add client to waiting list
  waitingClients.push(res);

  // Set timeout
  setTimeout(() => {
    const index = waitingClients.indexOf(res);
    if (index !== -1) {
      waitingClients.splice(index, 1);
      res.json({ hasUpdates: false });
    }
  }, 30000);
});

// When new data arrives, notify all waiting clients
function notifyClients(data) {
  waitingClients.forEach(res => {
    res.json({ hasUpdates: true, data });
  });
  waitingClients.length = 0;
}
This approach works but requires careful resource management. Each waiting client consumes a connection and memory.
When to Use Long Polling:
Long polling is useful when:
- You need real-time updates but can’t use WebSockets
- Firewall restrictions block WebSocket connections
- You’re working with legacy systems that don’t support modern protocols
- You need compatibility with very old browsers
However, long polling is less efficient than WebSockets or SSE. It’s essentially a workaround for environments where better options aren’t available.
Limitations:
- Inefficient: Each poll is a new HTTP request with full headers
- Latency: Still involves request overhead, though better than short polling
- Server load: Holding many connections consumes resources
- Scalability: Doesn’t scale as well as WebSockets or SSE
Modern applications typically use WebSockets or SSE instead of long polling, but understanding long polling helps appreciate why those technologies were developed.
Publish-Subscribe: Decoupling at Scale
Publish-subscribe (pub-sub) is a powerful pattern that decouples producers from consumers. Instead of services communicating directly, they interact through a message broker. Publishers send messages to topics, and subscribers receive messages from topics they’re interested in. This indirection enables massive scalability and flexibility.
How It Works:
The pub-sub pattern involves three key components:
- Publisher: Sends messages to a broker (e.g., Kafka, RabbitMQ)
- Broker/Queue: Middleman that handles message delivery
- Subscriber: Listens for messages from the broker
Publishers and subscribers don’t know about each other—they only know about topics. This decoupling is the pattern’s superpower.
Real-World Example: YouTube Video Processing
YouTube’s video processing pipeline is a perfect example of pub-sub in action. When you upload a video, multiple services need to process it:
- Uploader Service publishes “raw video uploaded” to the “raw-videos” topic
- Compression Service subscribes to “raw-videos,” compresses the video, and publishes to “compressed-videos”
- Format Service subscribes to “compressed-videos,” converts to multiple resolutions (1080p, 720p, 480p), and publishes to “formatted-videos”
- Notification Service subscribes to “formatted-videos” and sends alerts to subscribers
Each service works independently. If the compression service crashes, the uploader service continues accepting uploads. When compression comes back online, it processes the backlog. This resilience is crucial for large-scale systems.
Key Characteristics:
- Decoupling: Publishers and subscribers don’t know about each other
- Scalability: Add more subscribers without changing publishers
- Fault tolerance: Services can fail and recover independently
- At-least-once delivery: Messages are delivered at least once (possibly duplicates)
- Topics: Messages are organized by category for targeted delivery
Practical Implementation:
Here’s a simplified example using a message broker:
// Publisher
async function uploadVideo(videoData) {
  await broker.publish('raw-videos', {
    videoId: videoData.id,
    url: videoData.url,
    timestamp: Date.now()
  });
  console.log('Video uploaded and published');
}

// Subscriber
broker.subscribe('raw-videos', async (message) => {
  console.log('Received video for compression:', message.videoId);
  const compressed = await compressVideo(message.url);

  // Publish to next stage
  await broker.publish('compressed-videos', {
    videoId: message.videoId,
    compressedUrl: compressed.url
  });
});
Each service focuses on its specific task. The uploader doesn’t need to know about compression, and compression doesn’t need to know about formatting. They communicate through well-defined topics.
Advantages:
- Independent scaling: Scale each service based on its specific load
- Flexibility: Add new subscribers without modifying publishers
- Resilience: Services can fail and recover without affecting others
- Asynchronous processing: Publishers don’t wait for subscribers to finish
- Load distribution: Multiple subscribers can share the workload
Challenges:
- Duplicate messages: At-least-once delivery means you might receive the same message twice
- Message ordering: Messages might arrive out of order (though some brokers guarantee ordering)
- Increased complexity: More moving parts to monitor and debug
- Network overhead: Messages travel through the broker, adding latency
- Broker dependency: If the broker fails, the entire system is affected
Handling Duplicates:
Duplicate messages are a reality in pub-sub systems. Your code must be idempotent—processing the same message twice should produce the same result:
// Idempotent message handler
const processedMessages = new Set();

broker.subscribe('notifications', async (message) => {
  // Check if already processed
  if (processedMessages.has(message.id)) {
    console.log('Duplicate message, skipping');
    return;
  }

  // Process message
  await sendNotification(message.userId, message.content);

  // Mark as processed
  processedMessages.add(message.id);
});
This ensures that even if a notification message is delivered twice, users only receive one notification.
When to Use Pub-Sub:
Pub-sub is ideal for:
- Microservices architectures: Where services need to communicate without tight coupling
- Event-driven systems: Where actions trigger cascading events
- High-volume processing: Where work needs to be distributed across multiple workers
- Asynchronous workflows: Where immediate responses aren’t required
Popular Pub-Sub Systems:
- Apache Kafka: High-throughput, distributed streaming platform
- RabbitMQ: Flexible message broker with multiple messaging patterns
- Redis Pub/Sub: Lightweight, in-memory messaging
- Google Cloud Pub/Sub: Managed service for cloud applications
- AWS SNS/SQS: Amazon’s pub-sub and queuing services
Comparison with Other Patterns:
| Pattern | Coupling | Scalability | Latency | Complexity |
|---|---|---|---|---|
| Request-Response | Tight | Limited | Low | Low |
| Push-Pull | Medium | Good | Low-Medium | Medium |
| Long Polling | Medium | Limited | Medium | Medium |
| Pub-Sub | Loose | Excellent | Medium-High | High |
Pub-sub trades latency and complexity for scalability and decoupling. It’s not the right choice for every situation, but for large-scale distributed systems, it’s often essential.
The Evolution of Communication Patterns:
These four patterns—request-response, push-pull, long polling, and pub-sub—represent an evolution in how we think about system communication:
- Request-response: Simple, synchronous, tightly coupled
- Push-pull: More flexible, supports both directions
- Long polling: Attempts real-time with request-response infrastructure
- Pub-sub: Fully decoupled, asynchronous, scalable
Modern systems often combine multiple patterns. A web application might use:
- Request-response for API calls
- Push (via SSE) for notifications
- Pub-sub for backend service communication
Understanding all these patterns makes you a more versatile backend engineer. You can choose the right tool for each situation rather than forcing every problem into the same solution.
Why This Matters:
Communication patterns are the foundation of distributed systems. Every architectural decision—whether to use REST or gRPC, WebSockets or SSE, synchronous or asynchronous processing—ultimately comes down to choosing the right communication pattern for your requirements.
The patterns we’ve discussed aren’t just theoretical concepts. They’re practical tools that shape how we build real systems. YouTube’s video processing, Twitter’s tweet distribution, Netflix’s content delivery—all rely on these fundamental patterns, often combining multiple patterns to achieve their goals.
As backend engineers, our job is to understand these patterns deeply enough to make informed decisions. When should you use pub-sub instead of request-response? When is long polling acceptable, and when do you need WebSockets? These questions don’t have universal answers—they depend on your specific requirements for latency, scalability, reliability, and complexity.
The beauty of these patterns is that they’re protocol-agnostic. Whether you’re using HTTP, gRPC, or custom protocols, these patterns apply. They’re the conceptual building blocks that transcend specific technologies, making them invaluable for understanding and designing distributed systems.
6. Threading and Concurrency in Backend Systems
Now that we understand communication patterns, we need to explore how backends actually execute the work. When thousands of requests arrive simultaneously, how does a server handle them all? The answer lies in understanding processes, threads, and concurrency patterns—the fundamental building blocks of backend execution.
Every backend application, whether it’s a simple Node.js server or a complex distributed system, must decide how to organize its execution. Should it use a single thread with an event loop? Multiple processes? A pool of worker threads? These aren’t just implementation details—they’re architectural decisions that profoundly impact performance, scalability, and reliability.
Processes vs. Threads: The Foundation
Think of a process as a separate office with its own staff and resources, running a program independently. Each process has its own memory space, keeping its data isolated from other processes. This isolation means that if one process crashes, others keep running. The operating system manages processes, giving each a unique identifier (PID) and scheduling them to use the CPU.
A thread, on the other hand, is like a worker within that office, sharing the same resources with other threads in the same process. Threads are lighter because they don’t need their own memory space, but this sharing can lead to conflicts if multiple threads try to change the same data at once.
Key Differences:
| Aspect | Process | Thread |
|---|---|---|
| Memory | Isolated memory space | Shares memory with parent process |
| Resource Usage | Heavier, requires more resources | Lighter, shares resources |
| Communication | Slower, uses inter-process communication | Faster, uses shared memory |
| Concurrency | Runs independently, uses multiple cores | Runs within a process, shares cores |
| Crash Impact | Isolated—one crash doesn’t affect others | Can crash entire process |
Real-World Examples:
-
Redis: Primarily uses a single-threaded event loop for client requests. Since version 6, it introduced threaded I/O for network operations, but core operations remain single-threaded. This design avoids synchronization overhead, making Redis incredibly fast for I/O-bound tasks.
-
Nginx: Uses a multi-process architecture with a master process managing multiple worker processes. Each worker handles client connections independently, scaling across CPU cores. The master process handles configuration and coordination.
-
Apache Envoy: Employs a multi-threaded model within a single process, with a main thread for coordination and worker threads for handling connections. Each worker thread manages its own connections, allowing parallel processing across CPU cores.
-
PostgreSQL and MySQL: Use a multi-process design, where each connection is handled by a separate process with shared memory for data access. SQL Server, in contrast, uses a multi-threaded design within a single process.
When to Use Threads
Using threads can feel like a double-edged sword. They promise to speed up your program, but they also introduce complexity and potential bugs. Many developers try to avoid threads unless absolutely needed. So when are threads truly worth it?
Three Key Scenarios:
1. I/O-Blocking Tasks
When your code waits for slow input/output operations—like disk reads or writes—that operation can block the thread. If this happens on the main thread, your whole program pauses until the I/O finishes.
Using a background thread solves this. For example, Node.js’s libuv library runs file I/O (such as writing logs) on worker threads so the main event loop isn’t blocked. This way, if a log write takes time, it only ties up the background thread while the main program continues.
// Node.js example: async file operations use thread pool
const fs = require('fs').promises;

// This doesn't block the event loop
await fs.writeFile('log.txt', 'Important log message');
2. CPU-Bound Tasks
A CPU-bound task requires heavy computation—like image processing or complex calculations. If such a task runs on the main thread, it starves the rest of the program: everything else waits until the computation finishes.
Offloading the heavy computation to another thread lets it run on a different CPU core. The main thread (or other threads) can continue running on the original core. This truly uses more CPU resources instead of keeping them idle.
3. Large Volume of Small Tasks
When you have many small, independent jobs—like a server handling hundreds of client connections—a single thread might not achieve high enough throughput. Using multiple threads (or a thread pool) lets several threads process connections in parallel, increasing overall throughput.
Operating systems often provide features like SO_REUSEPORT to allow multiple threads to listen on the same port without clashing, distributing incoming connections across them.
The Trade-offs:
- Advantages: True parallelism on multiple cores, better responsiveness, efficient resource usage
- Disadvantages: Race conditions, synchronization complexity, debugging difficulty, potential deadlocks
My personal rule is: measure first, then thread. Only add threads when the performance gain is clear and the added complexity is justified.
Threading Execution Patterns
Handling many client connections is a core challenge in server design. If a single thread must listen, accept, and read every request, it quickly becomes overloaded. To improve throughput, architectures split these duties across threads. Let’s compare three common patterns:
Pattern 1: Single-Thread Model (Node.js Style)
One thread does everything: listens on a port, accepts new connections, and reads data from clients. This is the single listener/acceptor/reader pattern.
// Simplified Node.js-style server
const server = net.createServer((socket) => {
  socket.on('data', (data) => {
    // Process request
    const response = handleRequest(data);
    socket.write(response);
  });
});

server.listen(3000);
Node.js uses a non-blocking event loop (via libuv and epoll) so one thread can juggle many clients. The thread waits for events from the OS: new connections or incoming data on any socket. Then it handles them one by one.
Advantages:
- Simple and easy to reason about
- No thread synchronization needed
- Good for I/O-bound tasks
Disadvantages:
- Becomes a bottleneck under heavy load
- CPU-intensive tasks block everything
- Can’t utilize multiple CPU cores (without running multiple processes)
Pattern 2: Multi-Reader Model (Memcached Style)
A single main thread listens and accepts connections, then immediately hands each new connection to one of several reader threads. Memcached uses this pattern.
# Multi-reader pattern (pseudo-code)
server_socket = socket()
server_socket.listen()

# Pre-spawn N reader threads (often equal to CPU cores)
workers = [Thread(target=handle_connections) for _ in range(num_cores)]
for t in workers:
    t.start()

while True:
    conn = server_socket.accept()
    # Assign the new connection to a worker (round-robin or queue)
    assign_to_worker(conn)
Each worker thread loops reading and processing requests on its assigned connections. This uses all CPU cores, but heavy connections can still skew work—if one thread’s connections demand more work while others are idle, load becomes imbalanced.
Advantages:
- Uses multiple cores effectively
- Main thread stays free to accept new connections
- Readers run in parallel
Disadvantages:
- Not perfectly balanced—uneven connection loads can cause imbalance
- More context switching overhead
- Requires careful connection distribution
Pattern 3: Load-Balanced Worker Pool (RAMCloud Style)
The main thread listens, accepts, and also reads the incoming request data. After parsing the request, it places a “work item” into a queue. A pool of worker threads then pulls tasks from this queue to execute.
# Worker-pool pattern (pseudo-code)
server_socket.listen()
work_queue = Queue()

# Worker threads process queued requests
for _ in range(num_workers):
    Thread(target=lambda: process_queue(work_queue)).start()

while True:
    conn = server_socket.accept()
    data = conn.read()
    request = parse_request(data)
    work_queue.put(request)  # Enqueue for a worker
This achieves true parallelism: the main thread does network I/O and parsing, while many workers focus solely on processing. Any idle worker picks up the next request from the queue, providing excellent load balancing.
Advantages:
- True load balancing—work distributed at fine granularity
- Separates I/O from processing
- Near-ideal multi-thread scaling
Disadvantages:
- More complex—needs thread-safe queue and synchronization
- Main thread can become bottleneck if parsing is slow
- Message-passing overhead between I/O thread and workers
Comparison Table:
| Pattern | Roles | load balancing | Example |
|---|---|---|---|
| Single-Thread | One thread: listen, accept, read | None (serial) | Node.js |
| Multi-Reader | 1 listener + N readers | Balances connections | Memcached |
| Worker Pool | 1 listener/reader + N workers | True queue-based | RAMCloud |
Multiple Threads on One Socket
Could we handle many connections by having several threads all wait on the same listening socket? Instead of using separate sockets, one process creates a listening socket and spawns many threads. Each thread calls accept() on this socket in a loop.
The big question is: how does the OS manage that, and is it efficient?
How It Works:
In this pattern, one listening socket is shared by many threads within the same process. Each thread blocks on accept(). When a client connects, the kernel wakes up one (or possibly more) threads to handle it. On modern Linux (>=3.9), the kernel typically wakes one thread per connection, avoiding the “thundering herd” problem where all threads wake and compete.
listen_fd = socket(...)
bind(listen_fd, port)
listen(listen_fd)

for i in 1..NUM_THREADS:
    thread_start {
        while (true) {
            client_fd = accept(listen_fd)
            // Handle the new connection
            process_request(client_fd)
            close(client_fd)
        }
    }
Advantages:
- No special socket options needed (unlike
SO_REUSEPORT) - Can utilize multiple cores for accepting
- Simple to implement in multithreaded servers
Disadvantages:
- Thundering herd: In older systems, all threads might wake for one connection, wasting CPU
- Load imbalance: If one thread is slow, others might idle while connections queue
- Single process limit: Can’t scale across processes
- Marginal benefit: Often similar to having one accept thread and worker threads
Modern kernels reduce the thundering herd problem, but adding more threads on one socket has limited benefit. I would probably prefer socket sharding (if available) or a single acceptor with worker threads.
Race Conditions and Synchronization
One major challenge with threads is race conditions, where multiple threads try to modify shared data simultaneously, leading to errors. For example, if two threads increment a counter at the same time, the result might be incorrect without proper coordination.
Example Race Condition:
let counter = 0;

// Two threads both increment
Thread1: temp = counter;  // reads 0
Thread2: temp = counter;  // reads 0
Thread1: counter = temp + 1;  // writes 1
Thread2: counter = temp + 1;  // writes 1
// Result: counter = 1 (should be 2!)
The Solution: Locks (Mutexes)
Locks ensure only one thread accesses critical data at a time:
let counter = 0;
const lock = new Mutex();

function increment() {
    lock.acquire();
    counter = counter + 1;
    lock.release();
}
However, locks can cause deadlocks if not managed carefully—where threads wait indefinitely for each other. This is why many developers prefer single-threaded designs or message-passing architectures that avoid shared mutable state.
Choosing the Right Model
The choice depends on whether your application is CPU-bound or I/O-bound:
-
I/O-bound tasks (web servers, API gateways): Benefit from asynchronous designs or multi-reader patterns. Single-threaded event loops (like Node.js) work well here.
-
CPU-bound tasks (image processing, data analysis): Need multiple processes or threads to use all CPU cores. Worker pool patterns excel here.
Configuration Best Practices:
To optimize performance, configure the number of processes or threads to match the number of CPU cores. Overloading the system with too many can lead to inefficiencies due to context switching and resource contention.
# Check CPU cores
nproc

# Configure workers to match cores
# Nginx example
worker_processes auto;  # Automatically matches CPU cores
Key Takeaways:
Understanding processes and threads is essential for designing efficient backend systems. Processes offer isolation and stability but use more resources, while threads are lightweight and fast but require careful management to avoid conflicts.
The three main architectures—single-threaded, multi-process, and multi-threaded—each suit different workloads. Redis’s single-threaded model is great for simplicity and I/O-bound tasks. Nginx’s multi-process design provides isolation and scalability. Envoy’s multi-threaded approach balances efficiency with parallelism.
Choosing the right model depends on your workload characteristics, and careful configuration (like matching threads to CPU cores) is key to avoiding performance issues. The trade-offs between simplicity and scalability are something to keep in mind as you design backend systems.
Part V: Connection Management & Socket Programming
7. Connection Management: TCP Connections, Pooling, and Port Management
Now that we understand communication patterns, let’s dive into one of the most critical aspects of backend engineering: managing connections. Every time a client communicates with your server—whether it’s a browser loading a webpage, a mobile app fetching data, or a microservice calling another service—a connection is established. How you manage these connections can make the difference between a responsive, scalable system and one that grinds to a halt under load.
Connection management is about more than just opening and closing sockets. It’s about understanding the lifecycle of TCP connections, knowing when to reuse them, recognizing the limits of your system, and implementing strategies that balance performance with resource constraints. Poor connection management can lead to port exhaustion, memory leaks, and cascading failures that bring down entire systems.
The Three Pillars of Connection Management:
Effective connection management rests on three fundamental concepts:
- TCP Connection Lifecycle: Understanding how connections are established, maintained, and terminated
- connection pooling: Reusing connections to avoid the overhead of creating new ones
- Port Management: Recognizing and working within the limits of ephemeral ports
Let’s explore each of these in depth, drawing on real-world examples and practical troubleshooting scenarios.
TCP Connections: The Four-Tuple and Connection Identity
Every TCP connection is uniquely identified by a four-tuple: (source IP, source port, destination IP, destination port). This simple concept has profound implications for how we build and scale backend systems.
When a client connects to a server, the server’s IP and port are fixed—for example, example.com:443 for HTTPS. The client’s IP is also typically fixed (its machine’s address). The only variable is the source port, which the operating system assigns from a range called the ephemeral port range.
On most Linux systems, this range is approximately 32768–60999, giving you about 28,000 available ports. This might seem like a lot, but as we’ll see, it’s surprisingly easy to exhaust them.
Example Connection:
# Client connection from ephemeral port 40001
192.168.1.10:40001 -> 10.0.0.5:443

# Another connection from the same client
192.168.1.10:40002 -> 10.0.0.5:443
Each connection consumes one ephemeral port. If your application creates a new connection for every request without reusing them, you’ll quickly run out of ports.
Checking Your Ephemeral Port Range:
You can check your system’s ephemeral port range with:
sysctl net.ipv4.ip_local_port_range
On many systems, you’ll see something like:
net.ipv4.ip_local_port_range = 32768 60999
While you can expand this range, the real solution to port exhaustion isn’t increasing the limit—it’s reusing connections efficiently.
The Real-World Cost of Poor Connection Management
Let me share a real debugging story that perfectly illustrates why connection management matters. A web server was handling incoming HTTP requests and forwarding them to a backend message broker. The code seemed straightforward: for each incoming request, open a connection to the broker, send the message, and move on.
Everything worked fine during testing. But in production, after handling thousands of requests, the server suddenly became unresponsive. New requests failed with cryptic errors like “Cannot assign requested address.” The server hadn’t crashed—it was still running—but it couldn’t accept new connections.
The Investigation:
Running netstat -an revealed the problem:
netstat -an | grep 5672 # 5672 is the broker's port
The output showed 10,000 to 20,000 established connections from the web server to the broker. This was shocking—the broker supported multiplexing, so normally only one or two connections should exist.
Each request had opened a new connection to the broker, and due to a custom “ping-pong” heartbeat mechanism at the application layer, these connections stayed alive indefinitely. The server had exhausted its ephemeral port range. With all ports consumed, it couldn’t create new outbound connections—not just to the broker, but to anything. Even other applications on the same machine broke because they couldn’t open connections.
The Fix:
The solution was simple but powerful: reuse connections. Instead of creating a new connection for each request, the code was modified to maintain a single persistent connection (or a small pool) to the broker. After this change, the server handled requests smoothly with just one connection, and the port exhaustion problem disappeared.
Key Lessons:
- Ephemeral ports are a finite resource: With about 28,000 available ports, it’s surprisingly easy to exhaust them
- Idle connections consume resources: Even if a connection isn’t actively transferring data, it still holds a port
- Connection reuse is essential: Creating new connections for every request is wasteful and dangerous
- Monitoring matters: Tools like
netstatcan reveal connection issues before they become critical
Client vs. Server Perspective:
It’s important to understand the asymmetry here. Many clients connecting to one server works fine because each client has a unique source IP, creating unique four-tuples. But one client making many connections to the same backend quickly runs out of ports because the only variable is the source port.
This is why connection pooling is so critical for backend services that make outbound connections—database clients, HTTP clients, message queue clients, and any service-to-service communication.
Connection Pooling: Reusing Connections Efficiently
connection pooling is the practice of maintaining a group of reusable connections rather than creating new ones for each request. It’s one of the most important optimizations in backend engineering, providing both performance benefits and resource efficiency.
Why connection pooling Matters:
Creating a new TCP connection is expensive. The three-way handshake requires at least one round trip (more with TLS), and TCP’s slow-start algorithm means new connections don’t immediately use full bandwidth. For database connections, there’s additional overhead: authentication, session initialization, and state setup.
By reusing connections, you avoid this overhead entirely. A connection that’s already established can immediately start transferring data, providing lower latency and higher throughput.
The Database Connection Problem:
Databases present a particularly interesting challenge for connection management. Consider a web application with multiple concurrent users, each making database queries. Can you use a single database connection for all users?
The answer is no, and understanding why reveals important insights about TCP and concurrency.
Problem 1: Concurrency and Blocking
If multiple clients share a single connection, they must take turns. While one client is executing a query, others must wait. It’s like having one checkout line at a busy store—everyone waits longer, and throughput suffers.
Problem 2: Response Matching
TCP is a bidirectional byte stream protocol, not a request-response system. When you send multiple queries over the same connection, how do you know which response belongs to which query?
Without explicit tagging or multiplexing at the application layer, you can’t. If User A sends a query, then User B sends a query before A’s response arrives, B might receive A’s response. This is catastrophic—imagine User B seeing User A’s private data.
Some modern protocols like HTTP/2 and gRPC solve this with stream multiplexing, but traditional database protocols don’t. Each connection can only handle one query at a time, and responses must be matched to requests by the order they were sent.
The Solution: connection pooling
connection pooling solves both problems:
- Concurrency: Each client gets its own connection from the pool, so they don’t block each other
- Response Matching: Each connection handles one query at a time, ensuring responses match requests
How connection pooling Works:
The pattern is straightforward:
- Initialization: Create a pool of N connections to the database (or other backend service)
- Acquisition: When a client needs to make a request, it acquires a connection from the pool
- Usage: The client uses the connection exclusively for its request
- Release: After receiving the response, the client returns the connection to the pool
- Reuse: The connection is now available for the next client
Practical Implementation:
Here’s a simple example using Node.js and PostgreSQL:
const { Pool } = require('pg');

// Create a connection pool
const pool = new Pool({
  host: 'localhost',
  port: 5432,
  database: 'myapp',
  user: 'dbuser',
  password: 'dbpass',
  max: 20,  // Maximum 20 connections in the pool
  idleTimeoutMillis: 30000,  // Close idle connections after 30 seconds
  connectionTimeoutMillis: 2000,  // Fail if can't get connection in 2 seconds
});

// Using a connection from the pool
async function getUserById(userId) {
  // Acquire a connection from the pool
  const client = await pool.connect();

  try {
    // Use the connection
    const result = await client.query('SELECT * FROM users WHERE id = $1', [userId]);
    return result.rows[0];
  } finally {
    // Always release the connection back to the pool
    client.release();
  }
}

// The pool handles connection reuse automatically
app.get('/user/:id', async (req, res) => {
  const user = await getUserById(req.params.id);
  res.json(user);
});
The pool manages the connections automatically. When you call pool.connect(), it either gives you an idle connection or creates a new one (up to the maximum). When you call client.release(), the connection goes back to the pool for reuse.
connection pool Sizing:
How many connections should your pool have? This is a critical tuning parameter that depends on several factors:
- Concurrency: How many concurrent requests do you expect?
- Query Duration: How long do queries typically take?
- Database Limits: How many connections can your database handle?
- Resource Constraints: Each connection consumes memory on both client and server
A common starting point is:
Pool Size = (Core Count × 2) + Effective Spindle Count
For modern SSDs, the spindle count is effectively 1. So for a 4-core machine:
Pool Size = (4 × 2) + 1 = 9
However, this is just a starting point. Monitor your application under load and adjust based on:
- Connection wait time: If clients frequently wait for connections, increase the pool size
- Database CPU usage: If the database is maxed out, more connections won’t help
- Memory usage: Each connection consumes memory; too many can cause swapping
connection pooling for HTTP Clients:
connection pooling isn’t just for databases. HTTP clients also benefit enormously from connection reuse, especially with HTTP/1.1’s Keep-Alive](#http-1-1) feature.
Here’s an example using Node.js’s built-in HTTP agent:
const http = require('http');

// Create an agent with connection pooling
const agent = new http.Agent({
  keepAlive: true,
  maxSockets: 50,  // Maximum 50 concurrent connections per host
  maxFreeSockets: 10,  // Keep up to 10 idle connections
  timeout: 60000,  // Socket timeout
  keepAliveMsecs: 1000  // Send keep-alive probes every second
});

// Use the agent for requests
function makeRequest(url) {
  return new Promise((resolve, reject) => {
    http.get(url, { agent }, (res) => {
      let data = '';
      res.on('data', chunk => data += chunk);
      res.on('end', () => resolve(data));
    }).on('error', reject);
  });
}

// Multiple requests reuse connections automatically
async function fetchMultiple() {
  const urls = [
    'http://api.example.com/users',
    'http://api.example.com/posts',
    'http://api.example.com/comments'
  ];

  const results = await Promise.all(urls.map(makeRequest));
  return results;
}
The agent maintains a pool of connections to each host. When you make a request, it reuses an existing connection if available, or creates a new one (up to maxSockets). After the request completes, the connection stays open (up to maxFreeSockets idle connections) for future requests.
Keep-Alive and Connection Reuse:
HTTP/1.1’s Keep-Alive header tells the server to keep the connection open after sending the response:
GET /api/users HTTP/1.1
Host: example.com
Connection: keep-alive
The server responds with:
HTTP/1.1 200 OK
Connection: keep-alive
Keep-Alive: timeout=5, max=100

[response body]
This tells the client the connection will stay open for 5 seconds or 100 requests, whichever comes first. The client can immediately send another request over the same connection without the overhead of a new TCP handshake.
connection pooling Best Practices:
- Always release connections: Use try-finally blocks to ensure connections return to the pool even if errors occur
- Set appropriate timeouts: Prevent connections from being held indefinitely
- Monitor pool metrics: Track pool size, wait times, and connection errors
- Handle connection failures: Implement retry logic and circuit breakers
- Close pools gracefully: When shutting down, close all connections properly
The Trade-offs:
connection pooling isn’t free:
- Complexity: Managing pools adds code complexity and potential bugs
- Resource usage: Idle connections consume memory and file descriptors
- Stale connections: Long-lived connections can become stale if the server closes them
- Connection leaks: Forgetting to release connections can exhaust the pool
However, these trade-offs are almost always worth it. The performance benefits and resource efficiency of connection pooling make it essential for any production backend system.
Troubleshooting Connection Issues
Understanding connection management helps you diagnose and fix real-world problems. Here are some common issues and how to troubleshoot them:
Problem: “Cannot assign requested address”
This error typically means you’ve exhausted your ephemeral ports. Check with:
# See all established connections
netstat -an | grep ESTABLISHED | wc -l

# See connections to a specific port
netstat -an | grep :5432 | grep ESTABLISHED
If you see thousands of connections to the same destination, you likely have a connection leak. The fix is to implement connection pooling or reuse.
Problem: “Too many open files”
Each connection is a file descriptor. Check your limits:
# Current limit
ulimit -n

# See current usage
lsof -p <pid> | wc -l
You can increase the limit, but if you’re hitting it, you probably have a connection leak that needs fixing.
Problem: Slow database queries
If queries are slow but the database isn’t under heavy load, check your connection pool:
// Add logging to your pool
pool.on('connect', () => {
  console.log('New connection created');
});

pool.on('acquire', () => {
  console.log('Connection acquired from pool');
});

pool.on('remove', () => {
  console.log('Connection removed from pool');
});
If you see many “New connection created” messages, your pool might be too small or connections are being closed prematurely.
Problem: Intermittent connection failures
This often indicates stale connections. Implement connection validation:
const pool = new Pool({
  // ... other config

  // Validate connections before use
  validate: async (client) => {
    try {
      await client.query('SELECT 1');
      return true;
    } catch (err) {
      return false;
    }
  }
});
Monitoring Connection Health:
Production systems should monitor connection metrics:
- Active connections: How many connections are currently in use?
- Idle connections: How many are waiting in the pool?
- Wait time: How long do clients wait to acquire a connection?
- Connection errors: How often do connections fail?
- Connection lifetime: How long do connections stay open?
These metrics help you tune pool sizes and identify issues before they become critical.
Connection Management in Distributed Systems
In microservices architectures, connection management becomes even more critical. Each service might maintain connection pools to multiple other services, databases, and message queues. The total number of connections across your system can grow exponentially.
The N×M Problem:
If you have N services, each with M instances, and each instance maintains a pool of P connections to every other service, you have:
Total Connections = N × M × (N-1) × P
For 10 services with 5 instances each, maintaining pools of 10 connections:
Total Connections = 10 × 5 × 9 × 10 = 4,500 connections
This is why service meshes and connection management strategies are so important at scale.
Strategies for Large-Scale Systems:
-
Service Mesh: Tools like Istio manage connections between services, implementing connection pooling, circuit breaking, and retry logic automatically
-
Connection Limits: Set maximum connections per service to prevent any single service from monopolizing resources
-
Graceful Degradation: When connection pools are exhausted, fail gracefully rather than cascading failures
-
Circuit Breakers: Stop attempting connections to failing services, allowing them to recover
-
load balancing: Distribute connections across multiple instances of backend services
Why Connection Management Matters
Connection management might seem like a low-level implementation detail, but it has profound impacts on your system’s behavior:
- Performance: Reusing connections eliminates handshake overhead, reducing latency by 50% or more
- Scalability: Efficient connection management allows you to handle more concurrent users with the same resources
- Reliability: Proper connection handling prevents port exhaustion and cascading failures
- Resource Efficiency: connection pooling reduces memory usage and file descriptor consumption
- Cost: Fewer connections mean lower infrastructure costs, especially for managed databases that charge per connection
The story of the web server running out of ephemeral ports illustrates this perfectly. A simple code change—reusing connections instead of creating new ones—transformed a failing system into a stable one. The difference between creating 20,000 connections and reusing one connection isn’t just quantitative; it’s qualitative. It’s the difference between a system that works and one that doesn’t.
The Takeaway:
Connection management is one of those topics that seems simple until you encounter problems in production. Understanding the four-tuple, ephemeral ports, connection pooling, and the lifecycle of TCP connections gives you the tools to build systems that scale gracefully and fail gracefully.
Every time you write code that opens a connection—whether to a database, an API, or another service—ask yourself: “Could I reuse this connection?” That simple question can save you from debugging nightmares and production outages.
As backend engineers, we’re responsible for the invisible infrastructure that makes applications work. Connection management is a perfect example of how small design decisions—like whether to reuse a connection—can have enormous impacts on system behavior. Master these fundamentals, and you’ll build systems that are not just functional, but robust, scalable, and efficient.
8. Socket Programming: The Foundation of Network Communication
Now that we understand connection management at a high level, let’s dive deeper into the actual mechanics of socket programming. Sockets are the fundamental building blocks of network communication—every HTTP request, database query, and API call ultimately goes through socket APIs. Understanding how sockets work at the system level gives you the power to debug connection issues, optimize performance, and build more efficient backend systems.
When you call a high-level function like fetch() in JavaScript or requests.get() in Python, you’re using abstractions built on top of socket APIs. But beneath those abstractions, the operating system is managing socket file descriptors, kernel buffers, and TCP state machines. As one lecturer put it: “You might say, I don’t do any of this stuff. Well, you don’t do it because the library does it for you.” Understanding what the library does for you makes you a better engineer.
8.1. Socket APIs: accept(), send(), and recv()
Socket programming revolves around a handful of system calls that manage the lifecycle of network connections. Let’s explore the core APIs and understand what happens at each step.
Creating and Binding a Socket:
The journey begins with creating a socket and binding it to an address:
// Create a socket
int server_socket = socket(AF_INET, SOCK_STREAM, 0);

// Bind to an address and port
struct sockaddr_in addr;
addr.sin_family = AF_INET;
addr.sin_addr.s_addr = INADDR_ANY;  // Listen on all interfaces
addr.sin_port = htons(8080);  // Port 8080

bind(server_socket, (struct sockaddr*)&addr, sizeof(addr));
The socket() call creates a file descriptor—a handle to a kernel object that represents the socket. The bind() call associates that socket with a specific IP address and port. At this point, the socket exists but isn’t yet listening for connections.
Listening for Connections:
To accept incoming connections, you must call listen():
listen(server_socket, 128); // Backlog of 128 connections
The backlog parameter (128 in this example) specifies the maximum length of the accept queue—the queue of fully-established connections waiting for your application to accept them. This is distinct from the SYN queue, which holds half-open connections during the TCP three-way handshake](#network-layer-protocols).
When a client initiates a connection, here’s what happens:
- Client sends SYN: The kernel receives the SYN packet and places the connection in the SYN queue
- Server sends SYN-ACK: The kernel responds automatically
- Client sends ACK: When the kernel receives the final ACK, it moves the connection from the SYN queue to the accept queue
- Application calls accept(): Your code retrieves a fully-established connection from the accept queue
This separation is crucial: the kernel handles the entire TCP handshake. Your application only sees connections that are already established. This is why accept() is typically fast—it’s just popping a connection off a queue, not waiting for network round trips.
Accepting Connections:
The accept() call retrieves a connection from the accept queue:
int client_socket = accept(server_socket, NULL, NULL);
This call blocks until a connection is available. When it returns, you get a new socket file descriptor representing the connection to the client. The original server_socket continues listening for new connections, while client_socket is used for communication with this specific client.
In Node.js, this looks different but the concept is the same:
const net = require('net');

const server = net.createServer((socket) => {
  // This callback is invoked for each accepted connection
  console.log(`Connection from ${socket.remoteAddress}:${socket.remotePort}`);

  // socket is the equivalent of client_socket in C
  socket.write('Hello from server\n');
});

server.listen(8080, '0.0.0.0');
Node.js’s event-driven model hides the accept() call, but it’s happening behind the scenes. The callback is invoked each time a connection is accepted from the queue.
Sending and Receiving Data:
Once you have a connected socket, you can send and receive data using send() and recv():
// Send data
char buffer[] = "Hello, client!";
send(client_socket, buffer, sizeof(buffer), 0);

// Receive data
char recv_buffer[1024];
int bytes_received = recv(client_socket, recv_buffer, sizeof(recv_buffer), 0);
These calls interact with kernel buffers. When you call send(), the data is copied from your application’s memory into the kernel’s send buffer. The kernel then handles packetizing the data into TCP segments, transmitting them, and waiting for acknowledgments. Similarly, when you call recv(), the kernel copies data from its receive buffer into your application’s memory.
The Buffer Dance:
Understanding kernel buffers is key to understanding socket performance. Each TCP socket has two buffers in kernel space:
- Send Buffer: Queues data your application has sent but the kernel hasn’t yet transmitted or received acknowledgment for
- Receive Buffer: Holds incoming data that the kernel has received but your application hasn’t yet read
When data arrives from the network, the NIC (Network Interface Card) passes it to the kernel. The kernel examines the TCP headers, finds the matching socket, and places the data in that socket’s receive buffer. The kernel then sends a TCP ACK back to the sender, advertising how much space remains in the receive buffer (the flow control window).
This flow control mechanism prevents the sender from overwhelming your application. If your application is slow to call recv(), the receive buffer fills up. The kernel advertises a smaller window, and the sender slows down or stops sending until you read some data and free up buffer space.
On the sending side, when you call send(), the kernel copies your data into the send buffer and returns immediately (in non-blocking mode) or waits until there’s buffer space (in blocking mode). The kernel then transmits the data as TCP segments, often waiting to accumulate enough data to fill a segment (thanks to Nagle’s algorithm, which we’ll discuss in the performance optimization section).
The Cost of Copying:
Every send() and recv() call involves copying data between user space (your application) and kernel space. These memory-to-memory copies consume CPU and memory bandwidth. For high-performance applications, this overhead can be significant.
Modern techniques like zero-copy I/O aim to reduce this overhead. For example, Linux’s sendfile() system call can transfer data directly from a file to a socket without copying it through user space. Similarly, io_uring (a newer Linux API) allows submitting I/O operations to a ring buffer, enabling true asynchronous I/O with minimal copying.
Synchronous vs. Asynchronous I/O:
A basic recv() call blocks if no data is available. To handle multiple connections efficiently, you need to avoid blocking. There are several approaches:
- Multiplexing: Use
select(),poll(), orepoll()(on Linux) to monitor multiple sockets and only callrecv()when data is ready - Non-blocking sockets: Set sockets to non-blocking mode so
recv()returns immediately with an error if no data is available - Asynchronous I/O: Use APIs like
io_uringthat allow submitting read requests and getting notified when data arrives
Most modern frameworks use multiplexing or asynchronous I/O under the hood. Node.js, for example, uses epoll on Linux to efficiently handle thousands of concurrent connections with a single thread.
8.2. Socket Sharding and SO_REUSEPORT
As backend systems scale, a single thread accepting connections can become a bottleneck. Even with efficient multiplexing, there’s a limit to how many connections one thread can accept per second. This is where socket sharding comes in.
Socket sharding allows multiple processes or threads to listen on the same port simultaneously, with the kernel distributing incoming connections among them. This is enabled by the SO_REUSEPORT socket option, introduced in Linux 3.9.
How Socket Sharding Works:
Normally, only one process can bind to a port at a time. If you try to bind a second socket to the same port, you get an “Address already in use” error. But with SO_REUSEPORT, multiple sockets can bind to the same port:
int sockfd = socket(AF_INET, SOCK_STREAM, 0);

// Enable SO_REUSEPORT
int opt = 1;
setsockopt(sockfd, SOL_SOCKET, SO_REUSEPORT, &opt, sizeof(opt));

// Bind to the same port as other processes
struct sockaddr_in addr;
addr.sin_family = AF_INET;
addr.sin_addr.s_addr = INADDR_ANY;
addr.sin_port = htons(8080);
bind(sockfd, (struct sockaddr*)&addr, sizeof(addr));

listen(sockfd, 128);
You can run this code in multiple processes or threads, and each will successfully bind to port 8080. The kernel maintains separate accept queues for each socket and distributes incoming connections among them, typically using a hash of the connection’s four-tuple (source IP, source port, destination IP, destination port).
The Benefits:
Socket sharding provides several advantages:
- Increased Throughput: Multiple threads can accept connections in parallel, utilizing multiple CPU cores
- Reduced Contention: Each thread has its own accept queue, eliminating lock contention on a shared queue
- Better Load Distribution: The kernel’s hash-based distribution ensures connections are spread evenly
High-performance servers like NGINX and Envoy use socket sharding by default. When you configure NGINX with multiple worker processes, each worker binds to the same ports using SO_REUSEPORT, allowing them to accept connections independently.
Example: Multi-Process Server with Socket Sharding:
Here’s a simple example in C:
#include <stdio.h>
#include <stdlib.h>
#include <unistd.h>
#include <sys/socket.h>
#include <netinet/in.h>

void worker_process(int worker_id) {
    int sockfd = socket(AF_INET, SOCK_STREAM, 0);

    // Enable SO_REUSEPORT
    int opt = 1;
    setsockopt(sockfd, SOL_SOCKET, SO_REUSEPORT, &opt, sizeof(opt));

    struct sockaddr_in addr = {0};
    addr.sin_family = AF_INET;
    addr.sin_addr.s_addr = INADDR_ANY;
    addr.sin_port = htons(8080);

    bind(sockfd, (struct sockaddr*)&addr, sizeof(addr));
    listen(sockfd, 128);

    printf("Worker %d listening on port 8080\n", worker_id);

    while (1) {
        int client = accept(sockfd, NULL, NULL);
        printf("Worker %d accepted connection\n", worker_id);

        char msg[] = "Hello from worker\n";
        send(client, msg, sizeof(msg), 0);
        close(client);
    }
}

int main() {
    // Fork multiple worker processes
    for (int i = 0; i < 4; i++) {
        if (fork() == 0) {
            worker_process(i);
            exit(0);
        }
    }

    // Parent waits for children
    while (wait(NULL) > 0);
    return 0;
}
This creates four worker processes, each listening on port 8080. The kernel distributes incoming connections among them automatically.
The Trade-offs:
Socket sharding isn’t without drawbacks:
- Limited Language Support: Not all programming languages expose
SO_REUSEPORT. It’s common in C, Rust, and Go, but harder to use in higher-level languages like Python or Node.js - Load Imbalance: The kernel’s hash-based distribution can lead to uneven load if connections have very different workloads
- Security Considerations: On some systems, any process can bind to a port with
SO_REUSEPORT, potentially hijacking connections. Modern kernels use a secret key to prevent this, but it adds complexity - Complexity: Managing multiple processes or threads adds operational complexity
When to Use Socket Sharding:
Socket sharding is most beneficial when:
- You’re building a high-performance server that needs to accept thousands of connections per second
- You have multiple CPU cores and want to utilize them for accepting connections
- You’re using a language or framework that supports
SO_REUSEPORT - You’re willing to manage the complexity of multiple processes or threads
For most applications, a single acceptor thread with worker threads for handling requests is sufficient. But for extreme performance requirements—like load balancers, proxies, or high-traffic web servers—socket sharding can provide significant benefits.
8.3. Alternative Pattern: Multiple Threads on One Socket
Before SO_REUSEPORT was widely available, another pattern was common: multiple threads calling accept() on the same listening socket. This pattern still works and is simpler in some ways, but it has different trade-offs.
How It Works:
Instead of each thread having its own socket, one socket is shared by all threads:
int listen_fd = socket(AF_INET, SOCK_STREAM, 0);
bind(listen_fd, ...);
listen(listen_fd, 128);

// Spawn multiple threads
for (int i = 0; i < 4; i++) {
    pthread_create(&threads[i], NULL, worker_thread, &listen_fd);
}

void* worker_thread(void* arg) {
    int listen_fd = *(int*)arg;

    while (1) {
        int client_fd = accept(listen_fd, NULL, NULL);
        // Handle the connection
        close(client_fd);
    }
}
All threads call accept() on the same listen_fd. When a connection arrives, the kernel wakes one thread (on modern kernels) to handle it. The other threads continue waiting.
The Thundering Herd Problem:
On older kernels, all threads would wake up when a connection arrived, but only one could successfully accept it. The others would fail and go back to sleep. This “thundering herd” problem wasted CPU cycles and caused contention.
Modern Linux kernels (3.9+) solve this by waking only one thread per connection. However, the pattern still has limitations compared to socket sharding:
- Single Accept Queue: All threads share one accept queue, which can become a bottleneck under high load
- Lock Contention: The kernel must lock the queue when threads call
accept(), causing contention - Limited Scalability: Performance gains plateau as you add more threads
When to Use This Pattern:
Multiple threads on one socket is simpler than socket sharding because it doesn’t require SO_REUSEPORT. It’s useful when:
- You’re on an older kernel or platform that doesn’t support
SO_REUSEPORT - You want simple multi-threaded accepting without managing multiple sockets
- Your load isn’t high enough to justify the complexity of socket sharding
However, for high-performance servers, socket sharding with SO_REUSEPORT is generally preferred.
The Takeaway:
Socket programming is the foundation of all network communication. Understanding the APIs—socket(), bind(), listen(), accept(), send(), and recv()—and how they interact with kernel buffers gives you the tools to build efficient, scalable backend systems.
Socket sharding with SO_REUSEPORT is a powerful technique for scaling accept performance across multiple cores. While it adds complexity, it’s essential for high-performance servers that need to handle thousands of connections per second.
As backend engineers, we often work at higher levels of abstraction, using frameworks that hide these details. But when you encounter performance issues, connection problems, or need to optimize for extreme scale, understanding socket programming at this level becomes invaluable. The next time you see a “connection refused” error or wonder why your server can’t handle more connections, you’ll know where to look and what questions to ask.
Part VI: Load Balancing & Proxying
9. Load Balancing Strategies
When your application grows beyond a single server, you face a fundamental challenge: how do you distribute incoming traffic across multiple backend servers? This is where load balancing comes in. I remember the first time I had to scale an application beyond one server—suddenly I needed to understand not just how to run the application, but how to intelligently route traffic to multiple instances.
load balancing is more than just “spreading the load.” It’s about ensuring high availability, maximizing throughput, and providing a seamless experience even when individual servers fail. Modern applications often face thousands or millions of requests, and a well-designed load balancing strategy is what makes this scale possible.
9.1. Layer 4 vs Layer 7 Load Balancers
The distinction between Layer 4 and Layer 7 load balancers is one of the most important concepts in backend networking. These numbers refer to layers in the OSI model: Layer 4 is the Transport layer (TCP/UDP), while Layer 7 is the Application layer (HTTP/HTTPS). The layer at which your load balancer operates fundamentally changes what it can see and what it can do.
Layer 4 load balancers: Fast and Simple
A Layer 4 load balancer works at the transport layer. It makes routing decisions based purely on network information: IP addresses and TCP/UDP port numbers. It doesn’t look inside the packets to see what application data they contain—it just forwards them.
When a client connects to a Layer 4 load balancer, the load balancer selects a backend server (using algorithms like round-robin or least connections) and forwards all packets from that TCP connection to the chosen server. The key insight is that it maintains connection-level state: once it picks a server for a connection, all segments on that connection go to the same server.
Here’s a simple HAProxy configuration for Layer 4 load balancing:
defaults
    mode tcp

frontend ft
    bind *:80
    default_backend servers

backend servers
    server s1 192.168.0.10:80
    server s2 192.168.0.11:80
This configuration uses mode tcp, which tells HAProxy to operate at Layer 4. It will distribute incoming connections to the two backend servers in round-robin fashion, but it won’t inspect the HTTP content.
The advantages of Layer 4 load balancing are compelling:
- High Performance: It’s incredibly fast because it does minimal processing. No decryption, no parsing—just forwarding packets
- Protocol Agnostic: It works with any TCP or UDP service—databases, video streams, DNS, or custom protocols
- Simple Configuration: Less complexity means fewer potential bugs and easier troubleshooting
- Scalability: Can handle millions of connections with low overhead
But Layer 4 has limitations:
- No Content Awareness: It cannot route based on URLs, HTTP headers, or cookies. All traffic on a port goes through the same logic
- No Application Features: Cannot terminate SSL, compress responses, or cache content
- Limited Session Control: Only has connection-level state, making HTTP session affinity harder to implement
Layer 7 load balancers: Intelligent and Feature-Rich
A Layer 7 load balancer operates at the application layer. It understands HTTP (or other application protocols) and can inspect the content of requests. This means it can make routing decisions based on URLs, headers, cookies, or even the request body.
When a client makes an HTTP request to a Layer 7 load balancer, the load balancer terminates the client’s connection—it acts as the server from the client’s perspective. It then parses the HTTP request, makes a routing decision, and opens a new connection to the chosen backend server. This is fundamentally different from Layer 4, where the load balancer just forwards packets.
Here’s an equivalent HAProxy configuration for Layer 7:
defaults
    mode http

frontend ft
    bind *:80
    default_backend webservers

backend webservers
    server web1 192.168.0.10:80
    server web2 192.168.0.11:80
Using mode http enables Layer 7 features. Now HAProxy can inspect HTTP headers, implement sticky sessions with cookies, and route based on URL paths.
Layer 7 load balancers offer powerful capabilities:
- Content-Based Routing: Route
/api/usersto one backend and/api/ordersto another. Route based on hostname, query parameters, or any HTTP header - SSL/TLS Termination: Decrypt HTTPS traffic at the load balancer, offloading this expensive operation from backend servers
- Session Affinity: Implement sticky sessions using cookies or HTTP headers, ensuring requests from the same user go to the same server
- Advanced Features: Compression, caching, header rewriting, and request/response modification
- Security: Integrate web application firewalls (WAFs) to inspect and block malicious requests
But this power comes at a cost:
- Performance Overhead: Parsing HTTP and decrypting SSL adds latency and requires more CPU
- Complexity: More features mean more configuration and more potential for misconfiguration
- Protocol Limitations: Primarily designed for HTTP/HTTPS. Other protocols require falling back to Layer 4 mode
- State Management: Holding HTTP session state makes failures more impactful
NGINX Configuration Examples
NGINX can operate at both layers. For Layer 4 (TCP) load balancing, you use the stream module:
stream {
    upstream backends {
        server 10.0.0.1:80;
        server 10.0.0.2:80;
    }

    server {
        listen 80;
        proxy_pass backends;
    }
}
This forwards TCP connections directly without inspecting HTTP content.
For Layer 7 (HTTP) load balancing, you use the http module:
http {
    upstream apps {
        server 10.0.0.1:80;
        server 10.0.0.2:80;
    }

    server {
        listen 80;
        location / {
            proxy_pass http://apps;
        }
    }
}
In the http context, NGINX can inspect requests and apply routing rules based on paths, headers, or other HTTP attributes.
Choosing Between Layer 4 and Layer 7
The choice depends on your requirements:
Choose Layer 4 when:
- Performance and simplicity are paramount
- You’re load balancing non-HTTP services (databases, message queues, custom protocols)
- You don’t need content-aware routing
- You want to minimize latency and resource usage
Choose Layer 7 when:
- You need URL-based or header-based routing
- You want SSL termination to offload encryption from backends
- You need sticky sessions or advanced session management
- You want to integrate security features like WAFs
- You’re building a web application with complex routing requirements
In practice, many systems use both. You might have Layer 4 load balancers at the edge for initial traffic distribution, then Layer 7 load balancers (or API gateways) for intelligent routing within your application tier.
9.2. Proxies and Reverse Proxies
Before diving deeper into load balancing, we need to understand proxies and reverse proxies. These terms are often confused, but the distinction is crucial: it’s all about which side the proxy serves.
Forward proxies: Client-Side Intermediaries
A forward proxy (or just “proxy”) is a server that makes requests on behalf of clients. When you configure your browser to use a proxy, all your requests first go to the proxy server. The proxy then connects to the destination server for you.
The key characteristic: the client knows the final destination, but the destination server only sees the proxy’s IP address. The proxy “speaks” to the server on behalf of the client.
Client (you) --HTTP--> [Forward Proxy] --HTTP--> Server/Internet
Forward proxies are commonly used for:
- Anonymity: Hiding your IP address from destination servers
- Content Filtering: Corporate networks use proxies to block certain websites
- Caching: proxies can cache common resources, serving them instantly to many users
- Monitoring: Logging and inspecting all outbound traffic
Tools like Fiddler act as local forward proxies for debugging. They intercept your HTTP(S) requests, let you inspect them, and then forward them to the destination. This is incredibly useful for debugging APIs or understanding how web applications communicate.
Reverse proxies: Server-Side Intermediaries
A reverse proxy sits on the server side. It receives incoming client requests as if it were the real server, then forwards them to one or more backend servers. Clients think the reverse proxy is the final destination—they don’t know about the real backend servers.
The key characteristic: the client doesn’t know the true backend servers, only the proxy’s address. The proxy receives requests on behalf of the servers.
Client --HTTP--> [Reverse Proxy] --HTTP--> Backend Server (hidden)
Every load balancer is a reverse proxy, but not every reverse proxy is a load balancer. A reverse proxy might forward to just one backend server, while a load balancer distributes across multiple servers.
Reverse proxies are used for:
- load balancing: Distributing traffic across multiple backend servers
- SSL Termination: Handling encryption so backend servers don’t have to
- Caching: Storing responses to serve them faster
- Security: Acting as a firewall, filtering malicious requests before they reach backends
- Compression: Compressing responses to reduce bandwidth
- Content Routing: Directing different URL paths to different backend services
A Simple NGINX Reverse proxy
Here’s a basic NGINX configuration that acts as a reverse proxy:
server {
    listen 80;
    server_name example.com;

    location / {
        proxy_pass http://backend_servers;
    }
}
The proxy_pass directive makes NGINX a reverse proxy. Clients connect to example.com, but NGINX forwards requests to backend_servers.
The Visibility Difference
The distinction between forward and reverse proxies is about visibility:
- Forward proxy: Client knows the destination server. Server sees only the proxy’s IP (unless headers like
X-Forwarded-Forare added) - Reverse proxy: Client knows only the proxy. Backend servers see the proxy’s IP (unless the proxy passes client information in headers)
This visibility difference has security implications. Forward proxies can hide client identities, while reverse proxies hide server infrastructure from the internet.
Real-World Examples
- CDNs like Cloudflare and Fastly are globally distributed reverse proxies that cache content near users
- API Gateways are reverse proxies that route requests to different microservices based on URL paths
- Service Meshes use sidecar proxies (like Envoy) next to each service for observability and traffic management
- Corporate proxies are forward proxies that enforce policies and log employee web traffic
Understanding proxies and reverse proxies is fundamental to modern backend architecture. Whether you’re debugging with Fiddler, configuring NGINX, or designing a microservices architecture, these concepts appear everywhere.
9.3. Proxying and Caching Strategies
Now that we understand the difference between forward and reverse proxies, let’s dive deeper into how proxies work in practice and explore the caching strategies that make them so powerful. proxies aren’t just about routing traffic—they’re about optimizing it, securing it, and making systems more resilient.
Forward proxy Use Cases
Forward proxies serve the client side, and they’re more common than you might think. Every time you use a VPN, browse through a corporate network, or use a debugging tool like Fiddler, you’re using a forward proxy.
The primary use cases for forward proxies include:
1. Privacy and Anonymity: Forward proxies hide your IP address from destination servers. When you connect through a proxy, the server sees the proxy’s IP, not yours. This is the foundation of anonymity services and VPNs. The proxy “speaks” to the internet on your behalf, masking your identity.
2. Content Filtering and Access Control: Corporate networks often route all web traffic through a forward proxy that enforces policies. The proxy can block certain websites, restrict file downloads, or prevent access to social media during work hours. This centralized control point makes it easy to enforce organizational policies.
3. Caching for Bandwidth Savings: A forward proxy can cache frequently accessed resources. If 100 employees all visit the same news site, the proxy fetches it once and serves it from cache to everyone else. This dramatically reduces bandwidth usage and speeds up browsing. The proxy becomes a shared cache for all clients behind it.
4. Traffic Monitoring and Logging: Forward proxies see all outbound traffic, making them perfect for monitoring and logging. Organizations use this for security auditing, compliance, and troubleshooting. Every request passes through the proxy, creating a complete audit trail.
5. Debugging and Development: Tools like Fiddler and mitmproxy act as local forward proxies on your development machine. They intercept HTTP(S) traffic between your browser or app and the internet, letting you inspect requests and responses. This is invaluable for debugging APIs, understanding how web applications work, or testing how your app handles different responses.
To use Fiddler, you configure your browser to use localhost:8888 as a proxy. Fiddler then intercepts all traffic, displays it in a UI, and forwards it to the destination. For HTTPS, Fiddler installs a root certificate so it can decrypt and re-encrypt traffic (acting as a man-in-the-middle, but one you control).
The Trade-offs of Forward proxies
Forward proxies add a hop in the network path, which can increase latency. They’re also a single point of failure—if the proxy goes down, clients lose internet access. For HTTPS traffic, the proxy must decrypt and re-encrypt, which requires trusting the proxy with your encrypted data. This is fine for corporate proxies or debugging tools you control, but it’s a security concern if you don’t trust the proxy operator.
Reverse proxy Use Cases
Reverse proxies serve the server side, and they’re the backbone of modern web infrastructure. Every major website uses reverse proxies for load balancing, caching, and security.
1. load balancing: As we discussed in the Layer 4 vs Layer 7 section, reverse proxies distribute incoming traffic across multiple backend servers. This improves availability (if one server fails, others handle the load) and scalability (add more servers to handle more traffic).
2. SSL/TLS Termination: Decrypting HTTPS traffic is computationally expensive. Reverse proxies can terminate SSL at the edge, handling all the encryption/decryption, and then communicate with backend servers over unencrypted HTTP (within a secure internal network). This offloads the CPU-intensive work from application servers, letting them focus on business logic.
3. Caching and Content Delivery: reverse proxies can cache responses from backend servers. If 1000 users request the same homepage, the proxy fetches it once from the backend and serves it from cache to the other 999 users. This dramatically reduces backend load and improves response times. CDNs like Cloudflare and Fastly are essentially globally distributed reverse proxy caches.
4. Security and Firewall: Reverse proxies act as a security barrier between the internet and your backend servers. They can filter malicious requests, block SQL injection attempts, rate-limit abusive clients, and hide internal server details. Many reverse proxies integrate Web Application Firewalls (WAFs) that inspect traffic for known attack patterns.
5. Compression and Optimization: Reverse proxies can compress responses (gzip, brotli) before sending them to clients, reducing bandwidth and improving load times. They can also optimize images, minify JavaScript/CSS, and apply other performance enhancements without changing backend code.
6. API Gateway and Content Routing: Modern microservices architectures use reverse proxies as API gateways. Different URL paths route to different services: /api/users goes to the user service, /api/orders to the order service, and so on. The reverse proxy becomes the single entry point for all client requests, hiding the complexity of the backend architecture.
Caching Strategies
Caching is one of the most powerful features of proxies, but it requires careful strategy. Not all content should be cached, and cache invalidation is notoriously difficult.
Cache-Control Headers: HTTP provides Cache-Control headers that tell proxies (and browsers) how to cache responses:
Cache-Control: public, max-age=3600
This tells proxies they can cache the response for 3600 seconds (1 hour) and serve it to any user (public). Other directives include:
private: Only the client’s browser can cache, not shared proxiesno-cache: Must revalidate with the server before using cached contentno-store: Don’t cache at all (for sensitive data)s-maxage: Cache lifetime specifically for shared proxies (CDNs)
Cache Invalidation: The hardest problem in caching is knowing when cached content is stale. Common strategies include:
- Time-based expiration: Cache for a fixed duration (e.g., 1 hour), then fetch fresh content
- Versioned URLs: Include a version or hash in URLs (
/style.v123.css). When content changes, the URL changes, automatically invalidating old caches - Purge APIs: Manually tell the proxy to invalidate specific cached items when content updates
- Conditional requests: Use
ETagorLast-Modifiedheaders to let proxies check if cached content is still valid
Example: NGINX Caching Configuration
Here’s how you might configure NGINX to cache responses from a backend:
proxy_cache_path /var/cache/nginx levels=1:2 keys_zone=my_cache:10m max_size=1g inactive=60m;

server {
    listen 80;

    location / {
        proxy_pass http://backend;
        proxy_cache my_cache;
        proxy_cache_valid 200 60m;  # Cache successful responses for 60 minutes
        proxy_cache_valid 404 10m;  # Cache 404s for 10 minutes
        add_header X-Cache-Status $upstream_cache_status;  # Show cache hit/miss
    }
}
This configuration creates a cache zone (my_cache) and caches successful responses for 60 minutes. The X-Cache-Status header tells clients whether the response came from cache (HIT) or the backend (MISS).
9.4. WebSocket Proxying Challenges
WebSockets present unique challenges for proxies because they’re long-lived, bidirectional connections that start as HTTP but then “upgrade” to a different protocol. Understanding how proxies handle WebSockets is crucial for building real-time applications.
The WebSocket Handshake
WebSockets begin with an HTTP request that includes an Upgrade header:
GET /chat HTTP/1.1
Host: example.com
Upgrade: websocket
Connection: Upgrade
Sec-WebSocket-Key: dGhlIHNhbXBsZSBub25jZQ==
Sec-WebSocket-Version: 13
If the server supports WebSockets, it responds with:
HTTP/1.1 101 Switching Protocols
Upgrade: websocket
Connection: Upgrade
Sec-WebSocket-Accept: s3pPLMBiTxaQ9kYGzzhZRbK+xOo=
After this handshake, the connection switches from HTTP to the WebSocket protocol. The same TCP connection is now used for bidirectional, frame-based communication.
Layer 4 vs Layer 7 WebSocket Proxying
The layer at which your proxy operates dramatically affects how it handles WebSockets:
Layer 4 (TCP) Proxying: At Layer 4, the proxy doesn’t understand HTTP or WebSockets—it just forwards TCP packets. This creates a transparent tunnel: the WebSocket handshake and all subsequent frames pass through unchanged. The proxy sees only IP addresses and ports.
stream {
    server {
        listen 8080;
        proxy_pass websocket_backend:8080;
    }
}
This NGINX stream configuration creates a Layer 4 tunnel. Any connection to port 8080 is forwarded to the backend, regardless of protocol. The proxy doesn’t inspect the WebSocket handshake or frames.
Advantages of Layer 4 WebSocket Proxying:
- Simple and fast: No protocol parsing, just forwarding bytes
- End-to-end encryption: If clients use WSS (WebSocket Secure), the TLS tunnel passes through the proxy unchanged. The proxy never decrypts the traffic
- Protocol agnostic: Works with any TCP-based protocol, not just WebSockets
Disadvantages:
- No routing flexibility: Cannot route based on URL paths or headers. All traffic on a port goes to the same backend
- No connection reuse: Each WebSocket requires a separate TCP connection to the backend
- No inspection: Cannot log, monitor, or modify WebSocket messages
Layer 7 (HTTP) Proxying: At Layer 7, the proxy understands HTTP and can participate in the WebSocket handshake. It reads the Upgrade header, forwards it to the backend, and then switches to tunneling WebSocket frames.
location /chat {
    proxy_pass http://backend;
    proxy_http_version 1.1;
    proxy_set_header Upgrade $http_upgrade;
    proxy_set_header Connection "Upgrade";
}
The key lines are proxy_set_header Upgrade $http_upgrade and proxy_set_header Connection "Upgrade". These tell NGINX to forward the WebSocket upgrade headers to the backend.
Advantages of Layer 7 WebSocket Proxying:
- Routing flexibility: Can route
/chatto one backend and/streamto another based on URL paths - SSL termination: The proxy can decrypt WSS connections, inspect them, and re-encrypt to the backend
- Advanced features: Can add authentication, rate limiting, or logging at the proxy level
Disadvantages:
- More complex: Requires proper configuration to handle the upgrade handshake
- TLS overhead: If terminating SSL, the proxy must decrypt and re-encrypt, adding latency
- Resource intensive: Maintaining WebSocket state for thousands of connections consumes memory
Common WebSocket Proxying Pitfalls
- Timeout Issues: WebSocket connections can stay open for hours or days. proxies often have idle timeouts that close connections after a period of inactivity. You need to configure longer timeouts or implement heartbeat/ping-pong messages to keep connections alive.
location /chat {
    proxy_pass http://backend;
    proxy_http_version 1.1;
    proxy_set_header Upgrade $http_upgrade;
    proxy_set_header Connection "Upgrade";
    proxy_read_timeout 86400s;  # 24 hours
    proxy_send_timeout 86400s;
}
-
Missing Upgrade Headers: If the proxy doesn’t forward the
UpgradeandConnectionheaders, the WebSocket handshake fails. The backend receives a regular HTTP request instead of a WebSocket upgrade request. -
HTTP/1.0 proxies: WebSockets require HTTP/1.1. If your proxy uses HTTP/1.0 to communicate with backends, WebSockets won’t work. Always set
proxy_http_version 1.1. -
load balancing Challenges: WebSocket connections are long-lived, which can lead to uneven load distribution. If you use round-robin load balancing, the first few backend servers might accumulate all the connections while later servers sit idle. Consider using least-connections load balancing for WebSocket traffic.
Practical Example: HAProxy WebSocket Configuration
HAProxy can handle WebSocket proxying at Layer 7:
frontend http_front
    bind *:80
    default_backend websocket_back

backend websocket_back
    option http-server-close
    option forwardfor
    server ws1 192.168.1.10:8080 check
    server ws2 192.168.1.11:8080 check
HAProxy automatically detects the WebSocket upgrade and switches to tunnel mode after the handshake completes.
When to Use Each Approach
Choose Layer 4 for WebSocket proxying when:
- You need maximum performance and simplicity
- You don’t need URL-based routing
- You want end-to-end encryption without proxy decryption
- You’re proxying other TCP protocols alongside WebSockets
Choose Layer 7 for WebSocket proxying when:
- You need to route different WebSocket endpoints to different backends
- You want SSL termination at the proxy
- You need to inspect, log, or modify WebSocket traffic
- You’re building a complex microservices architecture with path-based routing
The Bigger Picture
Proxying and caching are fundamental to modern web architecture. Every major website uses reverse proxies for load balancing, caching, and security. CDNs are essentially globally distributed reverse proxy caches that bring content closer to users. API gateways are reverse proxies that route requests to microservices.
Understanding how proxies work—both forward and reverse, at both Layer 4 and Layer 7—gives you the tools to build scalable, performant, and secure systems. Whether you’re configuring NGINX, debugging with Fiddler, or designing a microservices architecture, these concepts are essential.
The key insight is that proxies are more than just middlemen—they’re powerful tools for optimization, security, and architecture. A well-configured proxy can transform a slow, fragile system into a fast, resilient one. And understanding the trade-offs between different proxying approaches lets you choose the right tool for each situation.
Part VII: Performance & Optimization
10. Performance Optimization Techniques
Performance optimization in backend systems often comes down to understanding the subtle behaviors of protocols and operating systems. I’ve spent countless hours debugging mysterious delays and performance issues, only to discover they were caused by well-intentioned optimizations that backfired in modern contexts. One of the most common culprits? An algorithm designed in the 1980s that’s still enabled by default in most TCP implementations.
10.1. Nagle’s Algorithm and TCP Optimization
I once faced a puzzling problem: my client application was working correctly, but responses from the server were randomly delayed by 40-200 milliseconds. The network was fine, the server wasn’t overloaded, so what was causing these unpredictable delays? The answer turned out to be Nagle’s Algorithm—a TCP optimization that, while well-intentioned, often causes more problems than it solves in modern applications.
What is Nagle’s Algorithm?
Nagle’s Algorithm is an old TCP feature designed to save bandwidth in the early days of the Internet, specifically during the Telnet era. Back then, every TCP packet carried about a 40-byte header (20 bytes for IP + 20 bytes for TCP). If you were typing in a Telnet session and each keystroke was sent immediately, you’d be sending a 1-byte payload with a 40-byte header—a 4000% overhead! That’s incredibly wasteful.
Nagle’s Algorithm was created to solve this problem by waiting until the outgoing data buffer can fill a full packet before actually sending it. The Maximum Segment Size (MSS) is typically 1460 bytes on Ethernet networks. So instead of sending many tiny packets, Nagle’s Algorithm holds back small writes until they can fill a packet, or until all previously sent data has been acknowledged.
As one instructor put it: “Combine the small segments and send them into one segment, fill the segment and then send it”.
How Nagle’s Algorithm Works
The algorithm follows a simple rule:
- If there’s no unacknowledged data in flight, send the data immediately (even if it’s small)
- If there IS unacknowledged data in flight, buffer small writes until:
- You have enough data to fill a full MSS packet, OR
- You receive an ACK for the previously sent data
This means that after sending data, subsequent small writes will be delayed by at least one round-trip time (RTT) while waiting for the ACK.
The Problem with Nagle’s Algorithm
While Nagle’s Algorithm reduces bandwidth waste, it introduces unpredictable latency. Let me show you with concrete examples:
Example 1: Small Writes
Suppose your MSS is 1460 bytes and your application writes 500 bytes. Nagle’s Algorithm won’t send it immediately because 500 < 1460. If your application then writes another 960 bytes, the two chunks add up to 1460 bytes, and one full packet is sent. But during this buffering time, your application (and the client waiting for a response) experiences delay.
Example 2: Large Writes with a Remainder
If you send 5000 bytes at once with an MSS of 1460:
- First packet: 1460 bytes (sent immediately)
- Second packet: 1460 bytes (sent immediately)
- Third packet: 1460 bytes (sent immediately)
- Fourth packet: 620 bytes (WAITS for ACK before sending!)
That final 620-byte packet will be delayed by roughly one round-trip time. If your RTT is 50ms, that’s a 50ms delay before the client receives the complete response.
The TLS Handshake Problem
Nagle’s Algorithm is particularly problematic during TLS handshakes. TLS involves multiple round-trips of small messages (ClientHello, ServerHello, certificates, etc.). If Nagle’s Algorithm is enabled, each small message might wait for an ACK before being sent, effectively doubling the handshake time.
In 2016, the author of curl discovered that slow TLS handshakes were caused by Nagle’s Algorithm buffering the handshake messages. After investigating, he reported: “We now enable TCP_NODELAY by default” in curl. This change eliminated the mysterious delays.
Disabling Nagle’s Algorithm with TCP_NODELAY
To avoid these delays, you can disable Nagle’s Algorithm by setting the TCP_NODELAY socket option. This tells TCP to send segments immediately without waiting to fill packets:
int sockfd = socket(AF_INET, SOCK_STREAM, 0);

// Disable Nagle's Algorithm
int flag = 1;
setsockopt(sockfd, IPPROTO_TCP, TCP_NODELAY, &flag, sizeof(flag));
In Node.js:
const net = require('net');
const socket = new net.Socket();

socket.setNoDelay(true);  // Disable Nagle's Algorithm
Most modern libraries and frameworks disable Nagle’s Algorithm by default because the latency cost outweighs the bandwidth savings in modern networks. NGINX, HAProxy, Node.js, and most HTTP clients all set TCP_NODELAY by default.
When to Keep Nagle’s Algorithm Enabled
There are rare cases where Nagle’s Algorithm is beneficial:
- Extremely bandwidth-constrained networks: If you’re on a satellite link or dial-up connection where every byte counts
- Bulk data transfer: If you’re streaming large amounts of data and latency doesn’t matter
- Legacy protocols: Some old protocols were designed with Nagle’s Algorithm in mind
But for most modern web applications, APIs, and real-time systems, you want TCP_NODELAY enabled.
The Latency vs. Throughput Tradeoff
Nagle’s Algorithm represents a fundamental tradeoff in networking: latency vs. throughput. By batching small writes into larger packets, Nagle’s improves throughput (more efficient use of bandwidth) but increases latency (delays in sending data).
In the 1980s, bandwidth was expensive and latency was tolerable. Today, bandwidth is cheap and latency is critical. Users expect sub-second response times. A 100ms delay caused by Nagle’s Algorithm is unacceptable for modern web applications.
This tradeoff appears throughout backend engineering:
- Batching database queries improves throughput but increases latency for individual queries
- connection pooling improves throughput but adds latency for connection acquisition
- Caching improves throughput but can serve stale data (latency in freshness)
Understanding these tradeoffs helps you make informed decisions about when to optimize for latency vs. throughput.
Practical Optimization Guidelines
Based on my experience debugging performance issues, here are practical guidelines:
-
Always disable Nagle’s Algorithm for request-response protocols (HTTP, gRPC, database queries). The latency cost is too high.
-
Consider keeping Nagle’s enabled for streaming protocols where you’re sending continuous data and latency spikes are acceptable.
-
Monitor your TCP settings. Many performance issues come from default settings that made sense in 1984 but don’t make sense today.
-
Test with realistic network conditions. Nagle’s Algorithm might not cause issues on localhost (RTT < 1ms) but will cause significant delays over the internet (RTT 50-200ms).
-
Use tools like
tcpdumpor Wireshark to observe actual packet timing. Sometimes the only way to understand a performance issue is to watch the packets on the wire.
The Bigger Picture
Nagle’s Algorithm is a perfect example of how well-intentioned optimizations can become performance problems as technology evolves. It was brilliant in 1984 when bandwidth was scarce. But in 2025, with gigabit connections and users expecting instant responses, it’s usually a hindrance.
This pattern repeats throughout backend engineering: optimizations that made sense in one era become bottlenecks in another. The key is understanding the tradeoffs, measuring actual performance, and being willing to disable “optimizations” that no longer serve your use case.
As one developer summarized after wrestling with slow handshakes: “We now enable TCP_NODELAY by default”. In practice, most backends and client libraries have made the same choice, valuing quick responses over tiny bandwidth savings. When you’re building modern backend systems, you should probably do the same.
10.3. Linux Networking Internals
Understanding how the Linux kernel manages TCP connections is crucial for building high-performance backend systems. When I first learned about SYN and accept queues, I had an “aha!” moment—suddenly, mysterious connection issues and performance bottlenecks made sense. Let’s dive into the kernel-level mechanics that power every TCP server.
The Two-Queue System
When you call listen() on a socket, the Linux kernel doesn’t just passively wait for connections. It sets up a sophisticated two-queue system to manage the TCP three-way handshake](#network-layer-protocols):
- SYN Queue: Holds half-open connections during the handshake (connections in the SYN-RECEIVED state)
- Accept Queue: Holds fully-established connections waiting for your application to accept them
This separation is elegant: the kernel handles the entire TCP handshake automatically, and your application only sees connections that are already established. This is why accept() is typically fast—it’s just popping a connection off a queue, not waiting for network round trips.
How the Queues Work
Let’s walk through what happens when a client connects to your server:
-
Client sends SYN: The kernel receives the SYN packet and places the connection in the SYN queue. It immediately responds with SYN-ACK without involving your application.
-
Server sends SYN-ACK: The kernel’s TCP stack handles this automatically. Your application code hasn’t even been notified yet.
-
Client sends ACK: When the kernel receives the final ACK, it moves the connection from the SYN queue to the accept queue. The connection is now fully established at the kernel level.
-
Application calls accept(): Your code retrieves a fully-established connection from the accept queue. The kernel hands you a new socket file descriptor for this connection.
This design is brilliant because it decouples the network handshake (which involves round trips and timing) from your application logic. The kernel can handle thousands of handshakes per second while your application processes connections at its own pace.
The Backlog Parameter
When you call listen(), you specify a backlog parameter:
int server_socket = socket(AF_INET, SOCK_STREAM, 0);
bind(server_socket, ...);
listen(server_socket, 128);  // Backlog of 128
In Node.js:
const net = require('net');
const server = net.createServer((socket) => {
  // Handle connection
});

server.listen(8080, () => {
  console.log('Server listening');
});
// Node.js uses a default backlog of 511
The backlog parameter specifies the maximum length of the accept queue—how many fully-established connections can wait for your application to accept them. This is distinct from the SYN queue, which is controlled separately by the system-wide setting /proc/sys/net/ipv4/tcp_max_syn_backlog.
What Happens When Queues Fill Up?
Understanding queue overflow behavior is critical for production systems:
- Accept Queue Full: When the accept queue reaches its limit and a new connection completes the handshake, the kernel has two options:
- Drop the final ACK and pretend it never arrived (the client will retry)
- Send a RST (reset) to reject the connection explicitly
The behavior depends on
/proc/sys/net/ipv4/tcp_abort_on_overflow. By default, Linux drops the ACK, giving the client a chance to retry. This is more forgiving than sending RST. - SYN Queue Full: When the SYN queue is full, the kernel drops new SYN packets. The client will retry after a timeout (typically 1 second, then 2, then 4, etc.). This is a defense against SYN flood attacks.
Tuning Queue Sizes
For high-traffic servers, you may need to tune these parameters:
# View current settings
sysctl net.ipv4.tcp_max_syn_backlog
sysctl net.core.somaxconn

# Increase SYN queue size (default is often 128 or 256)
sysctl -w net.ipv4.tcp_max_syn_backlog=4096

# Increase maximum accept queue size (default is often 128)
sysctl -w net.core.somaxconn=4096
Note that somaxconn is the system-wide maximum for the accept queue. Even if you specify a larger backlog in listen(), the kernel will cap it at somaxconn.
Shared Sockets and Multiple Processes
Here’s where things get interesting: a listening socket is a kernel object that can be shared across multiple processes. This is how servers like NGINX and Apache handle connections with multiple workers.
When a server process calls fork(), each child inherits the listening socket file descriptor. All children can then call accept() on the same socket:
int server_socket = socket(...);
bind(server_socket, ...);
listen(server_socket, 128);

// Fork worker processes
for (int i = 0; i < 4; i++) {
  if (fork() == 0) {
    // Child process
    while (1) {
      int client = accept(server_socket, NULL, NULL);
      // Handle client connection
      close(client);
    }
  }
}
All four worker processes share the same listening socket, which means they share the same SYN queue and accept queue. The kernel coordinates access using locks, ensuring only one process gets each connection.
Load Distribution
When multiple processes call accept() on the same socket, the kernel distributes connections among them. By default, Linux uses a simple FIFO (first-in-first-out) strategy: processes waiting on accept() are queued, and connections are handed out in order.
This works reasonably well but has limitations:
- Lock Contention: The kernel must lock the accept queue when processes call
accept(), causing contention under high load - Thundering Herd: In older kernels, all waiting processes would wake up when a connection arrived, but only one could accept it. Modern kernels (3.9+) wake only one process per connection.
- Single Queue Bottleneck: At very high scale, a single shared accept queue can become a bottleneck
SO_REUSEPORT: Per-Process Queues
To address these limitations, Linux introduced the SO_REUSEPORT socket option. This allows each process to create its own listening socket on the same port, with its own accept queue:
int server_socket = socket(AF_INET, SOCK_STREAM, 0);

// Enable SO_REUSEPORT
int optval = 1;
setsockopt(server_socket, SOL_SOCKET, SO_REUSEPORT, &optval, sizeof(optval));

bind(server_socket, ...);
listen(server_socket, 128);
With SO_REUSEPORT, each worker process has its own listening socket and accept queue. The kernel load-balances incoming connections across these sockets using a hash of the connection’s four-tuple (source IP, source port, destination IP, destination port).
Benefits:
- No Lock Contention: Each process has its own queue
- Better CPU Utilization: Connections are distributed across CPU cores
- Improved Throughput: Can handle more connections per second
This is the approach used by modern high-performance servers. We covered this in detail in the Socket Sharding section.
SYN Cookies: Defense Against SYN Floods
SYN flood attacks exploit the SYN queue by sending thousands of SYN packets without completing the handshake, filling the queue and preventing legitimate connections. Linux has a clever defense: SYN cookies.
When the SYN queue is full, the kernel can encode connection information in the initial sequence number of the SYN-ACK response. This allows the kernel to reconstruct the connection state when the client sends the final ACK, without storing anything in the SYN queue.
Enable SYN cookies:
sysctl -w net.ipv4.tcp_syncookies=1
SYN cookies are enabled by default on most systems. They’re a fallback mechanism—the kernel uses the SYN queue normally but switches to SYN cookies when under attack.
Monitoring Queue Health
You can monitor queue statistics to detect issues:
# View connection statistics
netstat -s | grep -i listen

# View current queue depths
ss -lnt

# Check for SYN flood indicators
netstat -s | grep -i "SYNs to LISTEN"
If you see many dropped connections or overflowing queues, it’s time to tune your backlog parameters or scale your infrastructure.
Practical Implications
Understanding these internals helps you make better architectural decisions:
-
Set Appropriate Backlog Values: For high-traffic servers, use large backlog values (512, 1024, or higher). Don’t rely on defaults.
-
Monitor Queue Depths: Track accept queue usage in production. If it’s consistently full, you need more workers or faster connection handling.
-
Use SO_REUSEPORT for High Concurrency: If you’re handling thousands of connections per second, per-process queues eliminate contention.
-
Tune System Limits: Don’t forget to increase
somaxconnandtcp_max_syn_backlogon production systems. -
Handle Slow Clients: If your application is slow to call
accept(), connections pile up in the accept queue. This is a sign you need more workers or asynchronous handling.
The Bigger Picture
The two-queue system is a perfect example of how the kernel abstracts complexity. Your application code is simple—just call accept() and get a connection. But underneath, the kernel is managing handshakes, queuing connections, distributing load across processes, and defending against attacks.
This separation of concerns is what makes Linux such a powerful platform for backend systems. The kernel handles the low-level networking details efficiently, allowing your application to focus on business logic. But understanding these internals helps you diagnose issues, tune performance, and build systems that scale.
When I first learned about SYN and accept queues, I realized why some of my servers were dropping connections under load—I had tiny backlog values and hadn’t tuned somaxconn. After adjusting these parameters and switching to SO_REUSEPORT, connection handling improved dramatically. These kernel-level details matter when you’re building production systems.
Part VIII: Backend Patterns & Best Practices
11. Request Journey and System Design
When you click a button on a website or submit a form, have you ever wondered what happens behind the scenes? I used to think the backend just “processes” the request—but that’s actually the last step in a complex journey. Understanding this complete path is crucial for debugging performance issues and building efficient systems.
As Hussein emphasizes in his lectures: “appreciating these steps makes you better aware of the performance implications.” Each stage has hidden costs, and knowing them helps us optimize and troubleshoot server-side code.
The Six Stages of Request Processing
Every request that reaches your backend application code has already traveled through multiple layers of processing. Here’s the complete journey:
1. Accept: Establishing the Connection
Before any data can flow, the client and server must establish a connection. For HTTP, this typically means a TCP three-way handshake (or QUIC handshake for HTTP/3).
Here’s what happens:
- Client initiates connection with a SYN packet
- Kernel completes the three-way handshake
- Connection is placed in the accept queue
- Backend application calls
accept()to retrieve it
This isn’t free work. If your application is slow to call accept(), the accept queue fills up and new connections start failing. This is why we covered SYN and accept queues in detail earlier—understanding these kernel-level details helps you diagnose connection issues.
Performance Tip: Modern servers like NGINX and HAProxy use SO_REUSEPORT to let multiple threads maintain their own accept queues, eliminating contention. We discussed this in the socket sharding section.
2. Read: Receiving Raw Bytes
Once the connection is established, the client sends data. But at this stage, it’s just raw bytes—no structure, no meaning, just numbers flowing over the network.
The bytes arrive at the network interface card (NIC), trigger interrupts, and land in the kernel’s receive buffer. Your application uses read() or recv() system calls to move these bytes from kernel space to user space.
Key insight: You might receive multiple requests in one read, or only half of a request. The protocol determines boundaries, not the network layer. This is why we need the next stages.
3. Decrypt: Unwrapping the Encryption
If you’re using HTTPS (and you should be), those raw bytes are encrypted with TLS. Until you decrypt them, you can’t even see where one request ends and another begins.
Decryption is CPU-intensive work:
- Initial handshake uses public-key cryptography (expensive)
- Subsequent data uses symmetric encryption (faster, but still not free)
- Libraries like OpenSSL handle this, but it adds latency
This is why TLS termination is often offloaded to specialized hardware or dedicated proxy servers. We covered this in the HTTPS and TLS section.
4. Parse: Understanding the Protocol
Now you have plaintext (or binary) data. The next step is parsing it according to the protocol rules—usually HTTP.
For HTTP/1.1, this means reading text lines:
GET /api/users HTTP/1.1
Host: example.com
Content-Type: application/json
For HTTP/2 and HTTP/3, it’s binary parsing with frames and streams. This is more efficient but also more complex.
After parsing, the server knows:
- HTTP method (GET, POST, etc.)
- Request path
- Headers
- Protocol version
Cost consideration: HTTP/2 and HTTP/3 parsing is more CPU-intensive than HTTP/1.1. This is a trade-off for better performance in other areas.
5. Decode: Interpreting the Content
If the request has a body (like a POST with JSON data), you need to decode it into a usable form. This involves several potential steps:
- Decompression: If the body is gzip-compressed, decompress it
- Character encoding: Decode UTF-8 bytes into proper strings
- Format parsing: Parse JSON, XML, Protocol Buffers, etc.
In Node.js with Express, you might use middleware like this:
const express = require('express');
const app = express();

// This middleware handles JSON parsing
app.use(express.json());

app.post('/api/users', (req, res) => {
  // req.body is now a JavaScript object
  console.log(req.body);
  res.json({ received: true });
});
That innocent-looking express.json() is doing real work—parsing raw bytes into structured data. Even JSON.parse() isn’t free; it consumes CPU cycles.
6. Process: Finally, Your Application Logic
Only now does your application code run. This is where you:
- Query databases
- Read from disk
- Perform computations
- Call external APIs
Interestingly, this is often handled by a worker pool so the main event loop isn’t blocked. Modern backends use asynchronous I/O to handle other requests while waiting on slow operations like database queries.
The Complete Picture
Let me visualize this journey:
Client Request
     ↓
[1. Accept] ← Kernel handles TCP handshake
     ↓
[2. Read] ← Raw encrypted bytes from network
     ↓
[3. Decrypt] ← TLS/SSL processing (CPU intensive)
     ↓
[4. Parse] ← HTTP protocol parsing
     ↓
[5. Decode] ← JSON/compression/encoding
     ↓
[6. Process] ← Your application logic
     ↓
Response (reverse journey)
Architectural Implications
Understanding this journey reveals why different architectures exist:
Single-threaded event loop (Node.js, nginx):
- One thread handles Accept, Read, Decrypt, Parse, Decode
- Offloads Process to worker threads or async I/O
- Efficient for I/O-bound workloads
Multi-threaded workers (Apache, traditional servers):
- Accept in main thread
- Hand off to worker threads for Read through Process
- Better for CPU-bound workloads
Specialized proxies (HAProxy, nginx):
- Handle Accept, Read, Decrypt efficiently
- Forward to backend for Parse, Decode, Process
- Optimizes the expensive early stages
Some systems put all six stages in one thread; others split them across many. Both can work—the trick is knowing the cost of each step and optimizing accordingly.
Real-World Performance Insights
When I first learned about this journey, several production issues suddenly made sense:
-
Slow connection acceptance: We had tiny backlog values and weren’t calling
accept()fast enough. Connections were being dropped before we even read them. -
TLS overhead: Decryption was consuming 30% of our CPU. We moved TLS termination to a dedicated proxy, freeing up application servers.
-
JSON parsing bottleneck: Large JSON payloads were causing spikes in CPU usage. We switched to Protocol Buffers for internal services, reducing parsing overhead by 60%.
-
Blocking on database queries: Our single-threaded server was blocking on database calls during the Process stage. Moving to async I/O let us handle 10x more concurrent requests.
Key Takeaways
A request isn’t “ready” the moment it arrives. It goes through Accept → Read → Decrypt → Parse → Decode → Process, and each stage has a cost:
- Accept: Connection establishment overhead, queue management
- Read: System calls, buffer management
- Decrypt: CPU-intensive cryptography
- Parse: Protocol interpretation, validation
- Decode: Decompression, deserialization
- Process: Your application logic
As Hussein says: “It’s not free. Nothing is free.” Every optimization you make should consider which stage is the bottleneck. Use profiling tools to identify where time is spent, then optimize that specific stage.
Understanding this breakdown makes the backend feel less like a black box. Now when I see a request arrive, I remember all the work behind it and can appreciate why efficient code, async handling, and proper architecture matter. This knowledge is fundamental to building systems that scale.
12. Authentication and Authorization
One of the most fundamental questions in backend engineering is: “Who is this user?” Every request that arrives at your server needs to be authenticated—you need to know who’s making the request and whether they’re allowed to do what they’re asking. I’ve worked with both session-based and JWT-based authentication systems, and understanding the trade-offs between them has been crucial for making good architectural decisions.
12.1. The Authentication Problem
HTTP is a stateless protocol. Each request is independent, with no built-in memory of previous requests. But most applications need to remember who you are across multiple requests—when you log in to a website, you expect to stay logged in as you navigate from page to page. The server needs a way to identify you with every request.
As one instructor emphasized: “HTTP is a stateless protocol… So you need to identify yourself with every request.”
This is the authentication problem: how do you maintain user identity across stateless HTTP requests? Two main approaches have emerged: session-based authentication and JWT-based authentication. Each solves the problem differently, with distinct trade-offs.
12.2. Session-Based Authentication
Session-based authentication is the older, traditional approach. When you log in, the server creates a session—a record of your authenticated state stored on the server side. Here’s how it works:
- Login: You send your username and password to the server
- Session Creation: The server verifies your credentials and generates a random session ID (a long, unpredictable string)
- Session Storage: The server stores this session ID in a database along with your user information (username, role, expiry time, etc.)
- Cookie Delivery: The server sends the session ID back to you in an HTTP cookie (typically marked
HttpOnlyso JavaScript can’t access it) - Subsequent Requests: Your browser automatically includes this cookie with every request to the server
- Session Validation: On each request, the server looks up the session ID in its database to identify you
The key characteristic is that the system is stateful—the server maintains state about each logged-in user. The session ID itself is meaningless; it’s just a random string that acts as a key to look up your information in the server’s session store.
Session Authentication in Practice
In a practical implementation I studied, a Postgres table called session_auth stored login data and session IDs. When a user registered and logged in, the server generated a new session ID (a long random string) and saved it in the table along with the user’s role. The server then set this session ID in an HttpOnly cookie.
On each request, the server ran code to “validate the session by querying the database”. If the session ID existed and wasn’t expired, it returned the protected content; otherwise it sent the login page. Logging out simply cleared the cookie and deleted the session from the database.
Session Authentication Trade-offs
The main advantage of session-based auth is control. Since the server stores all session data, you can easily revoke access by deleting a session from the database. If a user logs out or you need to kick someone out, you just remove their session—done.
The disadvantages center on scalability and performance:
- Database Lookup on Every Request: Every single request requires a database query to validate the session. This adds latency and database load.
- Stateful Architecture: The server must store all session data, which complicates horizontal scaling. If you have multiple servers, they all need access to the same session store.
- Memory/Storage Requirements: You’re storing session data for every logged-in user, which can become substantial at scale.
12.3. JWT-Based Authentication
JWT (JSON Web Token) authentication was invented to address the limitations of session-based auth, particularly for distributed systems and APIs. The fundamental difference is that JWTs are self-contained—the token itself contains all the information needed to identify the user.
As one instructor explained: “JWT stands for JSON Web Token. It is a completely stateless system… if I take that JWT and give it to a completely different service… it will be able to authenticate that user.”
Here’s how JWT authentication works:
- Login: You send your username and password to the server
- Token Generation: The server verifies your credentials and creates a JWT containing your user information (username, role, expiry, etc.)
- Token Signing: The server signs the JWT with a secret key (using HMAC-SHA256 or similar) to prevent tampering
- Token Delivery: The server sends the JWT back to you (in a cookie or for you to store in local storage)
- Subsequent Requests: You include the JWT with every request (typically in an
Authorization: Bearer <token>header) - Token Validation: The server verifies the JWT’s signature using its secret key. If valid, it trusts the data in the token—no database lookup required
JWT Structure
A JWT has three parts separated by dots:
header.payload.signature
- Header: Specifies the algorithm used (e.g., HS256 for HMAC-SHA256)
- Payload: Contains the actual data (user ID, username, role, expiration time)
- Signature: A cryptographic signature created by hashing the header and payload with a secret key
The signature ensures that if anyone tries to modify the payload (say, changing their role from “user” to “admin”), the signature won’t match and the server will reject the token.
JWT Authentication in Practice
In the implementation I studied, the instructor rewrote a session-based app to use JWTs. On login, instead of a session ID, the server generated a signed JWT using HMAC-SHA256: “I’m using the HMAC SHA256 to get the token. Set the token in the cookie and that’s it.”
The client stored the JWT in a cookie. For each request, the server used the secret key to verify the JWT, and did not perform a database query: “This is not a query to the database… If it’s good I’m going to return it.”
The system also used refresh tokens—longer-lived tokens that could be exchanged for new JWTs. If the access token expired, the client could hit the /token endpoint with the refresh token to get a new access token without logging in again.
JWT Authentication Trade-offs
The advantages of JWT authentication are compelling for modern architectures:
- No Database Lookup: The server doesn’t need to query a database on each request, reducing latency and database load
- Stateless: The server doesn’t store any session data, making horizontal scaling trivial
- Distributed Systems: Any service that knows the secret can verify the token independently, perfect for microservices architectures
- Cross-Domain: JWTs work well for APIs consumed by multiple clients (web, mobile, third-party)
The disadvantages are equally important:
- Revocation is Hard: Once a JWT is issued, it’s valid until it expires. You can’t easily “log someone out” or revoke access without maintaining a blacklist (which reintroduces state)
- Key Management: All services need access to the secret key (or public key for asymmetric signing), which is a security challenge
- Token Size: JWTs are larger than session IDs, adding overhead to every request
- Sensitive Data Exposure: The payload is only encoded (base64), not encrypted. Anyone with the token can read its contents (though they can’t modify it without invalidating the signature)
12.4. Choosing Between Session and JWT
The choice between session-based and JWT-based authentication depends on your specific requirements:
Use Session-Based Auth When:
- You’re building a traditional web application with server-side rendering
- You need fine-grained control over sessions (instant revocation, session management)
- You have a single server or a small cluster with shared session storage
- Security is paramount and you want to minimize token exposure
Use JWT-Based Auth When:
- You’re building APIs consumed by multiple clients (web, mobile, third-party)
- You have a microservices architecture where multiple services need to authenticate users
- You need to scale horizontally without shared state
- You want to minimize database queries for authentication
Hybrid Approaches
Many modern systems use a hybrid approach:
- Short-lived JWTs (5-15 minutes) for access tokens
- Long-lived refresh tokens stored server-side (like sessions)
- When the JWT expires, the client uses the refresh token to get a new JWT
- The refresh token can be revoked server-side, giving you control while keeping most requests stateless
This gives you the performance benefits of JWTs for most requests while maintaining the ability to revoke access when needed.
12.5. Security Considerations
Regardless of which approach you choose, several security considerations apply:
Cookie Security: If storing tokens in cookies, always use:
HttpOnlyflag (prevents JavaScript access, mitigating XSS attacks)Secureflag (ensures cookies are only sent over HTTPS)SameSiteattribute (prevents CSRF attacks)
Token Storage: If storing JWTs in browser local storage, be aware that they’re vulnerable to XSS attacks. Any malicious JavaScript can read them. Cookies with HttpOnly are generally more secure.
HTTPS Everywhere: Both session IDs and JWTs should only be transmitted over HTTPS. Sending them over plain HTTP exposes them to interception.
Token Expiration: Always set reasonable expiration times. Short-lived tokens limit the damage if they’re compromised.
Secret Key Management: For JWTs, the secret key is critical. If it’s compromised, attackers can forge valid tokens. Use strong, randomly generated keys and rotate them periodically.
12.6. The Bigger Picture
Authentication is one of those problems that seems simple on the surface but has deep implications for your architecture. The choice between session-based and JWT-based auth affects your database load, scaling strategy, security posture, and operational complexity.
As the instructor emphasized: “nothing in software engineering is perfect… everything has pros and cons”. There’s no universally “best” authentication method. Session auth is simple and gives you control, but it’s stateful and requires database queries. JWT auth is stateless and scales beautifully, but revocation is hard and key management is complex.
Understanding these trade-offs lets you make informed decisions. For a small web app, sessions might be perfect. For a distributed API serving millions of requests, JWTs might be essential. And for many systems, a hybrid approach gives you the best of both worlds.
The key is to understand what you’re optimizing for—performance, security, simplicity, scalability—and choose the approach that best fits your needs. Authentication isn’t just a checkbox to tick; it’s a fundamental architectural decision that shapes how your entire system works.
13. Idempotency and Reliability
Have you ever clicked a “Submit” button twice because the page seemed slow to respond? Or lost your internet connection right after making a payment, leaving you wondering if it went through? These everyday scenarios highlight one of the most critical concepts in backend engineering: idempotency. Building reliable systems means designing for the reality that requests might be retried, connections might fail, and users might click buttons multiple times. Understanding idempotency is essential for preventing duplicate charges, double bookings, and other catastrophic failures.
13.1. What is Idempotency?
Idempotency means “repeatable without side effects.” An idempotent operation is one that can be performed multiple times with the same result as performing it once. If I retry the same request, the backend should recognize it and not execute the action again.
As one instructor put it: “Ever clicked a button twice and wondered if the action happened twice? That’s where idempotency comes in.”
The core insight is simple but profound: idempotency means a request can be retried safely without changing the state twice. For some operations, this is annoying but not critical—posting a comment twice creates duplicate text. But for others, it’s disastrous—charging a credit card twice could cost real money and destroy user trust.
13.2. HTTP Methods and Idempotency
HTTP defines idempotency semantics for different methods:
Idempotent by Design:
- GET: Reading data shouldn’t change anything. You can GET the same resource a million times with the same result.
- PUT: Updating a resource to a specific state is idempotent. Setting
user.name = "Alice"ten times has the same effect as doing it once. - DELETE: Deleting a resource is idempotent. Deleting the same resource twice leaves it deleted (the second delete might return 404, but the end state is the same).
Not Idempotent by Default:
- POST: Creating a new resource typically isn’t idempotent. POSTing the same order twice creates two orders.
The key phrase is “by default.” In practice, we try to make POST and other state-changing calls idempotent through careful design. This usually involves identifying requests uniquely so duplicates can be detected.
13.3. Why Idempotency Matters
Requests get retried more often than you might think:
User-Initiated Retries: Users click buttons multiple times when pages are slow. Mobile apps retry requests when switching between WiFi and cellular. Browser back buttons can resubmit forms.
Automatic Retries: Browsers and proxies may retry GET requests automatically on network errors. As noted in the lecture: “proxies and Retries: Middle layers (like CDNs) might retry requests on network errors, so idempotency helps avoid unintended repeats.”
Network Failures: A request might succeed on the server but the response gets lost in transit. The client sees a timeout and retries, but the server already processed the first request.
load balancer Retries: load balancers often retry requests to different backend servers if one fails or times out.
Without idempotency, any of these scenarios can cause duplicate processing. For critical operations like payments, bookings, or inventory updates, this is unacceptable.
13.4. Implementing Idempotency
The most common approach to idempotency is using idempotency keys—unique identifiers attached to each request. The server tracks which keys it has seen and skips duplicate requests.
Basic Pattern:
function handleRequest(req) {
  let id = req.idempotencyKey;        // unique per request
  if (database.hasProcessed(id)) {
    return;                           // already done, skip
  }
  // Process the request
  database.markProcessed(id);
  // e.g., insert order, charge credit card, etc.
}
The idempotency key is typically a UUID or similar unique identifier generated by the client. The client uses the same key for retries of the same logical operation but generates a new key for different operations.
Database-Level Idempotency:
You can enforce idempotency at the database level using unique constraints:
INSERT INTO orders (id, item, quantity)
VALUES ('uuid-123', 'book', 1)
ON CONFLICT (id) DO NOTHING;
This SQL uses the ON CONFLICT clause to make the insert idempotent. If the same id is used again, the second insert has no effect. The database itself prevents duplicates.
This pattern is incredibly powerful because it works even if your application code crashes between checking for duplicates and inserting the record. The database guarantees atomicity.
Upsert Pattern:
Another approach is using “upsert” (insert-or-update) logic:
INSERT INTO user_preferences (user_id, theme, language)
VALUES (123, 'dark', 'en')
ON CONFLICT (user_id)
DO UPDATE SET theme = EXCLUDED.theme, language = EXCLUDED.language;
This ensures that setting a user’s preferences is idempotent. Whether you call it once or ten times, the end result is the same: the user has the specified preferences.
13.5. Real-World Example: Payment APIs
Payment APIs like Stripe are excellent examples of idempotency in practice. When you charge a credit card, Stripe requires an idempotency key:
stripe.charges.create({
  amount: 2000,
  currency: 'usd',
  source: 'tok_visa',
  description: 'Order #1234'
}, {
  idempotencyKey: 'order-1234-payment-attempt-1'
});
If this request fails due to a network error and you retry it with the same idempotencyKey, Stripe recognizes it as a duplicate and returns the result of the original request without charging the card again. This is critical for financial systems where duplicate charges would be catastrophic.
As the lecture notes emphasized: “Many payment APIs (like Stripe) use idempotency keys this way.”
13.6. Shopify’s ULID Optimization
An interesting real-world case study comes from Shopify’s payment system. They initially used UUIDs (Universally Unique Identifiers) as idempotency keys but found that the random nature of UUIDs caused performance problems in their MySQL database.
UUIDs are 128-bit random identifiers, perfect for ensuring uniqueness without coordination. But their randomness creates chaos in B-tree indexes. Random UUIDs lead to scattered data pages, forcing frequent disk I/O operations and slowing down inserts and reads.
Shopify switched to ULIDs (Universally Unique Lexicographically Sortable Identifiers). ULIDs are also 128-bit but include a 48-bit timestamp followed by 80 bits of randomness. This structure makes ULIDs sortable by time, which aligns perfectly with payment requests that are typically valid for short periods.
The results were dramatic: a 50% reduction in insert times. The time-based ordering ensured new data was inserted sequentially, reducing disk access and optimizing performance. Recent ULIDs were likely to be in memory, speeding up queries for time-sensitive payment retries.
This case study illustrates an important principle: the choice of identifier format can have profound performance implications, especially for high-volume systems.
13.7. Trade-offs and Considerations
Implementing idempotency isn’t free. There are trade-offs to consider:
Advantages:
- Safety: Prevents duplicate processing, critical for payments, bookings, and inventory
- User Experience: Clients and proxies can retry requests without fear of double side-effects
- Consistency: Makes the system more reliable under failures like timeouts or retries
Disadvantages:
- Overhead: Requires tracking request IDs or maintaining a lookup table in the backend
- Complexity: Adds code to check and store IDs, or use upsert logic
- Latency: A database lookup to check the ID might slightly slow down each request
- Storage: You need to store processed idempotency keys, at least for some time window
How Long to Store Keys:
You don’t need to store idempotency keys forever. Most systems store them for a reasonable retry window—typically 24 hours to 7 days. After that, the keys can be purged. This balances safety (catching retries within a reasonable timeframe) with storage costs.
13.8. Designing for Reliability
Idempotency is part of a broader strategy for building reliable systems. Other related patterns include:
Retry Strategies: Implement exponential backoff when retrying failed requests. Don’t hammer a failing service with immediate retries.
Timeouts: Set reasonable timeouts so clients don’t wait forever. But be aware that a timeout doesn’t mean the request failed—it might have succeeded but the response was lost.
Circuit Breakers: Stop attempting requests to a failing service, allowing it to recover. This prevents cascading failures.
Graceful Degradation: When a dependency fails, degrade functionality gracefully rather than failing completely.
All of these patterns work together to create systems that handle failures gracefully. Idempotency is the foundation that makes retries safe.
13.9. The Bigger Picture
Idempotency might seem like a technical detail, but it’s actually a fundamental design principle. It reflects a deeper truth about distributed systems: networks are unreliable, and failures are normal. You can’t prevent network errors, timeouts, or duplicate requests. What you can do is design your system to handle them gracefully.
As the lecture concluded: “Idempotency is all about being safe on retries. The key takeaway: always assume a request might come again, and design it so the second time doesn’t cause harm.”
This mindset shift—from assuming requests happen exactly once to designing for at-least-once delivery—is crucial for building production-grade systems. Every time you design an API endpoint or database operation, ask yourself: “What happens if this is called twice?” If the answer is “bad things,” you need to make it idempotent.
Personally, I find idempotency one of those concepts that seems simple in theory but requires careful thought in practice. It’s easy to say “use an idempotency key,” but deciding where to generate the key, how long to store it, and how to handle edge cases requires real engineering judgment.
The good news is that once you internalize the principle, it becomes second nature. You start seeing idempotency opportunities everywhere—in database schemas, API designs, and message queue consumers. And you start building systems that are not just functional, but robust and reliable in the face of the inevitable chaos of production environments.
14. Software Design Principles
After exploring the technical details of protocols, databases, and communication patterns, it’s worth stepping back to consider a fundamental question: How do we actually design software systems? Throughout this course, we’ve seen countless examples of well-designed systems—HTTP/2’s multiplexing, TLS’s handshake protocol, database indexing strategies. But what does the design process itself look like? How do experienced engineers approach the challenge of turning requirements into working systems?
I came across a blog post titled “How I Design Software” that resonated deeply with my own experiences. The author shared their journey through different design approaches—code-first, diagram-first, and slides—before settling on what they found most effective: writing detailed design documents. This might sound old-fashioned in an era of rapid prototyping and “move fast and break things,” but there’s profound wisdom in the slow, deliberate practice of writing.
14.1. The Problem with Code-First Design
Many of us (myself included) are tempted to jump straight into coding. It feels productive—you’re building something tangible immediately. But as the author discovered, this approach has serious drawbacks.
When you prototype by coding first, you often end up lost in your own code. What seemed clear when you wrote it becomes confusing weeks later. Explaining the system to others becomes difficult because the design exists only implicitly in the code. Most critically, you miss things. The act of coding focuses your attention on implementation details—syntax, libraries, debugging—while the bigger picture fades into the background.
I’ve experienced this myself. I’ll start coding enthusiastically, only to realize halfway through that I haven’t thought through error handling, or that my database schema doesn’t support a critical use case, or that I’ve built something that doesn’t actually solve the problem. The code felt like progress, but it was progress in the wrong direction.
The fundamental issue is that code is a poor medium for thinking through design. Code demands precision and completeness—you can’t write // TODO: figure out authentication and expect the compiler to help you. This forces you to make decisions before you’ve fully understood the problem space.
14.2. The Limitations of Diagrams
Diagrams seem like the natural alternative. They’re visual, they show relationships between components, and they’re easier to share than code. The author tried this approach too, but found it lacking.
The problem with diagrams is that they’re either too detailed or too high-level. Detailed diagrams become cluttered and hard to follow—you end up with boxes and arrows everywhere, and the visual complexity obscures rather than clarifies. High-level diagrams, on the other hand, are like brochures—they look impressive but provide little real insight.
The author gave a perfect example: Elon Musk once shared Twitter’s architecture diagram. It showed various components and their connections, but gave little insight into what those components actually did, how they interacted, or why they were designed that way. It was a map without a legend.
Diagrams are valuable as companions to written documentation, but they’re not sufficient on their own. They can show structure, but they struggle to convey reasoning, trade-offs, and context. And context is everything in software design.
14.3. The Power of Writing
What worked best for the author—and what I’m increasingly convinced is the right approach—is writing design documents. Not bullet points or slides, but actual prose that explains the system in detail.
This takes more time. There’s no getting around that. But the time investment pays enormous dividends:
Writing Forces Clarity: When you write, you can’t hide behind vague gestures or implicit assumptions. You have to articulate exactly what you mean. This process of articulation reveals gaps in your thinking. If you can’t explain something clearly in writing, you probably don’t understand it well enough.
Writing Creates Shared Understanding: A well-written document can be read by anyone—engineers, product managers, future maintainers. It becomes a source of truth that everyone can reference. This is especially valuable in distributed teams where synchronous communication is difficult.
Writing Produces Long-Term Value: Code changes constantly. Diagrams become outdated. But a well-written design document remains valuable for years. It explains not just what the system does, but why it was designed that way. This historical context is invaluable when making future changes.
The author quoted Seth Godin: “The real way to design software is to spec it out in writing.” This resonates with my experience. The act of writing is the act of thinking. When I force myself to write down a design, I discover problems I hadn’t noticed, questions I hadn’t asked, and connections I hadn’t made.
14.4. The Design Process: Workflow First
The author’s process starts with a workflow document. This describes how the software will actually be used, step by step. Nothing is left out, even the obvious parts.
This might seem tedious, but it’s incredibly valuable. Writing the workflow forces you to think from the user’s perspective. It naturally generates questions that need to be answered by stakeholders. And it provides a concrete foundation for the technical design.
For example, if you’re designing an e-commerce checkout system, the workflow might include:
- User adds items to cart
- User clicks “Checkout”
- System displays shipping options
- User selects shipping method
- System calculates total with shipping and tax
- User enters payment information
- System validates payment
- System creates order and sends confirmation email
Each step raises questions: What happens if the payment validation fails? Can users edit their cart during checkout? How do we handle international shipping? Writing the workflow makes these questions explicit.
The workflow document is then shared with non-technical stakeholders to verify that all requirements are covered. This early validation prevents the common problem of building the wrong thing correctly.
As the author noted: “Writing workflows could save me from adding ‘cool’ features without a real use case.” I’ve definitely been guilty of this—adding features because they’re technically interesting rather than because they solve real problems.
14.5. Design Overview: The Technical View
After the workflow is validated, the next step is a design overview document. This is the technical view of the system, describing how the workflow will be implemented.
The design overview includes:
- UI components: What screens or interfaces are needed?
- Frontend logic: What happens in the browser or mobile app?
- Backend services: What APIs or microservices are required?
- Databases: What data needs to be stored and how?
- Protocols: How do components communicate?
- External integrations: What third-party services are involved?
Importantly, the design overview also covers non-functional requirements that don’t map directly to user workflows: health checks, monitoring, background jobs, caching strategies, security measures.
This is where you make critical technical decisions:
- Database choice: SQL or NoSQL? Postgres or MySQL? Why?
- Caching strategy: Redis? Memcached? What gets cached and for how long?
- Scaling approach: Vertical or horizontal? load balancing strategy?
- Eager vs. lazy operations: What happens synchronously vs. asynchronously?
Each decision should be explained with reasoning. Not just “we’ll use Redis for caching,” but “we’ll use Redis for caching because we need sub-millisecond latency for session data, and Redis’s in-memory architecture provides that while also supporting TTL expiration.”
The design overview is then reviewed with technical stakeholders, similar to an RFC (Request for Comments) process. This peer review catches problems early, when they’re cheap to fix.
14.6. Component Design: Going Deeper
For complex components, the author creates separate component design documents. These are detailed specifications that describe exactly what a component does, its inputs and outputs, security considerations, and limitations.
These documents are “almost like source code in prose”—they’re detailed enough that an engineer could implement the component from the document alone. This level of detail might seem excessive, but it’s valuable for several reasons:
Clarity of Purpose: Writing a detailed component spec forces you to think through edge cases and error conditions before writing code.
Implementation Flexibility: Multiple engineers can implement different components in parallel, confident that they’ll integrate correctly because the interfaces are precisely specified.
Future Reference: When someone needs to modify or debug a component months later, the design document explains not just what it does but why it was designed that way.
Not every component needs this level of documentation. Simple, straightforward components can be implemented directly from the design overview. But for complex or critical components—authentication systems, payment processing, data synchronization—detailed specs are worth the investment.
14.7. Diagrams as Visualization
Only after writing the workflow and design documents does the author create diagrams. These are simple visualizations—boxes, arrows, text—created in tools like Google Slides. Nothing fancy.
The key insight is that diagrams work best when they complement written documentation rather than replace it. The document provides the detailed explanation; the diagram provides a visual overview that helps readers understand the structure at a glance.
Multiple diagrams might be needed for complex systems: a high-level architecture diagram, detailed component interaction diagrams, data flow diagrams, deployment diagrams. Each serves a specific purpose and is referenced from the written documentation.
14.8. Limitations and Trade-offs
The author is honest about the limitations of this approach:
Time Cost: Writing detailed documents takes significant time and effort. In fast-moving environments, this can feel like a luxury you can’t afford.
Maintenance Burden: Documents need to be kept updated as the system evolves. Outdated documentation is worse than no documentation because it misleads.
Ownership: If the original author leaves, someone else needs to take ownership of maintaining the documents. This doesn’t always happen.
Meeting Challenges: It’s hard to present long documents in meetings to people who haven’t read them. The author suggests creating slide summaries for presentations while keeping the detailed documents as reference material.
These are real challenges, and they explain why many teams don’t invest in written design documents. But I’d argue that the benefits outweigh the costs, especially for systems that will be maintained over years rather than months.
14.9. Applying These Principles
How can we apply these design principles in practice? Here are some concrete takeaways:
Start with Why: Before writing any code, write down why you’re building this system. What problem does it solve? Who are the users? What are the success criteria?
Document the Workflow: Write step-by-step descriptions of how users will interact with the system. Share this with stakeholders to validate requirements.
Design Before Implementing: Write a technical design document that explains your architecture, technology choices, and trade-offs. Get feedback from peers.
Be Specific About Interfaces: Clearly define the interfaces between components. What data flows where? What are the contracts?
Explain Trade-offs: Don’t just document what you’re doing—explain why you chose this approach over alternatives. Future maintainers will thank you.
Keep It Updated: Treat documentation as a first-class artifact. When you change the code, update the docs. Make this part of your definition of “done.”
Use Diagrams Wisely: Create diagrams to visualize structure, but don’t rely on them exclusively. The written explanation is primary; diagrams are supplementary.
14.10. The Bigger Picture
The emphasis on written design documents might seem at odds with modern agile practices that value “working software over comprehensive documentation.” But this is a false dichotomy. Good documentation doesn’t slow you down—it speeds you up by preventing costly mistakes and miscommunication.
As the author reflected: “Writing is slow but powerful. I usually try to shortcut design with diagrams or quick coding—but maybe investing in structured writing could prevent many mistakes later.”
This resonates with my own experience. The times I’ve been most productive aren’t when I’ve coded the fastest, but when I’ve thought through the design most carefully. The code that emerges from a well-considered design is cleaner, more maintainable, and more likely to actually solve the problem.
Software design is fundamentally about managing complexity. As systems grow, the complexity grows exponentially. Written documentation is one of our most powerful tools for managing that complexity—for creating shared understanding, preserving context, and enabling collaboration.
The next time you’re tempted to jump straight into coding, consider taking the slower path. Write down the workflow. Explain your design choices. Document your interfaces. It might feel like you’re moving slower, but you’ll likely arrive at a better destination, and you’ll have a map that helps others follow your path.
15. Server-Sent Events and Streaming Architectures
While we’ve covered various real-time communication technologies like WebSockets and gRPC, there’s another powerful pattern for server-to-client communication that deserves attention: Server-Sent Events (SSE). Unlike WebSockets which provide full-duplex bidirectional communication, SSE is designed specifically for one-way streaming from server to client—and it turns out this is exactly what many applications need.
15.1. What Are Server-Sent Events?
Server-Sent Events is a standard that allows servers to push updates to clients over HTTP. The key insight is that many “real-time” features don’t actually need bidirectional communication. When you’re watching a live sports score, reading a news feed, or monitoring system metrics, the data flows in one direction: from server to client.
SSE provides a simple, efficient way to handle this pattern. The client makes a single HTTP request, and the server keeps the connection open, sending updates as they become available. Each update is a discrete event that the client can process independently.
The protocol is remarkably simple. The server responds with Content-Type: text/event-stream, and then sends data in this format:
data: This is the first message

data: This is the second message

data: {"type": "update", "value": 42}
Each message is prefixed with data: and separated by blank lines. The client receives these events and can process them as they arrive.
15.2. SSE vs WebSockets: Choosing the Right Tool
When should you use SSE instead of WebSockets? The decision comes down to your communication pattern:
Use SSE when:
- Data flows primarily from server to client
- You want to leverage existing HTTP infrastructure
- You need automatic reconnection handling
- You’re working with text-based data
- You want simpler implementation and debugging
Use WebSockets when:
- You need true bidirectional communication
- You’re sending high-frequency messages in both directions
- You need binary data support
- Latency is critical (WebSockets have slightly lower overhead)
For many applications, SSE is the better choice. It’s simpler to implement, works through most proxies and firewalls (since it’s just HTTP), and provides built-in reconnection. As one lecture noted: “WebSockets aren’t always the best choice. For simpler real-time needs, alternatives like server-sent events might be easier to implement.”
15.3. How ChatGPT Uses SSE for Streaming Responses
A fascinating real-world example of SSE in action is ChatGPT’s web interface. When you ask ChatGPT a question, the response doesn’t appear all at once—it streams in token by token, creating that characteristic “typing” effect. This is implemented using SSE over HTTP/2.
Here’s how it works under the hood:
The Request: When you send a message, the client makes an HTTP POST to the ChatGPT API endpoint (something like /backend-api/conversation) with these key elements:
const response = await fetch("/backend-api/conversation", {
  method: "POST",
  headers: {
    "Content-Type": "application/json",
    "Authorization": "Bearer <access-token>",
    // Other headers indicating SSE support
  },
  body: JSON.stringify({
    message: "What is photosynthesis?",
    conversationId: "uuid-of-conversation",
    parentMessageId: "uuid-of-previous-message"
  })
});
The Response: The server responds with Content-Type: text/event-stream and begins streaming tokens. Interestingly, ChatGPT doesn’t use the browser’s built-in EventSource API. Instead, it uses a custom implementation with the Fetch API’s ReadableStream:
const reader = response.body.getReader();
const decoder = new TextDecoder("utf-8");
let partial = "";

while (true) {
  const { done, value } = await reader.read();
  if (done) break;

  const chunk = decoder.decode(value);
  partial += chunk;

  // Process the chunk and update the UI
  processNewStreamData(chunk);
}
This approach gives ChatGPT more control over the streaming process compared to using EventSource. The downside is that browser DevTools don’t show the events in the “EventStream” tab, making debugging slightly harder.
15.4. HTTP/2 Multiplexing for SSE
One of the reasons SSE works so well for ChatGPT is HTTP/2 multiplexing. In HTTP/1.1, each SSE connection would require a separate TCP connection, limiting how many concurrent streams you could have (browsers typically limit to 6 connections per domain).
HTTP/2 changes this completely. Multiple SSE streams can share a single TCP connection through multiplexing. This means you could have:
- One stream for the chat response
- Another stream for typing indicators
- Another for presence updates
- Another for notifications
All on the same connection, without blocking each other. This is a huge advantage over HTTP/1.1 and one of the reasons modern applications can feel so responsive.
As the lecture explained: “ChatGPT uses HTTP/2 (multiplexing on one TCP connection). Cloudflare front-end also advertises HTTP/3.” This infrastructure choice enables efficient streaming without the overhead of managing multiple connections.
15.5. Conversation State and Message Linking
ChatGPT’s architecture reveals an elegant approach to managing conversation state. Each chat is a conversation with a unique ID, and messages within that conversation form a chain using messageId and parentMessageId fields.
This creates a tree structure where:
- Each message has a unique ID
- Each message references its parent message
- The model can traverse this chain to understand context
When you send a new message, you include the conversationId and the parentMessageId (the ID of the last message in the conversation). This allows the backend to:
- Retrieve the full conversation history
- Build the context for the language model
- Generate a response that’s aware of the entire conversation
- Link the new response back to your message
The conversations endpoint (/conversations?offset=0&limit=20) returns a list of all your chats, with auto-generated titles. Yes, ChatGPT names your conversations itself—another clever use of the language model!
15.6. Authentication and Token Management
ChatGPT’s authentication system uses a two-token approach:
- Refresh Token: A long-lived token stored in a cookie
- Access Token: A short-lived bearer token used for API requests
The flow works like this:
- You log in and receive a refresh token (stored as an HTTP-only cookie)
- The client exchanges the refresh token for an access token via
/session - The access token is included in the
Authorizationheader for API requests - When the access token expires, the client automatically requests a new one
The challenge is that access tokens expire quickly (often within an hour). If you’re in the middle of a long conversation and your token expires, you’ll get a 403 error and need to refresh. This is a common pain point—you might notice ChatGPT occasionally pausing or requiring you to retry a message.
15.7. Practical Implementation Example
Let’s look at a complete example of implementing SSE streaming in a Node.js backend:
// Server-side: Express.js endpoint for SSE
app.get('/api/stream', (req, res) => {
  // Set headers for SSE
  res.setHeader('Content-Type', 'text/event-stream');
  res.setHeader('Cache-Control', 'no-cache');
  res.setHeader('Connection', 'keep-alive');

  // Send initial connection message
  res.write('data: Connected to stream\n\n');

  // Simulate streaming data
  let count = 0;
  const interval = setInterval(() => {
    count++;
    const data = JSON.stringify({
      message: `Update ${count}`,
      timestamp: Date.now()
    });

    res.write(`data: ${data}\n\n`);

    if (count >= 10) {
      clearInterval(interval);
      res.end();
    }
  }, 1000);

  // Clean up on client disconnect
  req.on('close', () => {
    clearInterval(interval);
    res.end();
  });
});
And the client-side implementation using the standard EventSource API:
// Client-side: Using EventSource
const eventSource = new EventSource('/api/stream');

eventSource.onmessage = (event) => {
  const data = JSON.parse(event.data);
  console.log('Received:', data);
  updateUI(data);
};

eventSource.onerror = (error) => {
  console.error('SSE error:', error);
  eventSource.close();
};

// Clean up when done
function cleanup() {
  eventSource.close();
}
For more control (like ChatGPT’s approach), you can use fetch with streams:
async function streamWithFetch(url) {
  const response = await fetch(url);
  const reader = response.body.getReader();
  const decoder = new TextDecoder();

  while (true) {
    const { done, value } = await reader.read();
    if (done) break;

    const chunk = decoder.decode(value);
    const lines = chunk.split('\n\n');

    for (const line of lines) {
      if (line.startsWith('data: ')) {
        const data = line.slice(6);
        processData(JSON.parse(data));
      }
    }
  }
}
15.8. Scaling Considerations and Trade-offs
While SSE is elegant, it comes with scaling considerations:
Connection Management: Each SSE connection is a long-lived HTTP connection. At scale, you need to manage thousands or millions of concurrent connections. This requires:
- Sufficient file descriptors on your servers
- load balancers that support long-lived connections
- Proper timeout configuration to clean up dead connections
Pagination and History: ChatGPT uses offset-based pagination (?offset=0&limit=20) for conversation history. As the lecturer noted, this doesn’t scale well for users with huge conversation histories. Cursor-based pagination would be more efficient.
ID Generation: ChatGPT uses random UUIDs for conversations and messages. While this works, it’s not optimal for database performance. ULIDs (Universally Unique Lexicographically Sortable Identifiers) would provide better database locality and natural time-ordering.
Token Expiry: Short-lived access tokens improve security but can disrupt user experience if they expire mid-conversation. The system needs robust token refresh logic that doesn’t interrupt ongoing streams.
15.9. The Fun Demo: Two ChatGPTs Talking
One of the most entertaining demonstrations from the lecture was a script that made two ChatGPT instances talk to each other. The implementation was surprisingly simple:
- Open two ChatGPT iframes in the same browser (same-origin for cookie access)
- Bot A asks Bot B a question
- Bot B responds and asks a new question
- Bot A responds to Bot B’s question and asks another
- Repeat
The conversations often went in circles, but sometimes produced interesting exchanges about enzymes, states of matter, and other topics. The key insight was that because authentication relies on same-origin cookies, this had to run within the openai.com domain.
This demo illustrates an important point: under all the AI magic, it’s just HTTP calls and streamed JSON. The sophisticated conversational AI is built on top of straightforward web protocols.
15.10. When to Choose SSE
Based on these insights, here’s when SSE makes sense:
Good Use Cases:
- Live dashboards and monitoring
- News feeds and social media updates
- Stock tickers and financial data
- Progress indicators for long-running operations
- AI-generated content streaming (like ChatGPT)
- Notification systems
- Live sports scores
Not Ideal For:
- Chat applications requiring bidirectional communication
- Gaming with frequent client inputs
- Collaborative editing with conflict resolution
- Applications requiring binary data streaming
- Scenarios where you need sub-100ms latency
The beauty of SSE is its simplicity. It’s just HTTP, which means it works with existing infrastructure, is easy to debug, and has built-in browser support. For many real-time features, this simplicity is exactly what you need.
As I’ve learned through this course, the best backend engineers don’t always reach for the most sophisticated solution. They understand the trade-offs and choose the simplest tool that solves the problem. SSE is a perfect example of this principle—a straightforward protocol that elegantly handles a common use case.
Part VI: Database Performance & Backend Considerations
16. Database Performance in Backend Systems
Throughout this course, we’ve focused heavily on networking protocols and communication patterns. But there’s another critical component of backend systems that deserves attention: databases. No matter how well you optimize your network layer, if your database queries are slow, your entire system suffers. Let me share some insights about database performance that came up during the course.
16.1. The SELECT COUNT Problem
One of the most deceptively simple queries in SQL is SELECT COUNT(*). It looks innocent enough—just count the rows in a table. But this query has caused more performance problems than almost any other in my experience.
Why COUNT is Slow:
In PostgreSQL (and many other databases), SELECT COUNT(*) has to check every single row in the table. You might think, “Can’t it just look at the table metadata?” Unfortunately, no. Because of MVCC (Multi-Version Concurrency Control), different transactions might see different numbers of rows. A row that’s visible to one transaction might not be visible to another due to isolation levels and transaction timing.
This means PostgreSQL has to scan either:
- The entire table (sequential scan)
- An entire index (index scan)
For a table with millions of rows, this can take seconds or even minutes. I’ve seen production systems grind to a halt because someone added a COUNT(*) query to a dashboard that refreshed every few seconds.
The Index Approach:
If you have an index, PostgreSQL might use an index-only scan, which is faster than a full table scan because indexes are smaller. But it still has to scan the entire index:
-- This might use an index scan if you have an index on id
SELECT COUNT(*) FROM users;

-- This will definitely use an index scan if you have an index on status
SELECT COUNT(*) FROM users WHERE status = 'active';
The key insight is that even with an index, you’re still scanning every entry. The index is just smaller than the table, so it’s faster—but not fast.
Better Alternatives:
For large tables, consider these approaches:
- Use Estimates: PostgreSQL maintains statistics about table sizes. For approximate counts, query the system catalogs:
SELECT reltuples::bigint AS estimate
FROM pg_class
WHERE relname = 'users';
This is instant but approximate. For many use cases (like showing “About 1.2 million users” on a dashboard), this is perfectly acceptable.
- Maintain Counters: Keep a separate counter table that you increment/decrement with triggers or application logic:
CREATE TABLE user_counts (
  status VARCHAR(20) PRIMARY KEY,
  count BIGINT NOT NULL DEFAULT 0
);

-- Update this whenever users change status
UPDATE user_counts SET count = count + 1 WHERE status = 'active';
This trades write performance for read performance—writes become slightly slower, but counts are instant.
- Cache the Result: If the count doesn’t need to be real-time accurate, cache it and refresh periodically:
let cachedUserCount = null;
let lastUpdate = null;

async function getUserCount() {
  const now = Date.now();

  // Refresh cache every 5 minutes
  if (!cachedUserCount || now - lastUpdate > 300000) {
    cachedUserCount = await db.query('SELECT COUNT(*) FROM users');
    lastUpdate = now;
  }

  return cachedUserCount;
}
The Lesson:
SELECT COUNT(*) is a perfect example of how a simple-looking operation can have hidden complexity. As backend engineers, we need to understand not just how to write queries, but how they execute and what their performance characteristics are. A query that works fine with 1,000 rows might bring your system down with 10 million rows.
16.2. Database Connections and Backend Architecture
Another critical aspect of database performance is connection management. Every database connection consumes resources—memory, file descriptors, and CPU cycles. Managing these connections efficiently is crucial for building scalable backend systems.
The Connection Problem:
Opening a database connection is expensive. It involves:
- TCP handshake (three round trips)
- Authentication
- Session initialization
- Memory allocation
For a single request, this overhead might be acceptable. But when you’re handling thousands of requests per second, opening a new connection for each request becomes a bottleneck.
The solution is connection pooling—maintaining a pool of open connections that can be reused across requests. Instead of opening a new connection for each request, you borrow one from the pool, use it, and return it.
const { Pool } = require('pg');

const pool = new Pool({
  host: 'localhost',
  database: 'myapp',
  max: 20,  // Maximum number of connections
  idleTimeoutMillis: 30000,  // Close idle connections after 30s
  connectionTimeoutMillis: 2000,  // Fail fast if no connection available
});

// Use a connection from the pool
async function getUser(id) {
  const client = await pool.connect();
  try {
    const result = await client.query('SELECT * FROM users WHERE id = $1', [id]);
    return result.rows[0];
  } finally {
    client.release();  // Return connection to pool
  }
}
Sizing Your Pool:
How many connections should you have in your pool? This depends on several factors:
-
Database Limits: PostgreSQL has a
max_connectionssetting (default 100). You can’t exceed this across all your application instances. -
Application Concurrency: If you’re using Node.js with async I/O, you might only need 10-20 connections even for high traffic. If you’re using threads that block on database calls, you might need more.
-
Query Duration: Long-running queries tie up connections longer, requiring a larger pool.
A common mistake is making the pool too large. More connections don’t always mean better performance—they can actually hurt performance by overwhelming the database with too many concurrent queries.
The Backend-Database Relationship:
The relationship between your backend and database is one of the most critical in your architecture. Some key principles:
-
Keep Connections Short: Don’t hold database connections while doing other work (like calling external APIs). Get the data you need and release the connection immediately.
-
Use Transactions Wisely: Transactions lock resources. Keep them as short as possible and only use them when you need ACID guarantees.
-
Monitor Connection Usage: Track how many connections are in use, how long queries take, and whether you’re hitting connection limits. These metrics are crucial for diagnosing performance issues.
-
Consider Read Replicas: For read-heavy workloads, use read replicas to distribute the load. Your connection pool can route read queries to replicas and write queries to the primary.
16.3. Query Performance and Backend Implications
The performance of your database queries directly impacts your backend’s ability to handle load. A slow query doesn’t just affect one request—it ties up a database connection, a backend thread or event loop tick, and potentially blocks other requests.
Understanding Query Plans:
Every database query goes through a query planner that decides how to execute it. Understanding query plans is essential for optimizing performance:
EXPLAIN ANALYZE SELECT * FROM users WHERE email = 'user@example.com';
This shows you:
- Whether an index was used
- How many rows were scanned
- How long each step took
- The total execution time
I’ve spent countless hours staring at query plans, trying to understand why a query is slow. The most common issues are:
- Missing Indexes: The query does a sequential scan instead of an index scan
- Wrong Index: The planner chose an index, but not the optimal one
- Index Not Used: You have an index, but the query can’t use it (often due to type mismatches or functions in the WHERE clause)
- Too Many Joins: Complex queries with many joins can be slow even with proper indexes
N+1 Query Problem:
One of the most common performance anti-patterns in backend development is the N+1 query problem. It happens when you fetch a list of items and then make a separate query for each item:
// BAD: N+1 queries
const users = await db.query('SELECT * FROM users LIMIT 10');

for (const user of users) {
  // This makes a separate query for EACH user
  const posts = await db.query('SELECT * FROM posts WHERE user_id = $1', [user.id]);
  user.posts = posts;
}
This makes 11 queries (1 for users + 10 for posts). With 100 users, it’s 101 queries. The solution is to fetch everything in one or two queries:
// GOOD: 2 queries total
const users = await db.query('SELECT * FROM users LIMIT 10');
const userIds = users.map(u => u.id);

const posts = await db.query('SELECT * FROM posts WHERE user_id = ANY($1)', [userIds]);

// Group posts by user_id in application code
const postsByUser = posts.reduce((acc, post) => {
  if (!acc[post.user_id]) acc[post.user_id] = [];
  acc[post.user_id].push(post);
  return acc;
}, {});

users.forEach(user => {
  user.posts = postsByUser[user.id] || [];
});
This is dramatically faster—2 queries instead of 101, and the database can optimize the second query much better than 100 individual queries.
Caching Strategies:
Not every query needs to hit the database. Caching can dramatically improve performance:
const cache = new Map();

async function getUser(id) {
  // Check cache first
  if (cache.has(id)) {
    return cache.get(id);
  }

  // Cache miss - query database
  const user = await db.query('SELECT * FROM users WHERE id = $1', [id]);

  // Store in cache with TTL
  cache.set(id, user);
  setTimeout(() => cache.delete(id), 60000);  // Expire after 1 minute

  return user;
}
For production systems, you’d use Redis or Memcached instead of an in-memory Map, but the principle is the same: avoid hitting the database for data that doesn’t change frequently.
16.4. Database Performance and System Design
Database performance isn’t just about writing fast queries—it’s about designing your system to minimize database load in the first place.
Denormalization for Performance:
While normalization is great for data integrity, sometimes you need to denormalize for performance. For example, if you frequently need to display a user’s post count, you might store it directly on the user record:
-- Instead of counting every time
SELECT COUNT(*) FROM posts WHERE user_id = 123;

-- Store the count on the user
ALTER TABLE users ADD COLUMN post_count INTEGER DEFAULT 0;

-- Update it with triggers or application logic
UPDATE users SET post_count = post_count + 1 WHERE id = 123;
This trades write complexity for read performance—a common trade-off in backend systems.
Eventual Consistency:
Not every operation needs to be immediately consistent. For example, updating a user’s “last seen” timestamp doesn’t need to be real-time accurate. You can batch these updates:
const lastSeenUpdates = new Map();

function recordUserActivity(userId) {
  lastSeenUpdates.set(userId, Date.now());
}

// Flush updates every 30 seconds
setInterval(async () => {
  if (lastSeenUpdates.size === 0) return;

  const updates = Array.from(lastSeenUpdates.entries());
  lastSeenUpdates.clear();

  await db.query(`
    UPDATE users
    SET last_seen = data.timestamp
    FROM (VALUES ${updates.map((_, i) => `($${i*2+1}, $${i*2+2})`).join(',')})
    AS data(id, timestamp)
    WHERE users.id = data.id
  `, updates.flat());
}, 30000);
This reduces database writes by 30x while providing “good enough” accuracy for most use cases.
The Database as a Bottleneck:
In many backend systems, the database is the ultimate bottleneck. You can scale your application servers horizontally (add more servers), but scaling databases is much harder. This is why:
- connection pooling is critical—you can’t just throw more connections at the problem
- Query optimization matters more than application code optimization
- Caching is essential for reducing database load
- Read replicas help distribute read traffic
- Sharding (splitting data across multiple databases) is sometimes necessary for write-heavy workloads
Understanding database performance isn’t optional for backend engineers—it’s fundamental. The fastest network protocol in the world won’t help if your database queries take seconds to execute.
Conclusion
What a journey this has been.
When I started taking notes on Hussein Nasser’s Backend Engineering course, I didn’t realize how deep the rabbit hole went. I thought I’d learn about HTTP and databases, maybe pick up some networking basics. Instead, I discovered an entire world of interconnected systems, trade-offs, and engineering decisions that shape every interaction we have with the internet.
The Big Picture:
Looking back at everything we’ve covered—from the low-level details of TCP three-way handshakes to the high-level patterns of authentication and idempotency—a few key themes emerge:
1. Everything is a Trade-off
There’s no perfect protocol, no ideal architecture, no silver bullet. TCP gives you reliability but adds latency. UDP is fast but unreliable. HTTP/1.1 is simple but slow for modern web apps. HTTP/2 multiplexes beautifully but still suffers from TCP head-of-line blocking. HTTP/3 solves that with QUIC but introduces new complexity.
The best backend engineers don’t memorize “best practices”—they understand the trade-offs and choose the right tool for the job. Sometimes that means using 25-year-old HTTP/1.1 because it’s simple and sufficient. Sometimes it means adopting cutting-edge WebRTC for peer-to-peer video. The key is knowing why you’re making each choice.
2. Layers Upon Layers
One of the most beautiful aspects of backend engineering is how everything builds on everything else. HTTP runs on TCP, which runs on IP, which runs on Ethernet or WiFi. HTTPS adds TLS between HTTP and TCP. HTTP/3 replaces TCP with QUIC, which runs on UDP.
This layering isn’t just academic—it’s practical. When you’re debugging a slow API, you need to think about every layer: Is it the application code? The database query? The network latency? The TCP congestion control? The load balancer configuration? Understanding the full stack helps you diagnose problems faster and design better systems.
3. Performance is About Bottlenecks
Throughout this guide, we’ve seen that performance optimization is really about identifying and eliminating bottlenecks. It doesn’t matter how fast your application code is if your database queries take seconds. It doesn’t matter how optimized your TCP settings are if you’re making 100 sequential HTTP requests instead of using HTTP/2 multiplexing.
The connection pooling discussion taught us that you can’t just throw more connections at a problem—you’ll run out of ports or overwhelm your database. The Nagle’s algorithm section showed how a 40-year-old optimization can actually hurt modern applications. The N+1 query problem demonstrated how innocent-looking code can destroy database performance.
Backend engineering is detective work: find the bottleneck, understand why it exists, and fix it intelligently.
4. Security Can’t Be an Afterthought
From TLS handshakes to JWT token validation, security permeates every aspect of backend systems. You can’t just “add security later”—it needs to be baked into your architecture from the start.
The HTTPS discussion showed how encryption protects data in transit. The authentication section explored the trade-offs between stateless tokens and stateful sessions. The idempotency patterns revealed how to build reliable systems that handle failures gracefully.
Security isn’t just about preventing attacks—it’s about building systems that fail safely, validate inputs rigorously, and maintain trust even when things go wrong.
5. The Network is Unreliable
This might be the most important lesson of all: the network will fail. Packets get lost. Connections drop. Servers crash. Databases become unavailable. Your code needs to handle these failures gracefully.
That’s why we have TCP retransmissions, HTTP status codes, connection pooling with health checks, load balancers with failover, and idempotency patterns for safe retries. Every layer of the stack includes mechanisms to detect and recover from failures.
The best backend systems aren’t the ones that never fail—they’re the ones that fail gracefully and recover quickly.
What I’ve Learned:
Beyond the technical details, this course taught me how to think like a backend engineer:
-
Question everything: Why does this protocol work this way? What problem was it designed to solve? What are its limitations?
-
Understand the fundamentals: Frameworks and tools come and go, but TCP, HTTP, and database principles remain constant. Master the fundamentals, and you can learn any new technology quickly.
-
Think in systems: A backend isn’t just code—it’s a complex system of processes, threads, sockets, connections, proxies, load balancers, databases, and more. You need to understand how all these pieces interact.
-
Measure, don’t guess: Performance optimization without measurement is just guessing. Use profilers, monitoring tools, and load tests to identify real bottlenecks before optimizing.
-
Embrace complexity: Backend engineering is inherently complex. Don’t fight it—embrace it. Learn to manage complexity through abstraction, modularity, and clear interfaces.
Where to Go From Here:
This guide covers the fundamentals, but backend engineering is a vast field. Here are some directions to explore further:
-
Distributed Systems: We touched on load balancing and connection management, but there’s much more to learn about consensus algorithms, distributed transactions, and CAP theorem.
-
Database Internals: We covered database performance, but diving deeper into B-trees, LSM trees, MVCC, and query optimization will make you a better backend engineer.
-
Cloud Architecture: Modern backends run in the cloud. Learn about containers, orchestration (Kubernetes), serverless computing, and cloud-native patterns.
-
Observability: As systems grow, monitoring and debugging become critical. Explore distributed tracing, metrics, logging, and observability platforms.
-
Security Deep Dives: We covered the basics of TLS and authentication, but there’s always more to learn about cryptography, threat modeling, and security best practices.
Final Thoughts:
Backend engineering is both an art and a science. It requires deep technical knowledge, but also creativity, intuition, and judgment. You need to understand the theory (how TCP congestion control works) and the practice (how to configure NGINX for optimal performance).
The field is constantly evolving. HTTP/3 is still being adopted. New databases emerge every year. Cloud platforms introduce new services monthly. But the fundamentals—the principles we’ve covered in this guide—remain constant. Master these, and you’ll be able to adapt to whatever comes next.
I hope this guide serves as both a learning resource and a reference. Whether you’re just starting your backend engineering journey or you’re a seasoned developer looking to fill in gaps, I hope you found something valuable here.
The internet is an incredible achievement—billions of devices communicating seamlessly across the globe, all built on the protocols and patterns we’ve explored. Every time you load a webpage, send a message, or stream a video, you’re participating in this vast, interconnected system.
Now you understand how it all works.
Keep building, keep learning, and keep questioning. The backend is where the magic happens, and you’re now equipped to create some magic of your own.
Thank you for reading.
This guide consolidates notes from Hussein Nasser’s “Fundamentals of Backend Engineering” course. All credit for the original content goes to Hussein—I just organized it into a single, comprehensive resource. If you found this helpful, I highly recommend checking out his YouTube channel and courses for even more backend engineering wisdom.